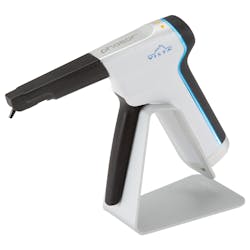
Phasor composite warming system by Vista Dental Products
The idea of heating composite is nothing new. Using a hot water bath and 3M Z100 restorative was part of our junior operative course at the University of Texas Health Science Center at San Antonio School of Dentistry in the early 2000s. Heating composite offers multiple advantages. The most widely discussed advantage is lowering the composite’s viscosity. When traditional paste composite is heated above 150 degrees, it behaves more like a flowable composite and adapts to the preparation better without losing its strength. Lesser known but equally important advantages are an increased depth of cure and reduced polymerization stress.1 Those are both great for our restorations.
The problem with heating composite has been the process. I was taught to heat composite with a hot water bath. This is by far the wonkiest method. It is cumbersome and messy, and frankly, most of us don’t have hot water baths anymore. There are several bench-top composite warmers on the market that are much easier to use than a hot water bath. These work well, but they require forethought because they take time to heat up and then time to warm up the composite. Phasor can heat composite in 45 seconds. Phasor is a composite dispenser as well, so it doesn’t take up any additional counter space. This makes it a great choice for composite heating.
Phasor is cordless and has a rechargeable battery, so you don’t need to worry about cords all over your patient. It comes with a little laminated card that provides the appropriate heating settings for basically every composite on the market. Simply find your brand and put your Phasor on the most optimal of the four different settings.
Using “near-infrared” LEDs, Phasor heats composite quickly and keeps it heated throughout the procedure. This sets Phasor apart from other heating products on the market. Safety is also a differentiating factor, as Phasor heats up the composite without any touchable surfaces becoming hot. No burn risks here!
Heated composite really is something you need to try. Most people who try it come to prefer it for their posterior restorations. The barrier is almost always the extra effort involved with getting the composite heated, but Phasor breaks down that barrier and makes it much simpler. Get ready to be stunned by how much you enjoy working with heated composite. You could even say, “Set your Phasor to stun!” Stand-up double to center field for Vista!
Reference
1. Calheiros FC, Daronch M, Rueggeberg FA, Braga RR. Effect of temperature on composite polymerization stress and degree of conversion. Dent Mater. 2014;30(6):613-618.
Take 1 Retraction Paste by Kerr
Even though my entire right side was numb, I still felt him packing that cord. It wasn’t really painful, but it was uncomfortable. That’s when I realized that not only did I hate packing cord as a clinician, but my patients hated having cord packed. For many of our indirect restorations, we can use retraction paste to eliminate or reduce this part of the procedure that neither patients nor clinicians enjoy.
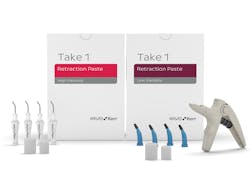
Retraction paste has been around for longer than a decade. The market for these materials has grown ever since Kerr introduced Expasyl. Instead of making another “me too” material, Kerr has innovated the retraction paste. While every other product in this category has been a single product, Take 1 Retraction Paste is not just one product. I know it seems odd, seeing as how the number one is in the name of the product, but Take 1 is actually two products: a high-viscosity paste and a low-viscosity paste. This makes Take 1 a retraction paste system.
With the active ingredients aluminum chloride and kaolin clay, Take 1 Retraction Paste provides excellent hemostasis and gentle retraction. It also cleans up easily and rinses away well. Using this retraction paste couldn’t be easier. Simply squirt it around the sulcus, place one of the included compression caps on top of it, and have the patient bite into it and hold for several minutes.
The low-viscosity paste will be the option of choice when you are using retraction paste to replace a second cord. I use this option when I am working subgingivally. I still need the cord to push the tissue apically, but I depend on the paste for that lateral sulcular expansion we need to give our lab techs a good view around and below the margin.
High viscosity is my go-to choice for equigingival margins. I use the high-viscosity paste as a cord replacement. This material also works well for very slightly subgingival margins around healthy tissues. High viscosity is thicker, and it provides enough gingival retraction for these situations.
Having the Take 1 Retraction Paste system around my office gives me options for the various situations that arise in restorative dentistry. These options are unique to Take 1. Triple to the fence for Take 1 Retraction Paste!
Activa Bioactive Cement by Pulpdent
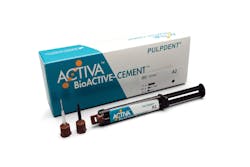
Activa Bioactive Cement lives up to the Activa name. Its bioactive properties are identical to its direct restorative material brother. Activa promotes ion release, like other materials. However, the ions aren’t only fluoride. Calcium and phosphate are key components. This ion release stimulates apatite formation and reduces microleakage over time. Microleakage is what leads to the failure of our restorative dentistry. Imagine being able to seal off indirect margins from microleakage.
Activa Bioactive Cement is a self-adhesive resin cement that is indicated for use with all types of indirect restorations. It bonds well to zirconia, glass ceramic, resin, and metal restorations. Since it is a self-adhesive material, no primer is needed on the tooth prior to delivery. Again, this is how Activa promotes simplicity and ease of use.
There are two things to remember here: the effect of saliva on the intaglio surface of restorations and the need for priming the ceramic surface. Saliva contaminates the intaglio surface when we try in restorations, so be sure to deal with that. Zirconia can be decontaminated easily and quickly with air abrasion using aluminum oxide media. Glass ceramics should be treated with Ivoclean, not air abraded. After decontamination, ceramic primer, specific to the crown material being inserted, should be applied to the inside of the crown. After these steps are taken, simply load the restoration with Activa Bioactive Cement and insert. It’s a dual-cure cement, so feel free to cure it however you see fit. I tend to tack cure when I use resin cements. Activa has been easy for me to clean up, and I have not yet had to fight any troublesome pieces I could not retrieve interproximally.
During my time using Active Bioactive Cement, I have had no complaints of postoperative sensitivity or lost crowns. With good clinical success, ease of use, and esthetic options (A2 and translucent shades), Activa Bioactive Cement has been a great choice for bonding indirect restorations in my practice. Base hit up the middle for Activa Bioactive Cement!About the Author
Joshua Austin, DDS, MAGD
Joshua Austin, DDS, MAGD, is a graduate and former faculty member of the University of Texas Health Science Center at San Antonio School of Dentistry. Author of Dental Economics’ Pearls for Your Practice column, Dr. Austin lectures nationally on products, dental technology, online reputation management, and social media. He maintains a full-time restorative dentistry private practice in San Antonio, Texas. You may contact Dr. Austin at [email protected].
Updated June 21, 2023


