Best procedures for placing and finishing dental composites
Key Highlights
- Prioritize conservative preps and a dry, well-anesthetized field with immediate desensitizing/disinfecting (e.g., glutaraldehyde/HEMA) and proper bonding technique.
- Place predictable 2 mm increments (or carefully verified bulk-fill) and verify curing depth—adequate light direction, power, and additional curing after matrix removal are essential.
- Finish and polish with low-speed electric handpiece technique, staged burs/finishing instruments and skilled assistant support to avoid marginal defects and maximize longevity.
Each month, Dr. Gordon Christensen answers a question from readers about everyday dentistry.
Q: Over several years of practicing dentistry, I have placed and finished many composites. After a few years in the mouth, I see many of my composites with significantly different quality relative to margins, contact areas, occlusion, color, and patient satisfaction. Are there best procedures for placing and finishing resin-based composites, and if so, what are they?
A: Having placed many composites myself over several decades, I agree with you. Composite resin as used in dentistry is an adequate intermediate-longevity restoration, but it lacks optimum long-term service in the mouth. There are many different techniques for placing and finishing composite, and I feel confident that you have tried many yourself.
My comments relative to your question are based on my empirical clinical evidence as well as scientific studies accomplished in Clinicians Report Foundation (CR), the dental literature, and other sources.
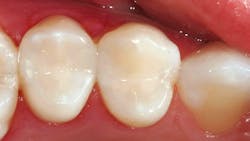
Please refer to a previously answered question in my article, “What are the best procedures for composite tooth preparations?” in the November/December 2025 issue of Dental Economics (dentaleconomics.com/composite-tooth-preps). The prep should be as conservative as possible (figure 1). An optimum dry field should be present, and the patient should have adequate anesthesia.
Immediately after tooth preparation, the first step for a tooth with or without an indirect or direct pulp exposure is two, one-minute applications of a desensitizing and disinfecting solution. After years of in vitro and in vivo research, CR has concluded that the most appropriate such solution is 5% glutaraldehyde and 35% HEMA (popular brands are Gluma from Kulzer, MicroPrime G from Zest Dental Solutions, and several others). See the previous DE article for the exact procedure.
If needed, place an indirect or direct pulp cap as described in the previous article.
Using a standard phosphoric acid liquid or gel, acid-etch the prep in one of the following three ways:
- Total-etch the entire prep for 15 seconds in a nonfluoride geographic area, or 20 seconds in a geographic area with community water fluoridation.
- Selective-etch the enamel only. This is my personal preference.
- Use a self-etch solution.
- Gently place a layer of your favorite bonding agent and cure it.
Now, we are to the topic of this article—placing and finishing composite—and there are many ways to do this. My most-used method follows.
No. 1: Viscosity of the resin
Restorative resin viscosity ranges from flowable to various levels of putty. I prefer to place a second layer of bonding agent, thin it gently with air, and not cure it. This second layer wets the polymerized first layer of bonding agent and allows the putty composite to adapt to the preparation walls.
No. 2: Depth and cure of increment placement
Placing 2 mm increments has been the most-used recommendation. In recent years, the concept of bulk-fill has been developed, and some manufacturers have promoted placing thicker layers than in the past. If done carefully and cured with a powerful curing light aimed exactly perpendicular to the surface of the resin, some of the thicker layers may be cured adequately.
However, after observing many experienced dentists placing composite in our hands-on restorative courses, it is clear to me that placing increments of 2 mm is still the most predictable technique.
Resin loses its putty characteristic in only a few seconds at body temperature. The rapid placement of putty resin allows (for a short time at least) minimal force on the matrix to assist in making a tight contact area.
If the matrix is not tightly adapted to the adjacent tooth, a small instrument can be used to place force on the matrix toward the adjacent tooth during curing. This is done on the coronal portion of the matrix above the resin.
Curing lights vary significantly in their ability to cure resin and their speed of cure. The only adequate way to determine how your lights cure is to test them.
Here’s a simple way: On a piece of white paper or a mixing pad, make a 10 mm high pyramid of your favorite resin brand and color. This usually requires at least two compules. Aim your light perpendicular to the top of the pyramid and as close to the resin as possible. Cure using the time you usually cure. After curing, start on the bottom of the pyramid and carve the resin away with a sharp instrument. When the resin begins to be hard to carve, it is partially converted (cured). When you can’t carve any more off, it is around 60% converted, which is as high as dental resins cure. Seldom does such a test cure deeper than 3 mm in this near-ideal situation and seldom does curing in the mouth equal the depth of this test.
A typical class II box form usually requires two or three 2 mm increments.
When the matrix is taken off, it is well to accomplish another cure on both the facial and lingual aspects of the box form.
When considering my many teaching experiences with dentists and dental students, I feel confident concluding that we need far more emphasis on curing resin to optimize the adequacy of composite resins.
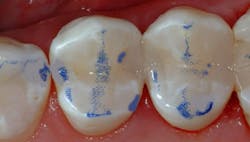
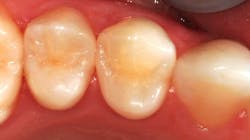
No. 3: Finishing and polishing the restoration (figures 2 and 3)
Electric handpieces are preferred by many (including me) for their precision, torque, and ability to cut effectively at low speed. Examples are Bien-Air, KaVo, NSK, Star, W&H, and others.
Some dentists prefer using carbide burs, and others prefer diamond burs. Both have their advantages and limitations. I prefer 12-bladed carbide burs (normal cavity preps are usually made with six-bladed burs).
All dentists occasionally see a white line on the margin of a finished composite. It is mutilated enamel and tooth structure, an unfortunate but great location for new caries to begin. To avoid making a white line, I suggest using an electric handpiece rotating slowly (1,000–2,000 RPM), no water, gentle cutting, and loupes on with careful aim at the cutting location.
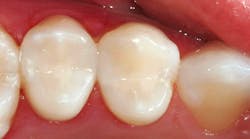
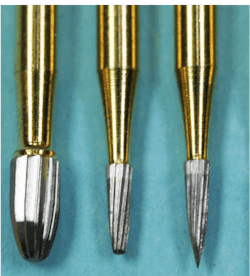
I suggest three bur sizes, used in the following order (figure 4): A 7406-carbide bur is a football-shaped bur used for the initial occlusal contour. A 7801-carbide bur is a narrow-tapered, round-ended bur for producing grooves and sluiceways in the occlusal surface, and a 7901-bur is a tapered pointed bur used for rounding the occlusal portion of the proximal box and any minor flash resin present on the proximal surfaces. Diamonds of the same shapes accomplish the same excellent result.
Rubberlike rotating instruments smooth the irregularities made by the burs. Examples are 3M Sof-Lex Spiral finishing and polishing wheels and silicone-based cups and wheels such as Centrix, Cosmedent, Kenda, Dentsply Sirona, Ivoclar, Shofu, etc.
Finishing strips: Used for slight overhangs. Examples include Cosmedent, GC, Komet, Premier, etc.
Polish: Used in the anterior of the mouth; some use it in the posterior. Examples are Cosmedent, VH Technologies, Ultradent, etc.
Summary
Placing, finishing, and polishing dental composites requires skill, the right instruments and techniques, a knowledgeable assistant, and patience! Plan significant time to do it properly. Dental assistant competence is mandatory to make this procedure time-effective, acceptable, profitable, and long-lasting (figure 5).

Editor's note: This article appeared in the January 2026 print edition of Dental Economics magazine. Dentists in North America are eligible for a complimentary print subscription. Sign up here.
About the Author

Gordon J. Christensen, DDS, PhD, MSD
Gordon J. Christensen, DDS, PhD, MSD, is founder and CEO of Practical Clinical Courses and cofounder of Clinicians Report. His wife, Rella Christensen, PhD, is the cofounder. PCC is an international dental continuing education organization founded in 1981. Dr. Christensen is a practicing prosthodontist in Provo, Utah.