Another look at 'dental economics'
Marshall Hanson, DDS
Any concept can be better understood when some attention is given to its origins. An appeal to an early 1800s Noah Webster dictionary provides some insight into what the idea of “economics” held for those in early American history. Herein, the word “economics” refers to “laws or systems for judicial and frugal management of a certain thing.”1 The terms “judicial” and “frugal” imply both wisdom and prudence in the “sparing use of something.”1
This idea has come to be associated with the way we manage our businesses and our money. However, if we apply this to all that is “dental,” we can reasonably conclude that a more literal concept of “Dental Economics” pertains to the laws and systems we employ in the designing and carrying out of clinical procedures that are responsible, conservative in nature, and “tooth sparing” by design. In other words, today’s “economy of the dentition” is found where clinicians use available technologies, concepts, and materials that enable them to provide services that are minimally invasive and at the same time maximize the health, function, and beauty of the end result. The American Academy of Cosmetic Dentistry refers to this as “responsible aesthetics.”2 Arguably, some clinicians today might consider this a relevant modern view on “Dental Economics,” as minimally invasive protocols continue to grow in desirability.
The purpose of presenting the following simple case is to illustrate the benefits of blending modern technologies, materials, and concepts with “tooth-sparing” protocols in our everyday dentistry to predictably and efficiently produce healthy, functional, and beautiful results.
Case history
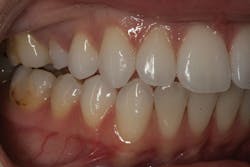
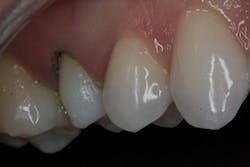
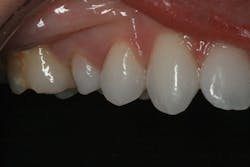
An 18-year-old female presented with a chief concern surrounding the appearance of an apparently “small tooth” visible in her smile on the upper-right side (figure 1). Upon evaluation, an underdeveloped upper-right second bicuspid was quickly identifiable. The patient had previously been treated orthodontically, and the tooth in question was found to be in an appropriate position within the arch form. Periodontally and functionally, the tooth was considered healthy. Further observation revealed that the buccal gingival margin was more coronal when compared to the adjacent teeth, likely as a result of the developmental discrepancy, distracting from the visual harmony of the patient’s smile. A 2 mm buccal sulcus depth was recorded.
Findings were discussed with the patient. It was mutually agreed upon to perform a crown-lengthening minimally invasive procedure in conjunction with an “additive” porcelain veneer in order to restore the visual harmony of the patient’s smile on this side. With the use of CAD/CAM, lithium disilicate, and enamel-bonding protocols, the goals of the treatment could be accomplished in an efficient and minimally invasive to noninvasive way. This was good news for everyone!
Workflow
1. The patient’s upper-right bicuspid was anesthetized via local infiltration.
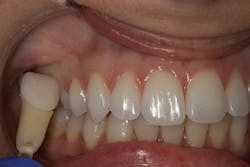
2. A visual shade selection of BL2 HT was made for the final restoration using lithium disilicate shade tabs (e.max, Ivoclar Vivadent) as a reference (figure 2).
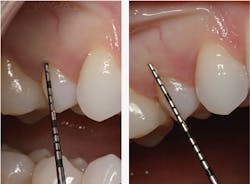
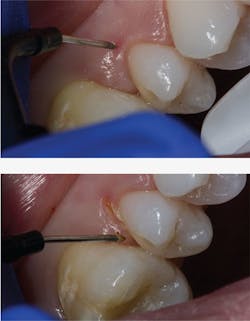
3. The buccal gingival sulcus was remeasured at 2 mm. A periodontal probe was used to mark a zenith point 1.5 mm apical from the current gingival margin, indicating the extent of the desired gingivectomy. Because the extent of the gingivectomy would be limited to only sulcular tissue (the measured tissue to be removed being less than the measured sulcular depth), the biologic width would not be detrimentally affected (figures 3-5).
4. Using a Radiosurge (Macan Manufacturing), the fine straight cutting tip was placed at the probe-marked zenith, and a gingivectomy was performed in two sweeping motions: from zenith to the distal line angle of the tooth, and then again from zenith to the mesial line angle of the tooth (figures 6-9).
5. The enamel was slightly and only superficially abraded with a diamond bur to round and smooth any sharp corners that would become the future interface between the tooth and the new porcelain restoration. The tooth surface was cleaned prior to impression using a MicroEtcher (Danville Materials) and 50-micron aluminum oxide particles.
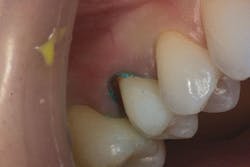
6. A cord (Ultradent Products) size one, presoaked in aluminum chloride, was then placed to retract the tissue and provide access for the polyvinyl impression material (figure 10). Although current chairside CAD/CAM technologies are such that an intraoral digital scan could have been performed with good accuracy, a polyvinyl impression technique was chosen to capture more of the subgingival detail of the tooth.
7. The cord was removed and a full-arch impression was made using both heavy- and light-body impression material (figure 11).
8. The impression was poured up in stone, and the sulcular tissue was then trimmed away from the stone model for better access with the 3-D scanning acquisition unit (CEREC Bluecam, Dentsply Sirona).
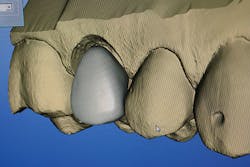
9. A full-arch digital scan was done. The digital designing of the veneer was assisted by virtually copying the well-proportioned contralateral second bicuspid and creating a “mirror image” of it for the proposal of the new restoration. This is often the best we can do to replicate what nature has already designed (figure 12).
10. The restoration was then milled out with Dentsply Sirona’s InLab MC XL milling unit, fit to the model, and polished with finishing discs and a DiaLite wheel (Brasseler).
11. The veneer was then stained, glazed, and fired in an in-office Programat ceramic furnace (Ivoclar Vivadent) according to recommended guidelines for e.max.
12. The restoration was then tried in the mouth to assess fit and color.
13. Satisfied with the color and fit, we cleaned the veneer and prepared it for bonding (figure 13).
14. An Isolite was placed for intraoral moisture management, and a new retraction cord, size one, was placed to protect the sulcular tissue. The area of the tooth to receive the bonded restoration was reabraded with 50-micron aluminum oxide, etched with blue phosphoric acid for 30 seconds, rinsed, and dried. Two metal Tofflemire bands were placed interproximally to prevent undesired adhesive or cement from entering the contact area.
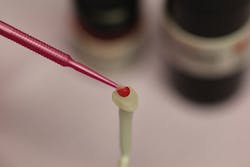
15. Pic-n-Stic (Pulpdent) was used to hold the prepared veneer, and clear Multilink Automix resin cement (Ivoclar Vivadent) was used, along with its companion bonding system, to lute the restoration to the tooth.
16. The retraction cord was removed along with any excess cement. Once cured, the margins of the restoration were again cleaned using a Cavitron (Dentsply Sirona) to ensure no unseen residual cement was left. Occlusion was assessed to ensure there were no working or nonworking interferences with the restoration in function, which will improve longevity.
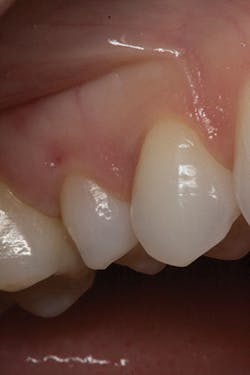
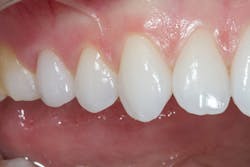
The patient was seen for follow-up at one week. Photos were taken again as a record at two years posttreatment. At two years, the tissue had remained healthy and the visual harmony of the restored tooth continued to be a pleasing enhancement from the pretreatment condition (figures 14-16).
Conclusion
Not only can these types of procedures prove rewarding for the clinician, but in their tooth-sparing designs they can have immense “dental economic” value for the patient.
This is an amazing time in dentistry! Available to us today are technologies, materials, and concepts that allow us as clinicians to be more conservative, efficient, and predictable in our approach, and at the same time achieve lasting, favorable results - all while being less invasive of tooth structure. This is a time when mastering the concept and practice of “Dental Economics” may be more within our grasp than ever.
References
1. 1828 Noah Webster Dictionary of the English Language. Published by Packard Technologies; 2011. Sourced through Librainia.com. http://www.librainia.com/apple/ebooks/1828.html. Accessed April 2017.
2. Responsible esthetics. American Academy of Cosmetic Dentistry website. http://yoursmilebecomesyou.com/cosmetic-dentistry/responsible-esthetics/. Accessed May 2, 2017.
Marshall Hanson, DDS, graduated with honors from the University of the Pacific Aurthur A. Dugoni School of Dentistry in 2007. He currently practices in Hamilton, New Zealand. He can be contacted at [email protected].

