Why are some restored teeth sensitive and others are not?
Ask Dr. Christensen
Q+A
In this monthly feature, Dr. Gordon Christensen addresses the most frequently asked questions from Dental Economics readers. If you would like to submit a question to Dr. Christensen, please send an e-mail to [email protected].
Q
I do not understand why some of my restorations are sensitive and others are not. I use current generation bonding agents routinely for my composite restorations. I use both in-office milled crowns and some indirect restorations made in the conventional manner, and I am careful not to abuse the teeth when prepping. But sensitivity is unpredictable and very frustrating to me. It is especially annoying to my patients. What am I doing wrong?
A
There are numerous reasons that could potentially explain the problem you are experiencing. I will discuss them below to provide some answers for your issues with sensitivity.
Questionable pulpal health
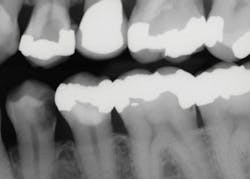
Often, it is difficult to estimate the vitality of teeth in older patients who have significantly receded pulps, or in patients of any age who have deep caries (figure 1). Teeth with minimal pulp tissue visible on the radiographs can be either nonvital and necrotic or in the process of becoming nonvital—you cannot determine that condition from radiographs. The trauma of tooth preparation and restoration placement can stimulate a painful condition for patients, even in relatively shallow tooth preparations.
When planning to prepare a tooth with deep caries, it is nearly impossible to determine from the radiograph how much dentin is present between the depth of a deep caries lesion and the pulp. Excavating the caries is the only reliable way to determine lesion depth.
The solution to reducing or eliminating sensitivity is elusive. There is not a predictable solution, and because of that, there is need for patient education and adequate informed consent. When treating patients with either minimal root canals visible on the radiographs or deep carious lesions, it is best to advise them of the potential for postoperative pain and the possible need for endodontic treatment.
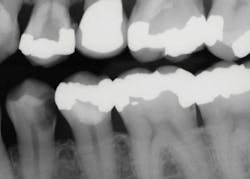
Figure 1: The mandibular first premolar tooth has caries that could be a pulp exposure. The maxillary first premolar has an apparent pulp exposure, but the caries could be facial or lingual to the pulp. Both teeth should be excavated carefully as described in this article to determine the status of the caries.
Deep carious lesions
Dentists encounter this situation nearly every day of clinical practice. A significant challenge when treating deep caries is interpreting the current generation of digital periapical or bitewing radiographs. It is well-known that digital radiographs show only a portion of actual caries depth or none at all, even in deep caries situations. In cases involving deep carious lesions, explain to patients that you must excavate the lesions to assess the actual depth of diseased tooth structure due to the limitations of what you can see on digital radiographs.
Pulp exposure
Use the following steps to prepare the tooth and reduce the possibility of exposing the pulp:
Plan the external cavosurface margins of the restoration, and cut the tooth preparation as though the tooth were a sound tooth. This is contrary to what is usually taught.
Remove any superficial caries or caries-undermining enamel as soon as the initial preparation outline is established. Leave the deeper areas of the caries intact until the last step in the tooth preparation procedure.
When removing the deep portion of caries, exercise extreme caution to avoid exposing the pulp. Water spray disguises the cutting with the bur. Significant sound from air blowing or the HVE makes the RPM of the bur difficult to determine. Turn off both the air and water when removing deep caries. The myth that cutting without water will overheat the tooth has been disproven—as long as the cutting is gentle and controlled.
Use careful, slow bur rotation augmented with a sharp spoon excavator to remove the soft dentin.
Now comes the most difficult and least predictable part of the deep tooth preparation procedure. Assuming the tooth is alive, the dentin will have a pink color as the pulp is approached. The dentist must make a clinical judgment about when to stop removing dentin. One may leave tooth structure that is hard when scraped with a spoon excavator but is still discolored, awaiting subsequent disinfection and desensitization.
Based on research and my personal experience, I strongly suggest that a live tooth is much better than one that has been treated endodontically.
Indirect pulp cap technique
The indirect pulp capping techniques (lining or basing) described below can be used for typical direct, resin-based composite restorations:
Desensitize and disinfect the entire tooth preparation.Numerous chemicals have been suggested to accomplish these goals, including chlorhexidine, benzalkonium chloride, sodium hypochlorite, glutaraldehyde, and others.
Research at Clinicians Report Foundation (CR) has shown that glutaraldehyde accomplishes both desensitization and disinfection of tooth structure predictably and effectively.1 Representative brands are G5 from Clinician’s Choice, Gluma from Kulzer, Glu/Sense from Centrix, and Micro Prime from Danville.
The solutions are applied by dipping a microbrush in the solution placed in a dappen dish, only dampening the microbrush, and carefully applying the solution to the tooth preparation surface. Allow the solution to stay on the tooth for one minute, and then repeat the procedure for one more minute. Do not wash it off. Suction off the solution with high-velocity suction. Do not let the solution get on the soft tissue, because it will irritate the tissue.
Place the liner or base of your choice. CR surveys show that the most popular type at this time for indirect pulp capping is resin-modified glass ionomer (Vitrebond Plus from 3M, Fuji LINING LC from GC America, and TheraCal LC from Bisco Dental). However, many others have been shown to be successful as well.
Bond with the technique of your choice. This may be total-etch, selective-etch, or self-etch. All have been shown to be acceptable despite controversy.
If using total- or selective-etch, glutaraldehyde must be placed again. The first application of glutaraldehyde was placed to desensitize and disinfect the dentin before the liner or base was placed, and it is now active under the liner or base. Then, the preparation was acid-etched and washed, thus washing off the first application of glutaraldehyde. The second glutaraldehyde application is only a brief rubbing of the moistened microtip on the prep for a few seconds. Suction off the excess glutaraldehyde.
If using self-etch, the second application of glutaraldehyde is not necessary,since the tooth prep was not washed off.
Complete the bonding procedure.
Place the restoration of your choice.
Indirect restoration technique (crowns, onlays)
Use the following technique to remove deep caries for indirect restorations, such as crowns and onlays (figures 2–4):
As with the direct tooth preparations above,prepare the tooth for the crown or onlay as though it has no caries or previously placed restorations.
Remove the superficial caries as described above, remove the previous restorations, and carry out the same procedure described above for an indirect pulp cap. Apply the glutaraldehyde as above in two one-minute applications. These tooth preparations for indirect restorations are primarily in dentin. Unless some enamel is present, there has not been an enamel etch and wash, so there is no need to make a second brief application of glutaraldehyde.
Place fillers (for small voids in the prep) or buildups (if more than one-half of the coronal tooth structure missing) in the tooth preparation voids.
Finish the tooth preparation.
Make a conventional impression or scan the preparation.
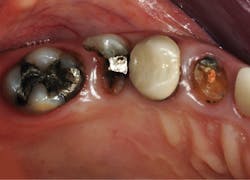
Figure 2: This patient requires significant treatment. The second premolar was extracted, and the other three teeth received caries excavation and treatment as described in this article.
Summary
Postoperative tooth sensitivity in teeth prepared for both direct and indirect restorations can be prevented using the procedures outlined in this article. However, tooth vitality remains an unknown in many clinical situations, and clinical judgment must be used to determine whether or not to accomplish endodontic treatment. Maintaining teeth in a vital state is a desirable goal if at all possible.
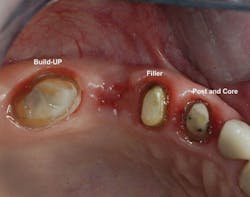
Figure 3: The second molar had about one-half of the coronal tooth structure removed and required a resin-based composite buildup. The first premolar had only a Class I defect and received a filler of bonded compomer (Dyract). The canine received a fiber-reinforced post, two pure titanium pins on the lingual (Filpins from Filhol Dental), and a resin-based composite coronal buildup.
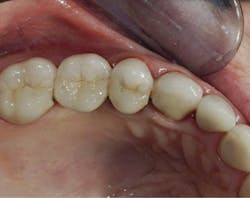
Figure 4: These final restorations have now served for 15 years.
Author’s note: Additional educational information from Dr. Gordon J. Christensen, Practical Clinical Courses:
Two-day course in Utah
• Restorative Dentistry 2—Fixed Prosthodontics: October 13–14, 2017
One-hour videos
• Class II Composite Resins Can Be Predictable, Non-Sensitive, and Profitable: Item No. V3554
• Mastering Frequent Esthetic Challenges with Resin: Item No. V3582
Reference
1. Christensen GJ. Disinfection of tooth preparations—Why and how? Clinicians Report. 2009;2(11).

Gordon J. Christensen, DDS, MSD, PhD, is a practicing prosthodontist in Provo, Utah. He is the founder and CEO of Practical Clinical Courses, an international continuing-education organization initiated in 1981 for dental professionals. Dr. Christensen is cofounder (with his wife, Dr. Rella Christensen) and CEO of Clinicians Report (formerly Clinical Research Associates).
About the Author

Gordon J. Christensen, DDS, PhD, MSD
Gordon J. Christensen, DDS, PhD, MSD, is founder and CEO of Practical Clinical Courses and cofounder of Clinicians Report. His wife, Rella Christensen, PhD, is the cofounder. PCC is an international dental continuing education organization founded in 1981. Dr. Christensen is a practicing prosthodontist in Provo, Utah.