Implant impressions: Tips and tricks for better results
Challenges with implant impressions
The absence of a periodontal ligament (PDL) around a dental implant presents a challenge when restoring adjacent implants that will be splinted together. The PDL will allow a slight discrepancy between natural teeth being restored when the bridge is inserted. Unfortunately, if not captured accurately, the lack of PDL around implants will result in a lack of passive fit of the prosthesis, which may lead to crestal bone loss on the compression aspect of the bone. Additionally, seating of the prosthesis—
whether screw- or cement-retained—on abutments may prevent full seating, requiring a remake. Therefore, accurate impressions of the implant are necessary to prevent these issues and ensure accuracy of the final prosthesis.
Implant impression types
Abutment-level impressions
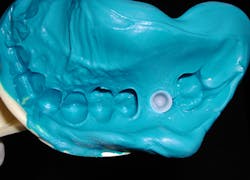
An abutment-level impression consists of placing a final stock restorative abutment that, once placed, is not removed from the implant. Abutment-level restorative components are designed with an antirotational feature (a flat plane) on the abutment (figure 1). A plastic impression coping is then snapped over the abutment, capturing the rotational orientation of the abutment in relation to adjacent teeth or other implants being restored (figure 2).When ordering abutment-level components, the practitioner determines the emergence diameter, gingival cuff height required based on the distance from the implant platform to the gingival margin of the sulcus, and the height of the abutment from the margin to the coronal height. The kit then contains the components that fit that particular abutment. The benefit of this type of system is that the implant surgeon can place the abutment at implant uncovery, so the restoring dentist does not need to manage healing abutment removal and restorative abutment placement. This can be beneficial to dentists who prefer not to be involved in this aspect of implant placement. Surgeons may consider this an added benefit for their referring dentists.
As the impression coping will be picked up in the impression, a stiffer impression material is recommended to ensure the coping is securely fixated in the impression upon removal. A heavy-body, tray, or putty vinyl polysiloxane (VPS) is recommended in the tray, and a light- or medium-body VPS can be injected intraorally around the gingival aspect before tray insertion. Use of a medium-body VPS in the tray will result in the coping being dislodged, which affects the accuracy of the impression. A stock tray is used for this technique.
You might also be interested in:
Improved efficiencies in implant dentistry: Use of patient-specific accelerated therapy
Accurate full-arch impressions using multiunit impression copings
Closed-tray impressions
As the impression will need to be removed intraorally and the impression abutment reinserted, the impression viscosity needs to allow some flexibility for removal without tearing the impression material. A medium-body VPS is ideally suited for this as it offers some spring to allow removal intraorally and reinsertion of the part into the impression without causing tearing. Use of a heavy-body VPS will lead to tearing of the impression material as it is removed intraorally, and it is too stiff to allow reinsertion into the impression, affecting accuracy of the resulting impression.
A potential hampering factor to reinsertion into the impression abutment with analog relates to impression material that captured the hex at the top of the impression pin (bottom of the closed-tray impression area). This will prevent full reinsertion of the closed-tray impression abutment into the impression. Placement of wax or other material into the pin’s hex prior to taking the impression will prevent this tag from being formed. A stock tray may be used for this technique.
Open-tray impressions
Open-tray impressions provide the most accurate capture of implants intraorally, especially when implants will be splinted prosthetically. As these impression abutments will remain in the impression upon removal intraorally, they have a longer pin that will emerge through the tray, allowing the pin to be removed by unlocking it from the implant prior to tray removal. These impression abutments have deeper retention grooves to better lock them in the set impression material (figure 5).As the goal is to capture the open-tray impression abutment in the impression material, locking it in an accurate orientation, a stiff material is desired in the tray. Higher viscosity VPS, such as heavy-body, tray, or putty materials, are ideally suited for this application. To avoid folds in the tray material that may affect capture of adjacent teeth, typically either a light-body or monophase material is placed at the gingival aspect to ensure gingival contour and adjacent tooth morphology are properly captured.
Tray selection is either a custom tray fabricated on the preliminary model by the office or lab, or a modified stock tray with holes cut in the tray to allow the long pin to emerge from the top of the tray upon insertion intraorally. The challenge to custom trays or modified stock trays is orienting the tray filled with impression material to allow the pins to pass through the holes in the tray.
Importance of radiographs
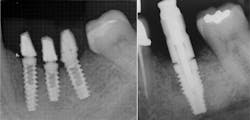
Component mating is critical with implant prosthetics. As the connection is subgingival, it is difficult to visualize how well the prosthetic will connect to the implant connector. Bone or soft tissue may hamper full seating, or the abutment may be rotated slightly so that it and the implant connector do not ideally align. Tightening the fixation screw may provide the perception that the parts are mated, when radiographically they are not. It is also important to radiographicallyConclusion
Accuracy of implant restorations begins with accurate impressions that capture the implant’s orientation to adjacent implants and natural teeth, as well as the implant connector’s rotational orientation. When accuracy is achieved, the prosthesis fits passively, and stress is removed from the fixation screw. The result is an improved long-term prognosis of the restorations and bone surrounding the implants.
Editor’s note: Further information on this topic is available with CE credit in the course, “Implant Impressions: Improving Accuracy and Decreasing Practitioner Stress,” at bit.ly/dace-kurtzman.
This article appeared in the November 2021 print edition of Dental Economics.
About the Author
Gregori M. Kurtzman, DDS, MAGD, FPFA, FACD, DICOI, DADIA, DIDIA
Gregori M. Kurtzman, DDS, MAGD, FPFA, FACD, DICOI, DADIA, DIDIA, is in private general dental practice in Silver Spring, Maryland. He is a prolific author and has lectured internationally on the topics of restorative dentistry; endodontics, implant surgery, and prosthetics; removable and fixed prosthetics; and periodontics. Dr. Kurtzman is a consultant and evaluator for multiple dental companies. He can be reached at [email protected].


