Painless injections and prep technique

After giving one of my crown-and-bridge lectures, 90 percent of the e-mails I receive are invariably about one of two topics. The first is regarding the high-potency topical anesthetic I use. The other is about my prep technique called the Reverse Preparation Technique. Since I receive so many questions about these topics, I wanted to explain each in depth.
In my second year of dental school, an instructor said that if I could give painless injections, I could be a successful dentist. Coupled with my own dislike of needles, I took this instructor’s challenge seriously. I was disappointed with most of the topical anesthetics I tried during and after dental school. I soon realized that if I wanted to give painless injections, I would have to find the most potent topical anesthetic available.
My search led me to a friend, a plastic surgeon who needed to anesthetize skin at donor sites without distending the tissue by injecting local anesthetic. My friend introduced me to the pharmacist who compounds his anesthetic so I could see if a dental version was available.
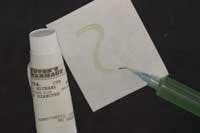
The anesthetic is called Profound (Fig. 1, shown at right). It is 10 percent lidocaine, 10 percent prilocaine, and four percent tetracaine. As a preinjection topical, I place it on the injection site with a cotton swab after drying the tissue. The anesthetic is left in place for 60 to 100 seconds. After rinsing, a painless injection can be given. The first time I tried this topical on myself, I put it above tooth Nos. 8 and 9 and left it in place approximately five minutes. Amazingly, I had achieved pulpal anesthesia on my central incisors with only a topical anesthetic!
Profound also comes in syringe form for use in scaling and root planing, when local anesthesia is not necessary or desired, or in states where hygienists are not allowed to give injections. The anesthetic, available in 30g tubes or 10g syringes, can be otbtained by calling Steven’s Pharmacy at (800) 352-3784.
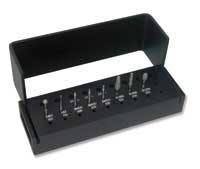
The Reverse Preparation Technique kit (Fig. 2, shown at left) was created to ensure that dentists would have an adequate amount of reduction. It’s called the Reverse Preparation Technique because we prepare the gingival margin first rather than last, as taught in dental school. The gingival margin is prepped with the bur on the far left, the round diamond (C801-021). When this round diamond is used, it cuts a perfect half circle at the level of the gingival margin at both the facial and the lingual surfaces.
Once the axial reduction is done, a quarter circle at the gingival margin remains. This is what a deep chamfer or shallow shoulder looks like. Since the gingival margin is prepared with the remaining tooth structure intact, it is simple to prep an almost perfect gingival margin.
Another critical part of the Reverse Preparation Technique is the use of the depth cut burs to ensure adequate occlusal, incisal, and axial reduction. The kit has three depth cut burs: the MADC 006, the MADC 015, and the MADC 020. These burs create depth cuts of 0.6 mm, 1.5 mm, and 2.0 mm, respectively. I use the 0.6 mm depth cutter to place cuts on the facial surface of porcelain veneer preparations. The 1.5 mm depth cutter is used to place cuts on the axial surfaces of anterior and posterior teeth. The 2.0 mm depth cutter is used for incisal edge reduction on anterior teeth, and for occlusal reduction on posterior teeth.
Most dentists reduce the teeth first and then check to see if they have enough reduction. I find this a difficult way to accurately judge if you have done enough reduction. By placing the depth cuts first, then preparing the teeth so that the cuts are no longer visible, you assure proper reduction. It’s just that simple. You will never receive a call from your laboratory or another reduction coping again. The Reverse Preparation Technique kit is made by Axis Dental and is available through dental dealers.
By providing your patients with painless injections, and your laboratory adequate reduction, you improve the quality of your restorative dentistry as well as your patients’ satisfaction with their treatment.
Dr. Michael DiTolla is director of clinical research and education at Glidewell Labs in Newport Beach, Calif., where he also teaches courses on topics such as esthetic and restorative dentistry. He teaches a two-day, live-patient, hands-on laser-training course that emphasizes diode and erbium lasers. He also teaches a two-day, hands-on digital photography course on intraoral and portrait photography, and image manipulation. For more information on these courses, e-mail Dr. DiTolla at [email protected] or call (888) 535-1289.