The 10-minute restoration
Dean Elledge, DDS, MS
This article demonstrates how to perform what I believe is the fastest method of producing a custom provisional restoration. The method is the synergistic combination of a wax impression and a fast setting, bis-acryl auto-cure composite (Access Crown® from Centrix Dental) that minimizes chair time for the dentist. The technique produces a quality custom provisional crown in 10 minutes or less and a custom provisional fixed partial denture in 20 minutes or less.
Ninety to 95 percent of all provisionals can be accomplished with this technique. It works for inlays, onlays, and veneers. The technique produces minimal marginal flash to speed the trim and finish. By using Access resin, the provisional can be trimmed with a high-speed handpiece and water-cooled diamonds. Composite stains and glazes can be used to customize the final appearance, or an optional polish can be made with a diamond impregnated felt wheel.
Access provisional restorations can be easily repaired and additions made with self-cure or light-cured composite resin. Occlusal adjustment is minimal and is normally accomplished intraorally or extraorally with a high-speed handpiece and water-cooled diamonds.
The 10-minute provisional
This technique is used for crowns or fixed partial dentures. My technique is based on a reseated wax impression — I use Shurwax regular — filled with bis-acryl resin, such as Access Crown resin. Here's how to accomplish a quick, quality restoration:
1. Cut a rectangle of wax approximately 2 inches by 3 inches.
2. Warm the wax in a flame, a hair dryer, or with hot water (120°F).
3. Roll the wax twice (so it is four layers thick).
4. Press firmly over tooth for an impression.
5. Scratch the mesial.
6. Punch one hole in each tooth with a perio probe.
7. Prepare tooth; inject Access Crown resin into wax.
8. Inject a donut of Access Crown resin on a saliva- wet tooth prep.
9. Reseat the wax properly.
10. Let set for 45 to 60 seconds until firm.
11. Unseat it.
12. Finalize trim with a high-speed handpiece, water, and a large diamond bur.
Although numerous, these steps may be completed very quickly because you skip impression mixing or setting. Since it's a custom technique, adjustments are minimal. The fit of Access Crown composite is superior to traditional polymethyl methacrylate (PMMA) resin.
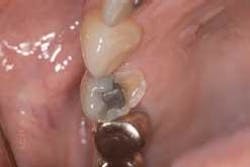
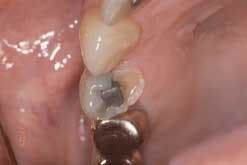
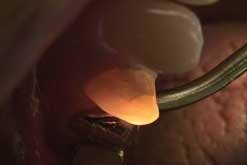
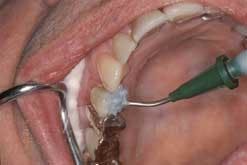
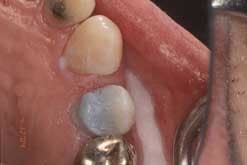
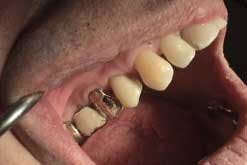
In the illustrated case, the problem the fractured tooth presents is a missing lingual cusp (figure 1). The tooth requires a full-crown restoration because the buccal cusp is crazed (figure 2). An Encore® core buildup will bond the weakened structure (figure 3). The core will provide resistance and retention for the crown restoration that is needed for the provisional restoration (figure 4).
The first step is to cut a piece of wax of appropriate size for the treatment site. Cut a rectangle the full width of the wax sheet for a bridge. Each wax sheet can form three impressions. The wax should be flexible at room temperature when the sheet is bent over on itself. This allows easy peeling of the wax from the bis-acryl composite resin in step 12. The wax shown is Shurwax. Laboratory boxing waxes are generally too soft and will distort at step 9. Furthermore, hard baseplate waxes are brittle at room temperature when bent over onto themselves and will not perform the technique.
The second step is to warm the wax. Don't melt the wax — it will become gooey and unusable. Warm it evenly in a gloved hand until it is as flexible as a piece of rubber dam material. A hair dryer, steamy tap water, or a flame will work satisfactorily.
The third step is to fold and roll the warm wax to give strength, rigidity, and thickness. Form it into a small rectangle that is four layers thick. Functionally, this is now a piece of wax putty that can be squeezed or pushed to form an impression.
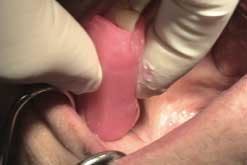
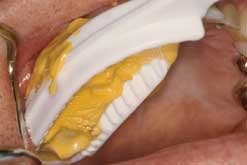
Next, form a wax impression of the tooth before it is prepared (figure 5). The wax impression is started one tooth anterior to the treatment site and is pushed at least one tooth posterior. If you are treating the terminal tooth in the arch, extend the wax impression one additional tooth, and pinch the wax impression against the ridge for stability. Press and squeeze firmly enough so there are no gaps or voids in the impression. The grooves, fossae, and gingival line should be well defined in the wax impression.
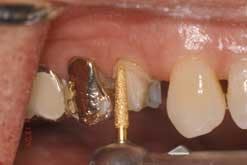
Now make an orientation mark on the mesial surface of the wax impression. This helps when repositioning the wax impression at step 9. Without this mark, it is sometimes difficult to identify the mesial surface when the impression anatomy is covered with resin at step 7. It also helps to create a mental picture that helps you to remember that the first premolar is not covered by the wax impression. This ensures accurate reseating at step 9. The sixth step is to punch one vent hole in the buccal cusp of each tooth. The hole should be about .7 mm in diameter. To accomplish this, insert a periodontal probe fully into the wax. The approach is from the internal side of the impression. The purpose of the hole is two-fold. First, it creates a vent hole that prevents a void or air bubble from forming in the provisional restoration. The second function of the vent hole is to allow the formation of an external excess or mushroom of resin material. We will use this excess material as a test for the intraoral set of the bis-acryl resin. There is no real need to set a timer, as the mushroom of the excess material will serve as a test. The tooth needs to be prepared to make room for the Access Crown resin. A 1 mm shoulder is chamfered with a Two Striper® (Premier) medium-grit diamond (figure 6).
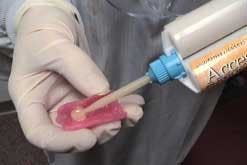
The next step begins by installing the mixing tip onto the cartridge of resin. The mating of the tip and the cartridge must be completed by a 180° revolution. There should be no caked or dried residue on this interface. Incomplete seating or alignment of the tip to the cartridge will result in an inadequate catalyst ratio, and the mix will not polymerize. Similar to using gun-delivered impression materials, the used tip remains on the gun until a few minutes before the procedure.
The next step involves backfilling the wax impression with Access Crown resin (figure 7). Keep the tip in contact with the occlusal or incisal surface of the wax impression. The wax impression should be filled to the gingival line. It's usually unnecessary to add a lubricant or release agent to the wax. The wax automatically picks up salivary proteins that function as a separator, even if the wax impression has completely dried. The only time a separating medium (silicone) is applied to the wax is following a laboratory wax impression from a diagnostic cast. It is the absence of saliva that can lead to the wax and resin adhering to one another.
Step nine is the injection of resin around the saliva-wet tooth. This donut shape of resin prevents an air bubble or void. This is similar to the customary step of a restorative impression technique.
Now it's time to reseat the filled wax impression in the exact same position that originally formed the impression. This is accomplished by keeping the mesial scratch mark oriented to the distal of the canine. Press down firmly in an occlusal direction on each end of the impression. Don't squeeze the sides, as this will collapse the wax impression on the tooth preparation. Also, don't push directly over the tooth preparation, as this will also collapse the wax impression upon the tooth preparation. These mistakes result in holes and thin areas in provisional restorations.
When the mushroom of crown resin feels as firm as bite registration material, remove the wax impression. The usual intraoral set time is approximately 45 seconds. The external excess is used as a test for resin polymerization. This eliminates the need of a mechanical timer or checking the clock.
Next, remove the wax impression from the treatment site. The provisional restoration usually stays inside the wax impression unless there is a large undercut in the tooth preparation. There is very little to trim because the Access Crown resin can escape through the wall interface and the occlusal vents. The wax will peel easily because it has been warmed by the mouth and a slight exothermic polymerization of the resin. The provisional restoration is easily retrieved and the wax impression is destroyed.
The proper sequence of steps results in an almost flashless provisional restoration that requires only minimal finishing. This is the normal appearance of the provisional when removed from the wax impression. The line angles need rounding and the single flash vent needs to be removed (figure 8). Mark your contact with a pencil and don't remove it during trim. This preserves contact pressure to prevent tooth drift during the wait for the completion of the laboratory prescription. For one or two crowns, and for inlays, onlays, and veneers, trim and finish using a high-speed handpiece and water cooling. It is quicker to use a gentle touch and finish it during the flexible stage of cure. Bis-acryl composite resins do not clog the diamond burs like acrylic resins. The provisional is held over a paper cup or bowl to catch the water during the trim. A 257SB diamond bur (Premier) will trim most axial contours. This is the same diamond that's used for the marginal finish line of the tooth in figure 6. It is a large-sized diamond that minimizes gouging of the resin. A smaller 253SA diamond bur is used for tight interproximal areas. The large 5811-037 bur is used for occlusal adjustment intraorally or extraorally. The final polish is with a felt wheel charged with diamond paste, such as Luminescence by Premier. The unfinished provisional restoration will need only minor occlusal adjustment and minor polishing. Untouched occlusion is slightly in hyperocclusion. The slight hyperocclusion is from incomplete reseating of the wax impression and approximately 2 percent resin shrinkage. The margins are clinically good and are usually superior to the traditional indirect or direct acrylic provisional restoration.
Production costs
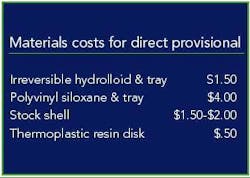
When a new procedure is introduced, the cost of materials and their effect on production should be determined. Product waste left on the mixing pad, in the mixing tip, or in the delivery syringe is a part of the cost of production. A gun delivery will waste .5 grams of resin in the mixing tip. A hand-mix resin and an injection syringe will waste 1 gram of resin. With a hand mix, there is more waste due to the mixing pad and the injection syringe.
Access Crown resin, which contains 78 grams per tube, costs $94.95 per tube. The estimated cost per gram is $1.22.
Cost analysis for gun delivery: $1 (tip) + $1.22 (resin) + 0 (waste on pad) = $2.22 (total). Add the materials cost of the impression and the total cost is approximately $3 per unit to use a wax impression and a gun-delivered bis-acryl resin. The materials cost more than traditional polymethylmethacrylate (PMMA) resin, but the marginal fit is superior and there is less occlusal adjustment.
The impression only reproduces what was present at the start of the procedure. If the tooth is missing a cusp, it should be built up for anatomic form before the wax impression. Sculpting and curing composite resin at the treatment site will accomplish this. A composite core build-up (Encore D/C, Centrix) is needed if the remaining tooth structure is compromised by decay or craze lines. An edentulous space in the mouth can be filled by scooping out the pontic with a small warmed spatula. This technique would be best suited in posterior regions where maximum cosmetics is not a factor.
Good alternatives to wax impressions
The first alternate technique to the wax impression technique is a Temp-Tab™ (All Dental Prodx). This thermoplastic resin disc works in a similar fashion. The disc is heated in 150°F water until it softens. This is pressed and adapted in the same manner as the wax impression. It is the equivalent of a wax impression with several additional advantages. It is more durable, and the resin disc won't be destroyed at step 12. The provisional is removed by flexing open the impression. It returns to its original shape and can be stored and used as a spare.
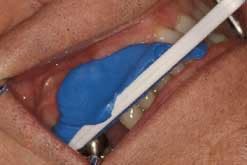
There are many other ways the Access Crown can be used successfully based on operator preference: Custom, direct, provisional restorations with bis-acryl resins also can be formed using dual-arch impressions such as 3.n.ONE from Centrix (figure 9) or Triple-tray from Premier (figure 10). The tray needs no impression material on the opposing side to form the provisional. This will result in a 50 percent impression material savings.This impression is not used to fabricate the final restoration because we could introduce a delamination in the impression materials. The occlusion will usually be superior to a replaced impression of an open-mouth technique because the opposing occlusion aids in repositioning. Stock shells are occasionally placed. They are usually needed when 50 percent or less of the tooth structure remains. A clear strip crown filled with Access Crown resin will restore the contour after the core is fabricated.
A periodontal probe can be used to select the size needed for a stock shell. The probe can be used to measure the width. The mesial-to-distal width can be measured from a radiograph before the patient is seated or from a direct intraoral measurement. This mesial to distal measurement is then transferred to the assortment of stock shells for the closest size. This prevents the problem of estimating the size by visual inspection and the saliva contamination that results when the incorrect size is chosen.
Contouring pontic and embrasures
For three or more units, it takes more than just a high-speed handpiece and a diamond bur because the curves of the pontic need to be shaped and trimmed. A low-speed electric handpiece and a straight nose cone will quickly contour the provisional. Some commonly used burs include Brasseler's Acrylic bur H79E-040; Grey Disc Rubber Wheel (301-220) Pre-polish; Grey Disc Knife Edge (301-220) Pre-polish; and the Diamond Disk (220).
A final polish is normally not needed because the wax will replicate the mouth surface of the treatment site. A clear glaze, such as QuickGlaze from All Dental Prodx, may be added.
Repairs
A bubble or void can occur in any custom impression technique. If an external defect is present, it is easily repaired with additional composite resin. The sticky oxygen-inhibited surface is preserved and is the bonding agent. This eliminates the need for an additional liquid bonding agent.
Step 1: Place and sculpt using an instrument. Flowable composite, such as Versaflow®from Centrix, also may be used.
Step 2: Light-cure as needed for polymerization. If there is an internal bubble, it is better to add additional auto-cure bis-acryl composite. The viscosity is low enough so an addition to the internal surface will not alter the occlusion. Its adhesion is highest if the oxygen inhibited layer is preserved and the material is in its elastic phase. The material can be placed where needed with the tip of the delivery gun or a very minimal amount can be mixed free-hand and placed. Auto-cured materials are best for internal additions where light may be unavailable.
The short margin is a low-stress area and can be quickly repaired. First, roughen provisional with a bur, then, cement the temp. Next, use one-step bond and addition with composite (no acid etch). The final step is to light-cure. This quick and fast addition will not have maximum strength, but it is not needed in this area. The repaired strength will be approximately 15 percent of original fabrication strength. High-stress areas, such as fractures, need more surface preparation to maximize the strength of the repaired area.
Steps:
1) Cut a Class II cavity prep in each fractured surface.
2) Etch using Ivoclar Special Bond Primer, or mechanically microetch with a sandblaster such as the unit manufactured by Danville Engineering.
3) Place bonding liquid.
4) Place a 100 percent resin composite filing material (don't use a glass/resin hybrid composite) for maximum strength.
5) Light-cure.
If your treatment plan changes, your assistant is always set up using the wax impression technique. If decay alters the treatment plan from an inlay to a full crown or even an extraction, the wax impression will allow the operator to easily provisionalize the treatment site. Note: Air vents may be punched in the central groove of an inlay which may be used as a handle prior to cementation.
Provisionals for extractions
If teeth need to be extracted, it is easiest to provisionalize abutments first. Then, make an impression and prescribe a laboratory provisional like Biotemp™ from Glidewell.
During the first appointment, provisionalize the canines as single units. Then get a polyvinyl siloxane impression, and send to the lab with prescription to extract teeth from the cast.
During the second appointment, extract the teeth, then place provisional fixed partial denture on the treatment site. Re-evaluate in six weeks for complete healing.
The margins will be perfect, and there is minimal time spent in a bloody field making the provisional at appointment two.
Multiple veneers
Provisional multiple veneers are the exception to my standard technique. The exception is to let the resin cure for six minutes, not 45 seconds, at the treatment site. Use wax as before to take an impression. Multiple veneers are the toughest and should be kept splinted as three or four units. Let the resin cure and lock completely on teeth. If it becomes solid and unremovable, finish with a high-speed diamond bur such as the Two Striper 257SB in the mouth approaching the margin. If the provisional is loose and is not mechanically retained, remove and chemically bond with light-cured composite resin. Do not use dentin conditioner to ease removal at the try-in stage. Place patient on chlorhexidine (Peridex, Procter and Gamble) and a fluoride toothpaste (Multi-care, Procter and Gamble) as an antibacterial treatment.
One or two veneers are provisionalized by direct placement and sculpture with light-cured composite resin. Retention is by a small spot of enamel etchant. Adhesion is provided by an enamel adhesive, such as ProBon from L.D. Caulk. There is no dentin adhesive or etch.
Commentary
The wax impression is my preferred method of fabricating an impression for a custom temporary crown. Wax impressions have a rigidity not found in elastic impression materials. The rigidity gives a solid stop or key effect when the impression is reseated. This minimizes occlusal and gingival adjustments. It is the most economical of all materials. Unlike elastic impression materials, there is nothing to mix, no wait for polymerization, and no need for tray support. The primary clinical advantage of bis-acryl composite is its elastic behavior during polymerization. This memory will allow it to pull from undercuts or non-parallel tooth preparations and return to its original form. It is a combination of a stiff impression material and the elastic, fastset bis-acryl composite that forms a synergistic effect.
The disadvantages of traditional PMMA resins are that they suffer from plastic deformation when pulled from undercuts before complete polymerization. PMMA resins can form a thick flash of resin at the margin that must be trimmed. PMMA resin can generate heat to melt or adhere to wax or thermoplastic materials. Thick lubrication of the matrix with these resins is mandatory.
Bis-acryl composite can be freely substituted for most uses of PMMA. The disadvantage of bis-acryl composites is they lack viscosity to finger mold in a block technique and they do not chemically adhere to polycarbonate crown forms or PMMA resins. The disadvantage of the wax impression is that it is destroyed with each provisional. A second wax impression is needed for those cases requiring a spare or a reusable thermoplastic resin impression (Temp-Tab, All Dental Prodx) can be incorporated.
If heated wax is not available or desired, my second selection for provisionalization is a dual-arch tray technique. The technique produces improved occlusion that is superior to the wax impression. A sided tray allows flexible impression material to be used, which allows easy retrieval of the provisional (figure 9). A sideless tray is less interfering with the tuberosity, but requires support from firmer bite registration materials (figure 10). The disadvantage of both trays are the requirements of mixing, syringing, and waiting for materials to set. Also, patients must be directed in the opening and closing of their mouths.
For delegation of the provisional fabrication to occur, the staff member needs guidance and direction. Verbal and visual understanding is followed by practice on a model of the treatment site. It is suggested that an unprepared laboratory cast and a prepared laboratory cast that replicates the clinical situation be used for practice. The dentist needs to evaluate each of the 13 steps as performed by the auxiliary. A single crown should first be accomplished before a three-unit fixed partial denture is fabricated. Auxiliaries need guidance, especially with pontic shape, marginal finish lines, and occlusion. The basics of the technique can be learned by an inexperienced staff member in an afternoon.
Note: References are available from the author upon request. A video for office training purposes is available at the Web site http://e.faculty.umkc.edu/elledge/index.html.
