Taking composite restorationsto the next level
For more on this topic, go to www.dentaleconomics.com and search using the following key words: adhesive dentistry, composite restorations, Paul Belvedere, curing light, polymerization.
Dr. Dalin: This month, we are talking with Dr. Paul Belvedere, whom I consier one of the gurus of composite restorations. After reading this interview, I think you can bring many specific skills to your resin regimens. Dr. Belvedere, I would like to make this interview informative and useful for your readers. I am going to let you lead us step by step through the placement of a composite resin restoration. First, would you talk about tooth preparation?
Dr. Belvedere: This is a great place to start. When we examine the literature through the years of acid etch bonding techniques, we find that the attachments are mechanical, not adhesive — both enamel and dentin. According to definitions from the Oxford American Dictionary, adhesive as an adjective means “able to stick fast to a surface or object; sticky — an adhesive label.” As a noun, it means “a substance used for sticking objects or materials together; glue.”
Adhesive dentistry continues to be used but a true evaluation of the “bonding” of resins to any surface is micro-mechanical in its physical connection to hard tooth surfaces.
A further search of dental research literature tells us that the “bond strength” to enamel ends of the exposed and etched enamel rods is 10 times greater than the bond to the sides of the rods. Therefore, I always round or bevel external margins, such as proximal and gingival in MOD preparations, so that the ends of the rods are exposed prior to etching.
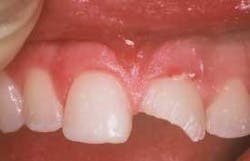
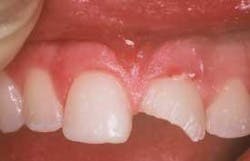
For anterior preparations — the best example is a large Class IV — mechanical additions through the placement of nonparallel grooves placed in the beveled areas on the labial and lingual will overcome the distortion of a cured, resin-based composite during increased functional pressures. If you can imagine the impossibility of an inlay pattern being removed from your preparation because of these grooves, you can understand the additional retention gained through preparation design.
Dr. Dalin: The tooth is now prepared. Next, we have to put a matrix band on it for the placement of the resin. What tips do you offer here?
Dr. Belvedere: This is the most important consideration if one wishes to eliminate all shaping, finishing, and shrinkage challenges. Shrinkage cannot be eliminated, but it can be controlled.
With the advent of light-curable dental materials in the early 1980s, I replaced all matrix systems with clear materials so that light could activate my resins at the margins. If the profession could start with a clean sheet of paper, would we not find a way to use clear plastic instead of light-blocking metal?
The doctors who are concerned about shrinkage at the gingival margins on Class II preparations can see mentally the advantage of directing curing energy from the bucco- and linguo-gingival corners. By transmitting the curing energy through a matrix material directly at those “corners” of the preparation from the sides — not through the occlusal access — marginal seal occurs before total volumetric shrinkage. Polymerization will begin immediately in these critical margins before sufficient volume of the composite has been cured.
I use only clear plastic matrices in anterior and posterior applications. In the posterior, the matrix is a Premier Cure Through Molar Band, stock No. 9061233. In anterior situations, it is Vivadent Contour Strips.
With both of these systems, there is a learning curve for doctor and staff. This can best be accomplished through attending workshops, such as one I recently finished in New York.
Plastic matrices can be molded to mimic the crown shapes, and anatomic elements increase in contact point pressures and ideal interproximal anatomy. Doctors who have learned the efficient uses of these materials sing the praises of these systems.
Dr. Dalin: What about the etching and drying process?
Dr. Belvedere: I have not given in to the “single use” dentin-enamel systems. If one compares the steps and the time used for proper placement of these later generations of acid etch techniques, one will find that Generation 4, total etch technique is not only more predictable, but faster.
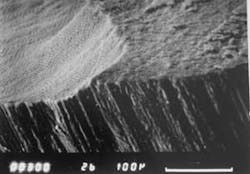
In 1984, I examined the effect of using a pumice scrub prior to etching versus a fine diamond or airbrasion to scour hard tooth surfaces for effectively etching tooth surfaces through SEM examination. I then etched for 60 seconds with 35 percent acid, and found that the diamond-altered enamel resulted in the ideal micromechanical surface to which resin will bond.
Dr. Dalin: Now we move to the bonding agent step. Discuss the highlights of what types to use and how to apply them properly.
Dr. Belvedere: There is one additional step that I utilize on every restoration. This is the use of 5 percent sodium hypochlorite scrub for a five- to 10-second application with a disposable brush. The brush is then rinsed off before applying the etching gel. Since the beginning of my dental career, I have used NaOCl as an organic solvent in endodontic treatments and in smear layer removal in the preparation. I realize that plaque may linger at the gingival margins after placing the matrix. There is sufficient evidence in dental literature of the increased permeability of dentin after its use, enhancing the penetration of the bond resins.
I prefer acetone-based bonding agents. The acetone penetration and evaporation of this solvent is more rapid in both respects. If one analyzes the “wet dentin” activity when placing the bonding resin, an over-wet condition demands that the fluids remaining in the dentin tubules must dilute the bonding agent liquid. Common sense tells me that the activity of the acetone in contact with water will assure penetration of the resins into the demineralized elements of the dentin and enamel.
Dr. Dalin: Now, let's talk about the curing light. I know that you think this is an area that frequently is not considered properly.
Dr. Belvedere: Use of the curing light is the most important step in the use of direct composites. If the curing energy is not properly transmitted to the composite, can the “chemistry” expected by its use be accomplished? I want the highest output I can purchase for the money I spend.
When buying a curing light, I am merely buying energy and the ability to transmit this energy into the resin-based composites I use to replace human tooth structure. If a light source has an output of less than 1,000 mW/cm2, and if the user cannot change the light guide sizes, the operator is limited in what can be accomplished with direct composite dentistry. Let's consider a Class I preparation. Imagine the light energy coming into the composite resins. All of these placed into the prepared opening, including the bonding resins in bulk, can only reach the resins by energy coming from the pulp chamber. Imagine the light is in the pulp chamber. Common sense tells us that the resins in contact with the inner portions of that preparation would polymerize in microseconds, with the same physical change that would occur if the composite were placed on the end of the light guide. When this occurs, can we not expect these resins to bond before shrinkage to create a gap between the tooth substance and the resin? But when we place a layer of resin into the preparation, and introduce the energy needed to cure it only through the occlusal opening, does that layer shrink from 2 percent to 3.5 percent?
I place the tip of the light guide on the buccal and the lingual on all Class I restorations and on the lingual of all labially placed composites in the anterior segment. In each operatory in my practice, there are two lights at each chair — just as there is more than one handpiece at each chair. The assistants have their lights and the doctors have their lights. The term I use to describe this is “trans-enamel polymerization” or “through-the-tooth” curing.
Dr. Dalin: We are now ready to place the resin.
Dr. Belvedere: I have hinted at this technique in previous answers. So, at this time, we should clarify the steps after having just discussed curing light situations.
Consider the following:
- Enamel is etched by demineralization, creating weakened ends on enamel rods.
- Dentin is also demineralized, leaving organic collagen fibers.
- A resin of some combination is placed on these surfaces.
- This resin is cured by itself.
- Missing inorganic structures of enamel and dentin are now coated with an unfilled resin and then cured, forming a brittle margin.
Let's use common sense and simplify, fortify, and advance the use of direct composite dentistry. Instead of curing the bonding resin at this point, let's add a small volume of a low viscosity, glass-fortified material called a flowable resin. This flowable resin is then manipulated with a microbrush to cover all surfaces and remove as much volume as possible. The flowable resin, filled to approximately 70 percent, now mixes and blends with the bonding agent resin, and the glass filler replaces the hard structures in the enamel and the dentin that have been removed through etching.
Next, let's inject from unit-dose carpules the functional resin-based composite that we think will replace the missing human tooth structure. The hydraulic pressure that is used for this step will squeeze any less-viscous resins from the preparation, that is, the excess flowable. “Burnish” this product to “rub” the filler and the resin materials into the enamel margins.
Now let's introduce the most critical step: polymerization. By placing a 1,000 to 1,600 mW/cm2 light source on the outside of the tooth substance, so that the energy must pass through tooth structure, the resins inside will polymerize and shrinkage will not pull them away from the preparation. The final placement of the curing energy will be through the occlusal areas. We use 20 seconds from buccal and linqual, and then 20 seconds from the occlusal for the Class I.
Dr. Dalin: For the finishing and polishing steps, do you have a distinct list of instruments and polishers that you recommend?
Dr. Belvedere: The more scratches that we put into a surface, the more we must reduce the bulk of the surface to remove it to create a polished, plaque-resistant result.
Initially, use care in shaping so that gross cutting is minimized. Do not use diamonds. Use spiral-bladed carbide burs to reduce occlusal and proximal excess. For occlusal shaping, I use a Brasseler H379-023, and for the flat surfaces a Brasseler H48L-010. These are spiral-bladed carbide finishing burs with 12 flutes. For additional occlusal anatomy, an H274-016 is best for secondary anatomy and spillways.
The key to these burs' success is the spiral-bladed configuration. In many cases, a surface will be created that requires no additional polishing steps. When more polishing is necessary, a composite polishing grade cup is used. Cup shapes are more efficient than disks, especially in the posterior. If disks are efficient, why do hygienists use cups? I use them throughout the mouth. I use no pastes or disks.
Dr. Dalin: I have heard you say that some dentists view the placement of composite resins as something harder than it needs to be. What can you say to dentists at any stage of their careers to make them more comfortable and confident in their ability to perform these restorations?
Dr. Belvedere: It is troubling, but rewarding, to have recent graduates take my courses because they wish to advance their knowledge after dental school. The same goes for the practicing dentist, no matter how long in practice. One should always see the need for more chairside-efficient techniques. Just recently in New York City, an 82-year-old dentist was taking a workshop to update his techniques in direct composite. The key is to avail yourself to the many excellent workshops that are available.
Here is my philosophy on direct composites. Do you use a rubber dam for every composite you place? I do not routinely use a rubber dam because dentists worldwide do not.
Therefore, I must find a technique that can be taught worldwide that will allow the profession to create the highest quality direct composites without the difficulties that are being espoused in many situations.
The matrix is your rubber dam. When it is properly placed so that contaminants are sealed away from the work area, it is all that we need.
Dr. Dalin: Is there anything else you would like to share with our readers?
Dr. Belvedere: Today's resin-based composites are far superior to those that we have used since their inception 25 years ago. For the last 29 years, I have been dedicated to clinically determining how, when, and why to use these products to their fullest potential. Contemporary resin-based composites rival anything that we can use to replace human tooth structure.
Can you imagine waking up some morning and learning that you may no longer use metal in the mouths of your patients starting that day?
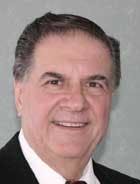
Dr. Paul Belvedere graduated from Loyola Dental School, Chicago, in 1955, but began his teaching as a student instructor in 1954. Dr. Belvedere has been teaching continuing education to practicing dentists for more than 30 years. He maintains a general and cosmetic practice in Edina, Minn. Dr. Belvedere helped create and is co-director of the Postgraduate Program in Esthetics and Contemporary Dentistry. He is an adjunct professor at the University of Minnesota School of Dentistry, and an associate professor at State University of New York at Buffalo. He has presented more than 600 featured lectures to state dental societies, study groups, and dental schools at home and abroad.
Jeffrey B. Dalin, DDS, FACD, FAGD, FICD, practices general dentistry in St. Louis. He is the editor of St. Louis Dentistry magazine, and spokesman and critical-issue-response-team chairman for the Greater St. Louis Dental Society. He is a cofounder of the Give Kids A Smile program. Contact him at [email protected].


