Pearls for your Practice
Joshua Austin, DDS, FAGD
Brasseler's DiaComp Feather Lite polishing system
Apparently, I love to polish composite. Sometimes it seems like polishing is all I write about. I guess I've just had a run of composite polishers come in for me to use, which means you get to read about polishing-ad nauseam. But as our forefathers always said, "If you can't make it fine, make it shine." So shine we will. Brasseler's DiaComp Feather Lite polishing system is a two-step system that works well on both posterior and anterior composites.
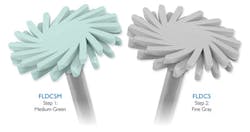
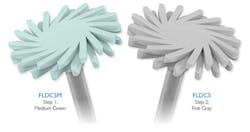
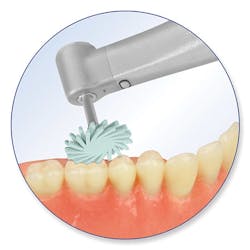
The DiaComp Feather Lite polishers are diamond-impregnated wheels with flexible spirals. The design allows you to polish the smooth surfaces of anterior composite restorations, as well as the occlusal surfaces and embrasures of posterior composites. The green polisher is medium-grit and is used first, followed by the gray polisher, which is fine-grit. When used in a latch handpiece at a slow speed with a bit of water spray, these polishers give composites an enamel-like finish without destroying the surface texture. Robert Margeas, DDS, FAGD, and I discussed this exact idea in a recent Product Navigator newsletter article.
I have used this system for both anterior and posterior composites in my practice. For posteriors, I really like the finish they give to occlusal embrasures. I despise the square, sharp occlusal embrasures that sometimes happen with Class II restorations. The DiaComp Feather Lite polishers are great at rounding out and smoothing these embrasures. Paired with a good segmental matrix system, you can really diminish the square embrasures! For anterior composites, the wheel and spirals allowed for easy polishing. With just the two steps, the process goes quickly, and the enamel-like sheen looks great.
There are a lot of great composite polishers out there. I've written about separate anterior and posterior systems in the past. If you are a clinician of simplicity, and you want one product for polishing both anterior and posterior composites, this is a great choice. If you hate square embrasures like I do, these work great, as well. All around, the DiaComp Feather Lite polishing system is a very nice composite-polishing product that will serve you well. Give it a try! Line-drive single up the middle!
EdgeCore obturators by EdgeEndo
In the January 2015 issue of Dental Economics, I wrote about EdgeEndo's EdgeFile. As a quick recap, I thought they were great-economical, well designed, and easy to integrate into an existing endo setup. Like most endo file systems on the market, there are compatible obturators to go with the files. EdgeEndo has corresponding gutta-percha points along with EdgeFill, which is its version of a plastic carrier thermal obturator. In addition to EdgeFill, there is EdgeCore. EdgeCore is similar to the other gutta-percha carrier thermal obturators that have debuted over the past few years.
Oven-heated endodontic thermal obturation cones are extremely popular and have been since their debut in the late 1980s. Criticism of these has always been focused on the plastic carrier because it's not a homogenous fill since the gutta-percha coating shrinks with cooling. It's difficult to prep a post space without pulling out the entire carrier. All of these are valid concerns in regard to plastic carrier thermal obturators.
After talking with a couple of endodontists, I learned (anecdotally) that the vast majority of these plastic carrier systems are used by general dentists. There seems to be little affection for them in the specialty world. So, why are these so popular with GPs? Ease of use and speed are what attract us to these. We are willing to deal with the plastic carrier because it's faster and simpler. But what if we had the same speed and simplicity without a plastic carrier? Seems like the best of both worlds, right? That's what EdgeEndo is shooting for with its EdgeCore obturators.
The EdgeCore obturators are still oven-heated, but instead of a plastic carrier, the carrier is made of dense, cross-linked gutta-percha. This gives us a more homogenous fill, eases post space preparation, and makes for an easier cleanup.
There are matching EdgeFill obturators for every EdgeEndo file system. You will need a thermal obturator oven. If you don't already have one, you can order one directly from Dentsply Tulsa Dental. Just as with other thermal obturators, you dry the canals, apply a small amount of sealer, and place the EdgeCore in the oven for heating. Once the oven beeps, remove the obturator and place it into the desired canal with slow, even pressure to the desired length. With the old plastic carriers, you were left to try to remove the handle and the excess plastic carrier. With EdgeCore, a slight twist after placement will break the handle off of the obturator. Plus, cleaning up the gutta-percha is much easier than cleaning gutta-percha and plastic. A handpiece or even a spoon excavator can accomplish the task. Prepping a post space, if needed, is as simple as it is in a traditional cold gutta-percha cone fill.
As a general dentist, my endo philosophy is to keep it simple-simple cases accomplished with a simple, elegant system. I try my best to clean and shape the canals well and to irrigate the hell out of them! The EdgeEndo file system has been easy for me to use, and I have enjoyed it very much. EdgeCore takes it to the next level. It gives me the ease and speed of thermal obturation without the problems of the plastic carrier. Cleanup is easy and quick, and the fills look phenomenal on radiographs. I really loved using the EdgeCore obturators. Frozen-rope triple, deep in the alley!
NV Microlaser by DenMat
I'll be the first to admit that I am not an expert on lasers. I know the simple stuff-like soft-tissue lasers are for . . . well, soft tissue. Hard-tissue lasers are expensive. Finally, I know that all of my laser experiences have been less than stellar. One of the biggest roadblocks is that the diode laser is never set up and ready to go when I need it. The NV Microlaser by DenMat tries to overcome this.
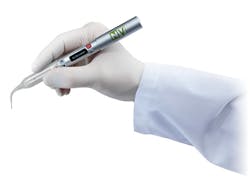
Another issue I have with many of the lasers on the market is the unsightly cords that run everywhere. The NV Microlaser is completely cordless. It charges on a cradle, and it comes with a wireless foot pedal that activates the laser. The laser itself is about the size of a Sharpie marker. A disposable single-use tip with a 400-micron fiber is snapped onto the top of the NV Microlaser. A small LCD screen with several input buttons allows the user to unlock the laser and select one of several different procedures with saved settings. Those procedures include troughing, gingivectomy, implant uncovering, operculectomy, and more. The laser also includes three pairs of protective eyewear.
As a laser "noob," I'm quite confident that I underutilize the NV Microlaser. I really only use it for troughing deep margins and zapping hemorrhagic tissue. For these applications, the NV Microlaser has performed beautifully. At a max of 2 watts, it has plenty of power for gingival procedures. It takes only seconds to get the NV Microlaser up, running, and frying gums. It requires only a small space on my countertop, which matters to a neat freak like me. Because it's small and neat, it can live out on my counters full-time, which means my assistant can pull it out on the quick draw like Josey Wales.
My underutilization of lasers is entirely my fault. I need more continuing education to diversify my laser applications. But the NV Microlaser makes me want to learn to do more with it. It's simple and easy to use. Its small size and lack of cords make it a winner in today's cluttered operatories. It's also very reasonably priced. If you are looking for a diode laser for soft-tissue gardening that's simple and easy to use, I'm not sure you could do much better than the NV Microlaser. DenMat has a winner all the way around! Sharp double into the power alley!
More Pearls for your Practice
June 2015
May 2015
April 2015


