When to load an implant

After a few failed implants, this dentist wonders what he is doing wrong. To make matters more complicated, he is not the one placing the implants. How can he tell when an implant is ready to place into service? Dr. Christensen answers.
Q:
I have been restoring implants for several years and am comfortable with the restorative aspects of implant dentistry. The challenge I have is when to load an implant. I have had a few implants fail in recent months and am wondering if I am loading them too soon. I am working with several oral surgeons and periodontists who place the implants. I rely on them to tell me when the implants are ready to load. How can I tell if an implant is ready to place into service?
A:
My answer to you would be much easier if you were placing the implants yourself, because you would observe the density of the bone as you placed the implants. If the bone is dense on placement, loading can be immediate in some cases.
There are several principles that can guide you in making the decision to load or not to load at any given time (figures 1 and 2). First, I will discuss bone density.
• If the bone is dense on implant placement, immediate loading has been proven in many studies to be successful.
• Often the bone has moderate density and there is some resistance on placement, but loading is still questionable. In such cases, a healing abutment or the final abutment with a provisional restoration on it, both of which should not contact opposing teeth when occluded, can be placed on the implant. These are desirable situations when compared to leaving the implant covered with gingival tissue, since the soft tissue can heal with nearly optimum contour and anatomy while the implant undergoes additional osseointegration. Also, less occlusal force is placed on the implant than if it is loaded immediately. In either of these cases, it is desirable to have the healing abutment or the final abutment slightly wider than the anticipated crown, which allows better access to the implant when a conventional or digital impression is made and more adequate soft-tissue healing in relation to the final restoration.
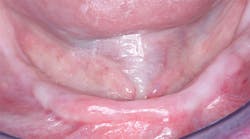
Figure 1: For a patient such as this edentulous person, it is nearly impossible to determine the potential bone quality and quantity without several diagnostic aids and adequate radiographs described in this article.
• If the bone density is questionable, a cover screw can be placed on the implant, the soft tissue sutured over it, and the implant allowed to integrate for a few months. Many clinicians suggest waiting four months before uncovering such a questionable implant.
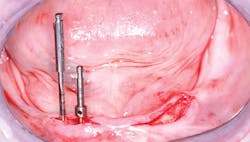
Figure 2: On exposing the bone on the patient in Figure 1 and making an osteotomy, the density of the bone becomes apparent to the clinician who is placing the implant, and density relates directly to the time needed to attain implant stability.
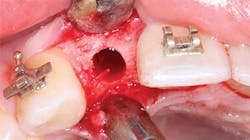
Figure 3: What resistance will this osteotomy provide to implant placement? Assuming the clinician has set the torque of the implant placement motor correctly, and the implant goes into the bone with the amount of torque at which the motor is set, the clinician may make a good estimation about the timing for implant loading.
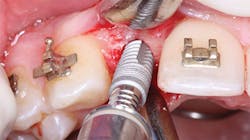
Figure 4: On screwing the implant into place, bone density or lack of it is obvious.
These above suggestions are some of the same criteria that guide the implant-placing dentist who gives you loading suggestions. However, if you are not placing the implants, you do not have the opportunity to evaluate the bone condition at the time of implant placement (figures 3 and 4). The following topics are a few factors or techniques that can help you decide when to load the implant:
Time since the implant placement
The person placing the implant can tell you the date the implant was placed. If at least four months have passed and the implant appears to be sound as described in the following points, it is probably ready to be loaded.
The simple tapping test
Although certainly not a scientific test, you may obtain a tentative opinion on the integration and stability of the implant by the following simple test. Gently tap the implant with a metallic instrument (e.g., a metal mirror handle) on the top of the coronal aspect of the implant in a direction perpendicular to the occlusal plane. It should have a solid "ring" as the metal instrument hits the implant. Now, tap laterally on the supragingival implant portion. It should have less "ring" than when tapped previously, but it should not have a dull "thud."
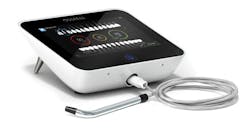
Figure 5: The Osstell device provides an approximation of the stability of the implant and provides information relative to loading.
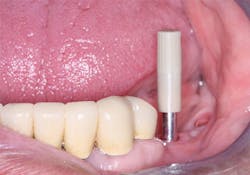
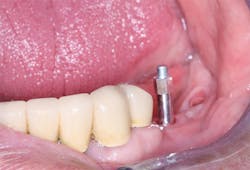
Figure 6: The Osstell device described in this article requires placement of a brand-specific SmartPeg into the implant before it can be used to estimate implant stability.
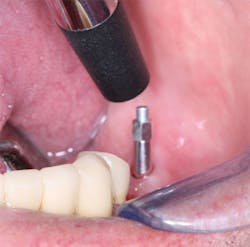
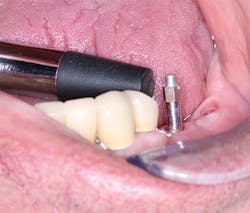
Figure 7: The stability of the implant is tested by the Osstell IDx using resonance frequency analysis. The device provides a number indicating that the implant has low, medium, or high stability.
The Osstell IDx
The Osstell IDx is an extremely useful instrument that measures implant micromobility by resonance frequency analysis (figures 5-7). The device provides information about the implant's stability (i.e., high, medium, or low). This device is especially useful for restorative dentists who are restoring implants placed by others. It is also valuable for surgeons to validate their own experience about implant stability. A specially designed piece of metal (i.e., SmartPeg) specific to the implant brand is inserted into the screw hole of the implant being tested. The Osstell handpiece is then placed near the SmartPeg, and a number is obtained on the Osstell readout. If the number is in the range suggested for implant stability by the company, the implant is considered to be stable enough to be loaded. This device helps dentists to objectively identify the stability of the implant and the apparent acceptability for loading. It also allows dentists to confidently communicate with their patients about the estimated timing for loading their implant.
Occlusion
If the patient is an adult who has signs of clenching or bruxism, you can easily identify the bruxing condition by observing the wear on the surrounding teeth or on crowns or prosthesis teeth. Bruxers place several times more load on teeth or implants than nonbruxers, and occlusal wear is usually easily identified. I prefer to allow more time for the implants to integrate for bruxers to provide an optimum chance for adequate integration before loading.
Amount of bone in a facial-lingual and crestal-apical dimension
This characteristic can be observed visually and palpated to estimate bone presence or determined from a CBCT radiograph. If evaluating visually, a ridge caliper, available from Salvin Dental Specialties or similar implant accessory companies, is a valuable instrument to measure the amount of bone in the facial-lingual dimension. Measure the total facial-lingual dimension of the bone and soft tissue. Then, subtract about 2 mm total for the thickness of the soft tissue on the facial and lingual surfaces of the bone. If (1) the remaining dimension is about 6 mm or more after the subtraction for the soft tissue, (2) the length of the implant is at least 10 mm, and (3) the diameter of the implant is 4 mm or more as observed from a standard 2-D radiograph, the implant has a good chance of integrating rapidly. Based on my clinical observations, measurements less than those listed in any direction lead me to wait longer before loading.
Location of the implant in the mouth
The anatomy and usual bone density of several locations in the mouth are conducive to predictable osseointegration and implant success, while others are not. The familiar bone density numerical designations suggested by Misch, Types 1 through 4, are often used to indicate bone density, and in my opinion, supported by published research, are also indicative of the possibility for implant long-term success.
• The mandibular anterior area (Type 1 bone) is considered to be most desirable and predictable for implant success. Therefore, earlier implant stability is expected to be achieved here. This is especially true if the bone has resorbed significantly, thereby reducing the quantity of porous trabecular bone on the internal of the mandible.
• The posterior mandibular area (Type 2 bone) is usually also considered to allow more predictability for implant success. However, location of the inferior alveolar canal, mental foramen, or mylohyoid indentation of the lingual surfaces of the mandible often inhibit optimum implant length, diameter, and location of placement.
• The maxillary anterior area (Type 3 bone), usually including the premolars, is often quite porous and trabeculated. This anatomic area requires more time for osseointegration; implant success is more difficult to achieve here. If I have any doubt about the stability of implants in this area, as well as the Type 4 bone to be described, I suggest waiting a few months to let the osseointegration and implant stability increase.
• The maxillary posterior area (Type 4 bone) is very porous and implant success is relatively unpredictable. I suggest that implants placed in this area should be allowed the optimum time of several months before loading.
Location of implant in the arch relative to occlusion
As you know, most of your patients do not have bruxism and have a canine guided occlusion. Replacing a tooth in the maxillary canine area with an implant requires some thought. That tooth or implant has significant stresses on it. I suggest waiting until you are sure the implant is stable. Also, for optimum success, do not place the implant in a canine rise position.
The second molars receive more force than the other teeth since they are located at the most forceful part of the lever arm of the jaw. Implants placed in maxillary second molar areas in Type 4 bone are in one of the least likely places to survive during service. Care should be taken to let them stabilize thoroughly before loading.
Measurement of bone density
CBCT devices have the ability to apply a measurement of bone density in the areas planned to receive implants. This measurement usually relates to the well-known Hounsfield unit scale. This scale provides a numerical value to the bone in which the radiodensity of distilled water is defined as zero Hounsfield units and the radiodensity of air is defined as -1,000 Hounsfield units. Although controversial, this scale applied to bone density provides another way to estimate the density of bone, which is related to the expected stability of an implant. The higher the number, the denser the bone. Unfortunately, many, if not most, implants are still placed without the aid of CBCT images.
Summary
There is no way to accurately estimate the actual stability of titanium alloy root-form dental implants in the supporting bone. However, please look over the many ways described in this article. It will be evident that relatively good estimations of implant stability can be made, leading you to make a clinical decision about when to load the implant.
Gordon J. Christensen, DDS, MSD, PhD, is a practicing prosthodontist in Provo, Utah. He is the founder and CEO of Practical Clinical Courses, an international continuing-education organization initiated in 1981 for dental professionals. Dr. Christensen is cofounder (with his wife, Dr. Rella Christensen) and CEO of Clinicians Report (formerly Clinical Research Associates).
About the Author

Gordon J. Christensen, DDS, PhD, MSD
Gordon J. Christensen, DDS, PhD, MSD, is founder and CEO of Practical Clinical Courses and cofounder of Clinicians Report. His wife, Rella Christensen, PhD, is the cofounder. PCC is an international dental continuing education organization founded in 1981. Dr. Christensen is a practicing prosthodontist in Provo, Utah.