Tips for profitable and predictable root canal treatment
Allan S. Deutsch, DMD
Introduction
The armamentarium used during the endodontic procedure can be quite expensive, time consuming, and operator sensitive. This technique review will assist the general dentist by introducing standardized protocols for root canal treatment; discuss factors for successful, cost-effective treatment; and uncover anatomical tips for safety.
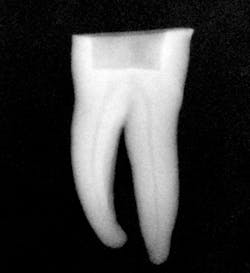
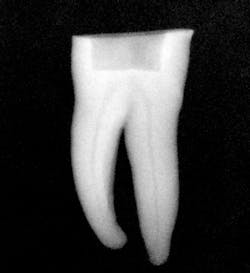
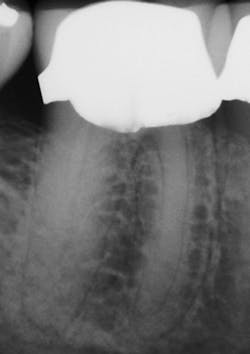
Figure 1: Radiograph of extracted tooth to demonstrate preoperative canals.
Endodontic access
Prior to successful endodontic shaping, proper endodontic access is required. Successful access is achieved by recognizing the location of the roof of the pulp chamber, piercing it, and fully removing the entire roof without jeopardizing (e.g., perforating) the floor of the pulp chamber. A simple rule to note is that the pulp chamber lies approximately 7.0 mm from the height of the cusps of any furcated tooth.1-4
I recommend creating a depth cut of 7.0 mm with a high-speed, surgical length round bur that will place the cutting tip into the pulp chamber. This technique should not be done on teeth that have a highly attritioned occlusal surface. Once the access into the pulp chamber is completed, an extra-long cylindrical non-end-cutting, extra-coarse diamond bur can be used to smooth and push back the walls of the tooth to remove the rest of the chamber roof.
Finding canals
A key to knowing where to relieve the secondary dentin is the color of the floor. The pulpal floor presents itself as a darkened dentin (e.g., a grayish-yellow color), and there are usually developmental grooves visible as dark lines on the floor. As you uncover this darkened dentin, you may find that the lines take the shape of a "Y" or, in molars, a square configuration, with the canals most likely to be found at the greatest extension of each line.
Glide-path creation
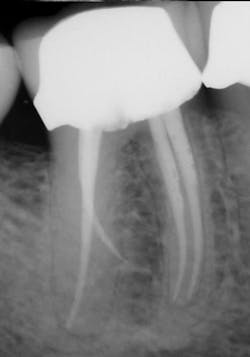
After preparing straight-line access to the canal orifice (figure 1), explore the canal using small-sized instruments. I typically use a size 08 SafeSider by hand with the help of an apex locator to determine working length. I then use the SafeSiders in sizes 10, 15, and 20 to verify patency and confirm a smooth, reproducible glide path (figure 2). I always irrigate and enlarge the glide path to a minimum 20/02 preparation.
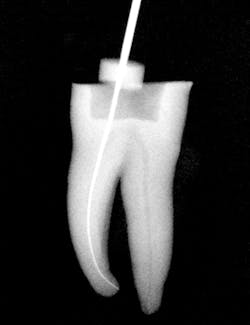
Figure 2: Radiograph confirming glide-path creation using SafeSider instruments.
Instrument movement
A major concern during endodontic instrumentation is instrument separation. Breakage of rotary nickel-titanium (NiTi) instruments occurs primarily from torsional stress, cyclic fatigue, or both.
Torsional instrument fracture occurs when horizontally positioned flutes of the instrument lock into the dentin of the canal wall. If the handpiece is in continuous rotation, it tends to screw and lock the file into the wall of the canal. When the torque of the handpiece exceeds the proportional limit of the NiTi file, separation occurs.
Cyclic fatigue is caused by mechanical loading and metal fatigue. When an instrument is used in rotation, each time it completes one 360-degree revolution, it goes into both tension and compression. Like a paper clip that is bent back and forth, it soon breaks. The degree of canal curvature and rotational speed are the key factors, which lead to instrument fatigue.
Reciprocation was introduced to reduce the incidence of instrument separation. The back-and-forth reciprocating motion reduces torsional stress by preventing binding of the file, and also reduces cyclic fatigue because the stress of tension and compression does not exceed the proportional limit of the metal, thereby increasing the instrument's lifespan.5
Endodontic instrumentation example
In the presence of irrigant, follow along the glide path and shape the wider extensions of oval canals with a Tango shaping instrument (single blue band on the latch head). Tango-Endo instruments (Essential Dental Systems) are specifically designed to be used in the Tango-Endo reciprocating handpiece. Use a gentle inward pecking motion with short 2 mm to 3 mm amplitude strokes until the working length is reached. Clean the flutes frequently during instrumentation and inspect for unwinding or abnormalities. I recommend always utilizing minimal apical pressure and not forcing the instrument down the canal. It is actually more efficient and beneficial to use short pecking motions rather than trying to push the instrument apically to measurement. More short pecking movements will get you to measurement faster.
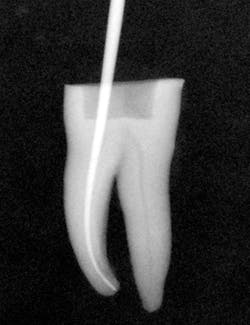
Figure 3: Radiograph showing master gutta-percha point fit to length.
I then use the Tango finishing instrument (double blue band on the latch head) in the same manner as described above. Always use the instrument wet. If you cannot achieve length, repeat the use of the Tango shaping instrument or use a 30/.04 SafeSider instrument to go to measurement. Confirm the Tango finishing instrument reaches the apical measurement. Move the instrument continuously against the canal walls until there is no resistance. I then fit the Tango-Endo gutta-percha point (figure 3). Figures 4 and 5 demonstrate the pre- and postop clinical radiograph.
Figures 4 and 5: Clinical pre- and postoperative radiographs using the Tango techniques described.
The result is a final shape that reflects the original canal anatomy without excessive mesiodistal tooth structure removal and inadequate removal of buccolingual tooth structure.
Instrumentation tips I recommend:
Always irrigate well during instrumentation. Irrigation not only helps to remove bacteria and debris from the canal; it also helps lubricate and facilitate canal instrumentation.
Make sure the instrument fits loosely in the canal. After you have achieved working length, work the lateral walls, instrumenting until it is loose in the canal. Maintain canal patency before moving to the next instrument in the sequence.
Wipe the instrument during instrumentation. By wiping the instrument, you remove debris from the flutes and facilitate efficient and safe instrumentation.
Use short pecking motions. By using a short 2 mm to 3 mm pecking motion, you move debris up, which helps to not impact debris apically. Peck, don't push, the instrument to the working length. Pushing creates both torsional and cyclic fatigue stress on the instruments. More pecking will get you to your measurement in less time.
References
1. Deutsch AS, Musikant BL. Morphological measurements of anatomic landmarks in human maxillary and mandibular molar pulp chambers. J Endod. 2004;30(6):388-390.
2. Deutsch AS, Musikant BL, Gu S, Isidro M. Morphological measurements of anatomic landmarks in pulp chambers of human maxillary furcated bicuspids. J Endod. 2005;31(8):570-573.
3. Lee MM, Rasimick BJ, Turner AM, Shah RP, Musikant BL, Deutsch AS. Morphological measurements of anatomic landmarks in pulp chambers of human anterior teeth. J Endod. 2007;33(2):129-131.
4. Azim AA, Azim KA, Deutsch AS, Huang GT. Acquisition of anatomic parameters concerning molar pulp chamber landmarks using cone-beam computed tomography. J Endod. 2014;40(9):1298-1302.
5. You SY, Bae KS, Baek SH, Kum KY, Shon WJ, Lee WC. Lifespan of one nickel-titanium rotary file with reciprocating motion in curved root canals. J Endod. 2010;36(12):1991-1994.
Allan S. Deutsch, DMD, is a practicing endodontist in New York City. He holds 18 patents for coinventing revolutionary endodontic products for Essential Dental Systems, a company he cofounded. He is an assistant clinical professor of endodontics at Columbia University Dental School. He is one of the leading authorities in endodontics, having lectured at more than 150 worldwide locations, and has coauthored more than 200 dental articles. Dr. Deutsch can be reached at (800) 223-5394, by e-mail at [email protected], or at the website essentialseminars.org.