DuraTemps: The single most important diagnostic and treatment tool available
Complex restorative and cosmetic cases can be challenging, but well-designed provisionals can be the key to maximizing success. Provisionals are not merely placeholders for the permanent restorations to come—they are one of the most important tools for diagnosis and treatment that dentists have available.
As Terry Donovan, DDS, and George Cho, DDS, have noted, “[T]he restorative dentist must clearly understand the esthetic expectations of the patient, and the patient must understand the inherent limitations of any type of restorative therapy. One often neglected modality at the clinician’s disposal to aid in the communication between the dentist and patient is the provisional restoration.”1
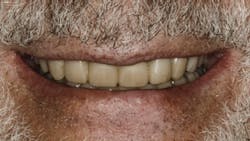
Figure 1: Before provisionals
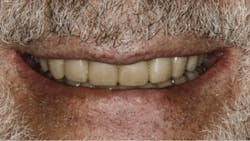
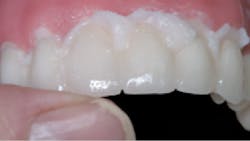
For restorative and cosmetic cases, there is no question that when provisionals are placed for a trial period of sufficient time to get clinical feedback from the patient, a higher success rate of the final restorations is attained (figures 1 and 2).
Figure 2:DuraTemps provisionals aiding in final restorations
Provisionals offer an esthetic and functional prototype for the final restorations, allowing dentists and their patients to evaluate these key aspects of the case:
Esthetic and phonetic aspects
- Is the patient happy with the smile design?
- Do the proportions, midline, cant, tooth position, and length all work in the smile?
- Are phonetics hampered in any way?
Functional aspects
- Ensuring occlusal accuracy
- Evaluating muscle and joint comfort
- Minimizing interferences that cause damage to the restorations
Product description: DuraTemps provisionals
DuraTemps (Burbank Dental Lab) are laboratory-fabricated provisional restorations that are more durable and esthetic than traditional chairside-fabricated provisionals, even rivaling finished restorations. DuraTemps save dentists valuable chair time by streamlining the provisional process and delivering patients a prototype smile at the prep appointment.
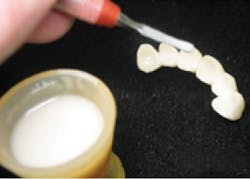
Figure 3: Mix acrylic and fill provisional abutments 3/4 full.
DuraTemps provisionals can be fabricated for single crowns and multiunits, including splinted full-arch bridges. When altering the vertical dimension of occlusion (VDO), using DuraTemps is an excellent way to establish a predetermined, ideal vertical prior to prepping teeth. DuraTemps are highly advantageous for immediate-extraction cases, allowing dentists to shape the ideal pontic site.
Bringing DuraTemps into the practice
DuraTemps can be fabricated from either preoperative or prepped models. They can be used as a diagnostic template for final restorations. Dentists and their patients can preapprove the length, contours, and shade after seating DuraTemps. Once dentists and their patients are satisfied with the modified provisionals, the clinician need only take an impression of the DuraTemps and send it to the lab along with the final prepped impressions. The lab will then use the model of the DuraTemps to use as a matrix for the final restorations.
Figure 4: Wait until acrylic has a slightly dull gloss, then seat in position in the mouth.
DuraTemps increase dental practices’ profitability by reducing the time dentists spend chairside fabricating traditional provisionals. DuraTemps allow dentists and their teams to free up more chair time and be more productive.
Advantages of lab-processed DuraTemps provisionals
The following are some key advantages dentists have found in incorporating DuraTemps into their practices.
Protecting and shaping tissues—One of the most important clinical concerns while a case is temporized is preserving the health and preparing the shape of the tissues. Proper gingival contouring of provisionals is therefore the foundation for success. Lab-processed DuraTemps are the best way to be assured of superior design and finish to protect and shape patients’ tissues. The highly glazed finish also ensures good tissue health.
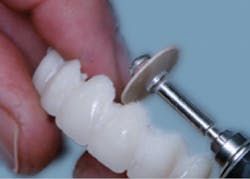
Figure 5: Clean away flash and finish margins.
Saving valuable chair time—Creating properly contoured and esthetic provisionals takes a significant amount of auxiliary and chair time. The technicians who craft DuraTemps do all of the design and finish work so that dentists have quick cleanup and devote minimal chair time to reline.
Eliminating surprises in the final seating of ceramics—The DuraTemps design allows team members to build in each dentist’s specific requirements, minimizing disappointed patients at placement of final restorations. Starting with DuraTemps gives dentists immediate feedback from patients, allowing time to alter the design if needed and get final approval before even beginning the ceramics. This can be done by simply taking an impression of the adjusted DuraTemps in place and sending it to the lab with final-preparation impressions. Burbank Dental Lab’s technicians will use the model of the temps as a design template for the final ceramic restorations.
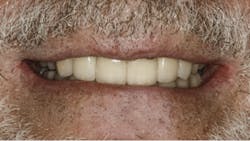
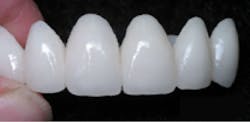
Figure 6: Final DuraTemps provisional restoration
Lab-processed versus direct provisionals
When is it advantageous to use lab-processed provisionals, and when is the direct technique the best solution?
Direct technique—For anterior veneer cases, direct is the popular choice with many clinicians. The preferred method seems to be using a putty impression with a polyvinyl siloxane wash that has been taken of a quality wax-up, then curing a bis-acryl in the mouth using the putty matrix. These typically are not cemented, but rather rely on material shrinkage and undercuts to hold them in place. Cleanup is done in the mouth without removal of the provisionals.
Lab-processed provisionals—Once a case gets more complicated (involving restorations beyond the anteriors or including full crowns in the treatment), indirect lab-processed provisionals become the standard. Some of the advantageous traits of lab-processed DuraTemps are as follows:
- Proper gingival contour
- No staining due to their smooth, glazed surfaces
- Accurate fit
- Patient’s testing of VDO
- Approximate shade
- Desired texture and shapes
- Stronger than chairside temps
- Can have additional strengtheners added, such as wire, metal mesh, or fiber mesh
- Properly proportioned
- Occlusal and functional design
It is essential to make all smile-design decisions with the patient before wax-up or provisional fabrication. Spending this time on the first records-collection appointment gives dentists and lab technicians the tools required to create provisionals that will be the working template for the final ceramics.
Fabrication procedures
The following are key aspects of DuraTemps fabrication procedures:
- DuraTemps provisionals are typically fabricated from pre-op models.
- The prescribed teeth are reduced 1 mm on all surfaces of the model in the lab.
- The tissue sites are shaped for dentists’ prescribed results.
- Reduction allows dentists to seat and reline easily in the mouth after preparation.
- DuraTemps are methyl methacrylate-based and require a cold-cure acrylic to reline.
Chairside procedures for seating lab-fabricated provisionals
Follow these steps to ensure success with DuraTemps:
- Prepare teeth, pack cord, and control bleeding.
- Try-in the DuraTemps to verify passive seating and estimate that the occlusion and vertical dimension are correct.
- After try-in, clean DuraTemps and brush the monomer on the inside of temps.
- Using petroleum jelly, paint the exterior of DuraTemps and the area 1 mm away from the margins, which will prevent the reline material from sticking to the
DuraTemps surfaces. - Mix acrylic and fill provisional abutments 3/4 full. Wait until acrylic has a slightly dull gloss, then seat in position in the mouth (figures 3 and 4).
- Test acrylic for stiff rubbery texture and remove. Do not allow to cure in mouth fully.
- Remove the temps from the preps while curing.
- Clean away flash and finish margins. Use soft rubber wheels or fine acrylic carbide, then polish marginal areas with a fine flower of pumice (figure 5).
- Polish restorations with pumice and acrylic polishing paste, and then use a light-cured glaze such as Palaseal (Kulzer).
- Use the temporary cement of your choice. We recommend noneugenol material if you are bonding final restorations (figure 6).
- If needed, you may reglaze the surfaces of DuraTemps with Palaseal, Luxaglaze (DMG America), or a similar light-cured glaze.
More information
For more information on DuraTemps and Burbank Dental Lab, visit burbankdental.com/products/duratemps.
Reference
1. Donovan TE, Cho GC. Diagnostic provisional restorations in restorative dentistry: the blueprint for success. J Can Dent Assoc. 1999;65(5):272-275.
