Digital workflow for clear aligner therapy
Instagram: @drkrisaadland
The gist:
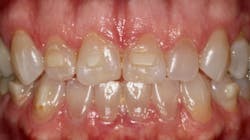
What does a fully digital orthodontic workflow look like? Follow this process for clear aligner therapy from consult to completion, allowing for more conservative esthetic treatment.
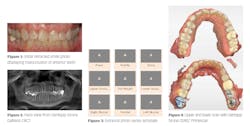
In our office, comprehensive exams start with the hygienist. Our team takes a CBCT (figure 2), extraoral photo series (figure 3), intraoral photos, periodontal charting, and an initial interview to find out any concerns prior to a doctor entering the room. If the hygienist believes there is a need for a digital impression, she will ask an assistant with a scanner to take a quick scan. The best part of the evolution of scanners is that these impressions can be done in less than five minutes. In this case, we used a CEREC Primescan to scan the upper and lower arch as well as the bite (figure 4), and the hygienist let me know the patient’s wishes prior to my exam.
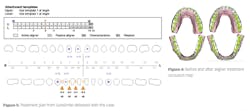
What I love about SureSmile is the responsiveness to both the initial treatment plan and any modifications that may be needed. It is not uncommon to get patients in treatment within two weeks after impressions. With the delivery of trays, you also receive a recipe guide as to where to place attachments, when the attachments should be placed and removed, and where IPR is needed (figure 5). The other plan I love to see is the initial and final occlusion (figure 6). This is a great tool to show the patient how the bite will change. You can also use it as a guide if you need to do any post-op occlusal adjustments.
The T1 shows where the attachments are located. There is an attachment template included in the kit. We start by using pumice on the teeth that need attachments, etch the teeth with Blue Etch, rinse, bond the necessary teeth, fill the template with flowable composite, and light-cure. When it is time to remove the attachments, we polish off the attachments with a red stripe diamond until it is close to the teeth, and then we use an Enhance cup to remove the remainder of the composite without damaging the teeth.
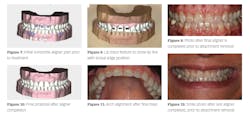
When I look at smile design cases, I like to see where the lips fall in conjunction with the teeth when the patient smiles. As seen in Figure 8, I love the feature of this software that lets me overlay where the lip line is going to be so I can plan future restorations. After 19 weeks of wearing trays, the final result with attachments is still in place (figure 9). The plan was very close to the proposed treatment, and the next step is to remove the attachments and place composite on nos. 8 and 9 to restore the teeth to a more ideal height and width ratio (figure 10). You can see in Figure 11 that the teeth are aligned as we wanted them, and the next step is to replace tooth structure (figure 12).
Editor's note: This article appeared in the July 2021 print edition of Dental Economics.
Kristine Aadland, DMD, graduated from Oregon Health & Science University School of Dentistry in 2006 with clinical honors. In her dream practice, she is constantly pushing the limits of CEREC technology with bridges, implants, orthodontics, and her same-day smile makeovers. Dr. Aadland is visiting faculty for CDOCS in the forum and at their Scottsdale facility, and she travels for CEREC trainings, ACCEPT courses, and other speaking engagements.
About the Author

Kristine Aadland, DMD
KRISTINE AADLAND, DMD, graduated from Oregon Health & Science University School of Dentistry in 2006 with clinical honors. In her dream practice, she is constantly pushing the limits of CEREC technology with bridges, implants, orthodontics, and her same-day smile makeovers. Dr. Aadland is visiting faculty for CDOCS in the forum and at their Scottsdale facility, and she travels for CEREC trainings, ACCEPT courses, and other speaking engagements.


