Effective use of digital photographs for patient education
We live in a society full of conveniences and technology. Digital pictures have become so simple that Grandma can take a picture of the grandkids with her new cell phone and e-mail it to Grandpa across the country instantly. Who would have ever thought this possible even 10 years ago? The use of digital imaging is evolving very quickly in the field of dentistry, but often is not used to its full potential. One tenet in dentistry is the importance of patient education, and digital images greatly enhance our ability to educate patients. Daily, we face the challenge of educating our patients so they can make informed decisions. With easy access to information on the Internet, patients can access many places to learn about every subject ever conceived. Nevertheless, they may have misconceptions about certain dental procedures, or they may have read about a dental material that is just on the horizon. You never know what they discovered or what resources they used. The dentist must have a comprehensive patient-education plan to help patients make good decisions in this world of information - and misinformation. Digital photographs allow you to easily show patients’ conditions, educate them about their options, and portray examples throughout the office.
The different choices of digital cameras, whether intraoral, point-and-shoot, or professional single lens reflex (SLR) cameras, can be daunting. The most important part of your decision process starts with how you plan to use the photographs. For example, images of individual teeth can be captured with an intraoral camera, while SLR cameras can take high-resolution quadrant, occlusal, and smile images. Remember that the ultimate goal is to determine the best method for educating your patients about their conditions. Fortunately, in today’s digital world, most digital cameras are made very well and deliver the intended goals. So, it comes down to your budget. Ironically, most people who buy any type of digital camera, including cameras outside the dental world, make their decisions based on brand-name recognition and “feeling” for the company. Talk with any professional photographer and you will usually hear something like, “I’ve been shooting with (insert brand name) for 20 years, and that’s the only camera I will use.” This is similar to automobile preferences - but not necessarily thought out logically. Therefore, if you avoid the cheapest cameras of the different categories, you will typically have predictable digital images.
Dental images are only as good as the way you portray them to patients. Digital images should be manipulated to enhance the subject. This allows better interpretation for the patient. When done properly, the patient can focus on the area of concern and not be distracted by superfluous information. But, the dilemma most of us face is what to do with the digital image after it has been taken. The image or series of images can be stored in many different types of imaging software, and most practice-management software systems have adequate imaging capabilities. Patterson EagleSoft has an “Advanced Imaging” module that is easy to use and has powerful image-manipulation tools.
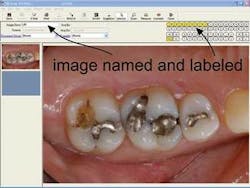
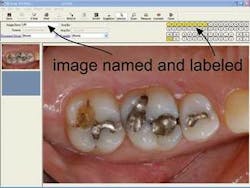
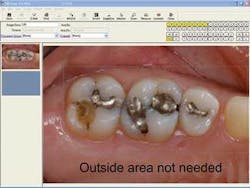
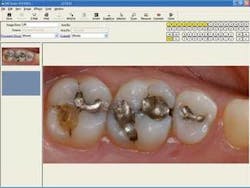
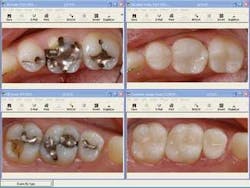
Once the image is in Advanced Imaging, it will be labeled by tooth number and given a description (see Fig.1). This way, it can easily be seen in other areas of the software, such as the chart area or in the treatment plan, and can be used to give the image a caption when printed. This makes for a seamless discussion with the patient as you reference the different images. The imaging software can be used to focus on the important aspects of the image, namely, the teeth. In just a few clicks, the image can be rotated, usually to the horizontal plane, and cropped to remove other areas of the image that have no significance (see Fig. 2, 3). This attention to detail not only improves the appearance of the image, but also impacts the patient’s perception of the quality and professionalism of your practice. Belief in your professionalism and the treatment options you present also helps you fully educate patients.
For treatment-plan presentations, the images should always be printed so patients can reference them during the presentation or later at home with family members. Today’s inkjet printers are relatively inexpensive and deliver beautiful printed pictures. But, the images must be printed on photographic paper of at least a medium grade. Many times a particular inkjet printer will print better pictures when the same brand of photo paper is used. Cheaper, off-brand photo paper does not give your images their best printed appearance. If images are printed on typical document paper, they can lose their detail and be of poor quality. Avoid using the smallest photo paper but, on the other hand, limit the number of photographs per page on the larger sizes. Usually four to six pictures on 8.5 x 11-inch paper is most effective. If more pictures are placed, they may confuse patients and detract from their understanding. It also is very effective to place the images in the same order as the treatment plan. This way, the patient can follow the phases and time line of his or her treatment.
During the treatment plan presentation, it is best to be in front of a large monitor. The patient should have the printed images, written treatment plan, and any other supporting documents. As you or a staff member review the images, it should be done from the monitor because the images can be toggled easily and will be larger and brighter than the printed images (Fig. 4). The printed images can be used for taking notes, highlighting certain areas, and for reference at home, but most of the focus should be on the monitor. During the treatment plan education process, it is always advantageous to point out examples of your previous work (Fig. 5).
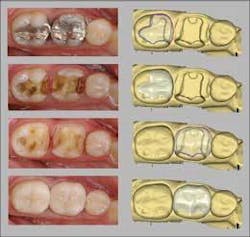
We all have a sense of pride with our dentistry, and it is important that our patients are aware of our abilities. Example images have to look their best to be effective. The dentistry has to be of high quality, of course, but again, the way the image is displayed is more important. Even an average case will look exceptional with the proper rotation, cropping, and mounting. Many dentists just display their work in a before-and-after format. This is acceptable, but includingimages that show the intermediate steps is effective for understanding why the treatment was done. One of the most effective pictures is taken during preparation, which allows visualization of caries, fracture lines, etc. When this picture is made, make sure there is no debris, blood, amalgam dust, cotton rolls, etc., that will distract the patient from focusing on the pathology. The number of images in an example series is dictated by the complexity of the case, but usually a “before” image, a “middle” image, and a “completed” image are adequate. For instance, a quadrant of porcelain onlays would only require these three images. You can easily acheive a professional look when the images are arranged properly (Fig. 6 ).
A nice veneer case traditionally features just the “before” and “after” pictures, but what if you included pictures of the wax-up, the whitening trays inserted, or taking the shade with a shade tab? All of those intermediate steps might spark questions from patientsand help them better understand the process.
A series of example pictures should be printed by a professional printing company for best results. Typically, 8.5 x 11-inch inkjet photographs are not large enough for an effective wall display. If you have many pictures this size on a wall, that is acceptable, but make sure there are not so many that they dilute the intended message. Local or online photography print shops can easily print up to 20 x 30-inch photographs at the highest quality. Contact your printing company to find out the file type (usually jpeg or tiff) and the resolution in dots per inch (usually 200 to 300 dpi) required for the larger prints. This is critical for large printing quality. The easiest way to mount the larger photographs is on ½ or 3/16-inch black foam board from a hobby shop. It has a clean look and will go with nearly any décor (see Fig. 5). Another effective way of displaying your work is with the small LCD screens that appear to be a picture frame. They can continuously cycle through cases all day long, and they are always a conversation starter.
You will need photography software that can manipulate and assemble the images. The practice-management software can easily manipulate the images, and programs such as CAESY allow you to insert before-and-after photos into smile galleries for viewing. You also can use software packages like Adobe PhotoShop and Xara to easily combine the images into a single file for viewing as a series. These two programs are inexpensive considering their digital imaging capabilities, and all are well worth the expense to fully educate our patients.
Photography will enhance a patient’s understanding of his or her condition without having a dental degree. Poor conditions in the oral environment (cracks or decay in teeth, ulcers or lesions in soft tissue, calculus, staining, etc.) are usually not visually pleasing. Therefore, patients can easily discern “good things” from “bad things.” Digital imaging will allow you to condense very complex conditions and situations into a simple thought process for the patient. Effective education in this technological world depends on a properly displayed digital image.
Dr. Todd Ehrlich is a lifetime alumnus of the University of Texas Health Science Center at San Antonio Dental School. He has a passion for photography and conservative restorative options using the CEREC CAD/CAM technology. Dr. Ehrlich lectures nationally, and is the author of “CEREC The Posterior Series.” He may be reached at (512) 263-8332, or e-mail [email protected].
