On your mark, cassette, get organized

Organizing your work space and implementing sound processes will contribute to your dental practice's success and profitability while reducing costs and expenses. With the right plan in place, you will hire the right people, retain your top-notch employees, team up with the right supply companies, organize your practice for efficiency, and keep your patients happy and satisfied with your services.
This article will focus on the organization and efficiency of the sterilization area and treatment rooms.
Sterilization area
Open the cabinets and drawers. Assess the level of organization. Discard unwanted and expired products after consulting the products' Safety Data Sheets for proper disposal instructions to comply with state and federal law.
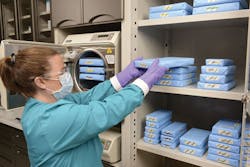
Wipe out and clean the interior drawers and shelves. Store dental supplies and wrapped instruments and cassettes in closed or covered cabinets.1 Do not store dental supplies and instruments under sinks or anywhere such items could become wet.
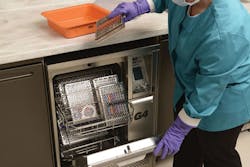
Ensure the flow of the sterilization area prevents cross-contamination with a "dirty" to "clean" task flow. The sharps container and trash receptacles must be located on the "dirty" side where contaminated instruments are received. Next, there should be an area to clean the instruments with an ultrasonic unit or instrument washer. Allow a space for packaging. Maintain a stock of various sizes of pouches to accommodate your setups in addition to instrument-cassette wrap. After sterilization, store the sterile pouches and wrapped cassettes in closed cabinets or drawers.
Save valuable space in the sterilization area for items used for the procedures performed. This is not a place to store personal items such as purses, cell phones, food, or beverages.
In observing workflow, I find that the safest and most efficient dental practices use instrument cassettes. The instruments needed for each type of procedure are stored in the cassettes, so dental staff are not required to touch loose, contaminated instruments. The cassettes are then locked into place, cleaned, wrapped, sterilized, and stored. Minutes saved from sorting and organizing instrument setups translate into dollar savings and precious time that can be devoted to serving patients. In addition, safety is significantly enhanced due to less instrument handling.
Treatment rooms
To prevent cross-contamination, minimize what is stored on the countertop. Some of the most organized and profitable dental offices I have served as a consultant use procedure tubs for storage. Rather than storing numerous tiny consumable products (that end up expiring) in each treatment room, organize your materials in procedure tubs. Color-code your tubs according to the procedure: endodontics, restorative, crown and bridge, etc. In essence, the tubs are like portable operatory drawers.
The challenge that most dental assistants and hygienists face is time. During patient procedures, valuable time is saved by using instrument cassettes. For example, it can be frustrating for clinical team members to interrupt patient care to retrieve a missing instrument or patient care item. Instrument cassettes allow the team to set up for the procedure in accordance with the practitioner's preferences. Always having the instruments needed within the cassette allows the staff to function at an optimal efficiency level. Efficiency translates into greater productivity.
Time studies are helpful in improving our processes. Time the service from the point the patient is seated until the time the room is ready for the next patient. Based on your averages, create an appointment template that fully reflects usage of the treatment rooms and determine the types of devices you need to minimize wasted time.
We are challenged with balancing superior care for our patients, time constraints, and the goal never to compromise safety. This leads us to a discussion of utility gloves. As a consultant, this is a common violation I note in dental office safety programs.
According to the Centers for Disease Control and Prevention (CDC), puncture- and chemical-resistant heavy-duty utility gloves should be worn for instrument cleaning and decontamination procedures.2 In my work with dental groups throughout the country, the question often comes up as to when the assistant or hygienist should don the utility gloves. The Organization for Safety, Asepsis and Prevention (OSAP) provides valuable instruction: After patient care has concluded, change into utility gloves.3 Isolate and remove the instruments.3 Flush the waterlines.3 Remove and dispose of the barriers, and remove the waste.3 Transport the contaminated instruments in a puncture-resistant, labeled, and leak-proof container.3 Although it is not specified that the container must have a cover or lid, it is safer if the container has a cover. The contaminated instruments and cassettes are ready for automatic cleaning. After placing them in the ultrasonic or instrument washer, wash the utility gloves to decontaminate them and prevent cross-contamination.3 Now you are ready to clean and disinfect the treatment room. After cleaning and disinfecting the operatory, remove the utility gloves, wash your hands, and don patient exam gloves.3 It's that easy!
Sometimes it feels like we are running a marathon as we race around the dental office juggling patient care, infection control and prevention, job safety, and efforts to make the practice a profitable business. However, if you get on your mark, cassette, and get organized, you will pass the finish line with success!
References
1. From Policy to Practice: OSAP's Guide to the CDC Guidelines (2004-2012). Atlanta, GA: Organization for Safety, Asepsis and Prevention:52.
2. Guidelines for Infection Control in Dental Health-Care Settings-2003. Atlanta, GA: Centers for Disease Control and Prevention, US Department of Health and Human Services; 2003.
3. Section 5-1. In: OSHA and CDC Guidelines: Combining Safety with Infection Control and Prevention for Dentistry. 4th ed. Atlanta, GA: Organization for Safety, Asepsis and Prevention.
Olivia Wann, JD, RDA, attended Tennessee Technology Center as a registered dental assistant and earned a bachelor's degree in health-care administration from Saint Joseph's College. She graduated from the Nashville School of Law with a doctorate in jurisprudence and is licensed to practice law in Tennessee. In 2000, she founded Modern Practice Solutions, which is dedicated to the compliance issues of dental practices. For more information, visit DentalComplianceTN.com or e-mail [email protected].