Helping dental practices take great clinical photos for more than 30 years
Mike McKenna works with PhotoMed and is an expert in helping dentists capture photographs both intra- and extraorally. I sat down to talk with him about the state of photography in dentistry and ask for some basic advice about getting better photos in my practice.
Joshua Austin: Mike, I met you through Photomed.net. Can you tell us a bit about what PhotoMed does and how you help dentists and their practices?
Mike McKenna: PhotoMed specializes in dental photography. We've been helping dentists and their staff take great clinical photos since 1991.
We make it easy to get started by assembling and setting our camera systems, so they’re ready to go out of the case. Each camera system includes custom instructions along with phone support for the life of the camera. We recognize that these cameras become integral parts of the practice, so we also include our unique loan equipment program in case a camera is dropped or stops working. PhotoMed also carries all the accessories that are necessary for clinical photography.
You might also be interested in: Talking digital workflows and 3D printing: "Nothing has transformed dentistry this much"
JA: I know I had a great experience with my recent purchase from PhotoMed. Can you tell me anything about the state of dental photography? Are you seeing any interesting trends?
MM: Camera technology is always advancing, and mirrorless cameras are the most recent change. Mirrorless cameras don’t have optical viewfinders (which use prisms and mirrors) like DSLR (digital single-lens reflex) cameras, so the cameras are thinner and lighter. Most of the camera manufacturers are phasing out their DSLR cameras and replacing them with mirrorless camera bodies.
Many offices are now using smartphones for clinical photography. The latest Apple and Android phones have very sophisticated cameras. The phone models that include a telephoto camera give you the ability to take closeup photos while maintaining a reasonable amount of working distance between the phone and the patient. We offer an LED lighting system for smartphones.
Cross-polarization has become very popular for lab communication, as well as working with composite and tracking white spot lesions. Cross polarization eliminates reflections on the teeth that can obscure important information. A simple filter attaches to the front of the macro flash with magnets and makes it very easy to take normal and cross-polarized photos.
JA: I got the Canon EOS RP mirrorless system and have been stunned about how great it has been. I had been using a DSLR for years, but now having used a mirrorless system, I can see what all the fuss is about. How would you recommend a dentist who isn’t really using photography other than maybe a USB intraoral camera start their journey in adding photography to their practice?
MM: If someone is new to dental photography, we always suggest a camera that keeps things as simple as possible. Most of our cameras now include the programmable custom shooting modes. This allows you to take great clinical photos without having to know what an f-stop or a shutter speed is, for example—the proper settings have already been set. There’s one mode for portrait views and another for closeup shots.
A standard macro "ring" flash is also recommended when first getting into clinical photography. Unlike other flash options, you don't have to think about the flash; when the photo is taken, the flash illuminates whatever the photographer has focused on.
There are lots of dental education groups that offer classes and seminars on dental photography, and we have books that help to guide the office in choosing which clinical views are best for them. And we are available Monday through Friday for any questions about the camera and dental photography in general.
JA: What would you recommend for dentists wanting to go to the next level with things like portraits and soft boxes? Where is the best place for them to start in getting to the next level?
MM: Ring flashes are very easy to use, and they give you images that are evenly illuminated across the field. The only drawback is that the images appear a bit two-dimensional. Ring flashes fire light in all directions, and this eliminates most shadows. Shadows are one of the ways that we perceive depth in a two-dimensional photo.
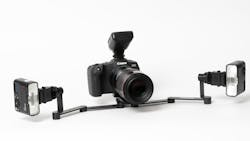
Putting small wireless flashes on a dual-point flash bracket to replace the ring flash gives you more realistic anterior esthetic photos. The flashes are positioned on either side of the smile and are pointed in at a 45-degree angle. These photos will have more three-dimensional depth (due to the minimal directional shadows) and the reflections will be moved to the line angles, and you’ll also see more incisal translucency.
There are accessories like LumiQuest Pocket Bouncers and Mini SoftBoxes that can be attached to the wireless flashes to soften the light for portrait views. Shooting portraits with the dual-point flash system and light diffusers is like having a portable portrait studio. You don't need to dedicate a large part of your office as a portrait area.
Editor's note: This article appeared in the April 2023 print edition of Dental Economics magazine. Dentists in North America are eligible for a complimentary print subscription. Sign up here.
About the Author
Joshua Austin, DDS, MAGD
Joshua Austin, DDS, MAGD, is a graduate and former faculty member of the University of Texas Health Science Center at San Antonio School of Dentistry. Author of Dental Economics’ Pearls for Your Practice column, Dr. Austin lectures nationally on products, dental technology, online reputation management, and social media. He maintains a full-time restorative dentistry private practice in San Antonio, Texas. You may contact Dr. Austin at [email protected].
Updated June 21, 2023

