Positioning for success
by Bethany Valachi, MS, PT, CEAS
For more on this topic, go to www.dentaleconomics.com and search using the following key words: Bethany Valachi, rear delivery, side delivery, over-the-patient delivery, over-the-head delivery, preventing pain in dentistry.
With productivity goals and time management constraints looming, taking the time to properly position yourself and your patients is often overlooked — and your body pays the price. Following these three basic steps for positioning can help you work more comfortably, with less fatigue, and avoid injury.
Operator posture
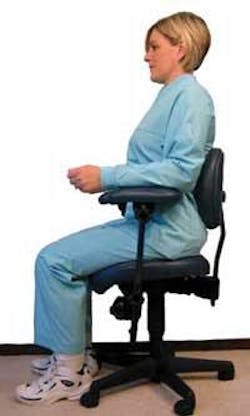
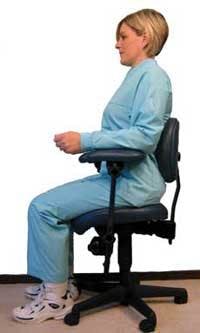
Always adjust your operator stool first to support a balanced working posture. (See Fig. a) Your operator stool should have at least two basic functions: seat tilt and backrest adjustment. The backrest must adjust not only up and down, but tilt toward and away from the operator. In order to obtain the maximum ergonomic benefits of the stool, follow these adjustment steps:
- Adjust the backrest height so the most convex portion nestles in your low-back curve.
- Move the backrest away from your back.
- Sit all the way back on the seat.
- Place three finger-widths behind your knee. If the closest finger touches the seat, the seat pan is too deep.
- Tilt the seat slightly forward (5 to 15 degrees). Begin with the smallest degree of seat tilt and progress up to 15 degrees as comfortable. Most seat pans tilt far more than 15 degrees, however, 10 to 15 degrees is all that's needed to open the hip angle and place the pelvis in a more neutral position. Greater angles can cause slippage forward on the seat and hyperlordosis of the lumbar spine.
- Adjust the height with feet flat on the floor so thighs slope slightly downward. Weight should be evenly distributed in a tripod pattern — on your seat pan and on each foot on the floor.
- Find your neutral pelvic position by alternately arching, then slouching the lower back. Find a comfortable position between the two, and stabilize by pulling navel to spine. Hold this position.
- Bring the backrest forward to have snug contact with the curve of your lower back.
- Have someone adjust your armrest height so that your arms feel fully supported and relaxed without visibly elevating your shoulders. Do not adjust the armrests too high, as this can set off spasms in the levator scapulae muscles and result in neck pain.
- At the highest adjustment, if your thighs are parallel with the floor or only slightly sloping downward, consider ordering a taller cylinder for the stool. On the other hand, if you cannot sit all the way back on the seat pan with your weight equally distributed through each foot and buttocks at the lowest adjustment, try a shorter cylinder.

Patient positioning
It is imperative to take time to strategically position your patient to preserve your best working posture and reduce muscle strain. Remember that the patient is in the operatory for only 45 to 60 minutes. You are there for your career.
Optimal patient positioning requires several strategies — reclined patient chair, proper chair and headrest adjustment, use of cervical positioning aids, verbal instructions to the patient, height adjustment, and lighting.
RECLINE THE PATIENT. General guidelines are to place the patient in the supine position for maxillary treatment and semi-supine for mandibular treatment. These guidelines vary depending on patient tolerance to supine, type of procedure, location of treatment surface, and other variables. Inevitably some patients will not physically be able to be reclined properly due to postural hypotension, inner ear issues, vertigo, and other conditions. This means they must remain in a more upright position, placing the treatment area higher and more forward, which makes access difficult. These cases may be best treated with the operator standing or using a saddle stool to gain a better view and proximity of the oral cavity.

HEADREST POSITIONING. Once properly reclined, the next objective is to position the patient's head to attain a more optimal view of the treatment area. Strategies will vary depending on whether your patient chairs are equipped with a flat or double-articulating headrest.

Flat headrests. Ask the patient to move all the way to the end of the headrest. Leaving “dead” space at the end of the headrest causes you to reach or lean forward and strains your back, neck, and shoulder muscles. This is especially important while treating at the 12 o'clock position. Moving short patients up to the end of the headrest may cause them to be uncomfortably out of alignment with the chair's natural lumbar support. This is easily resolved by placing lumbar, cervical, and/or knee supports under the patient.
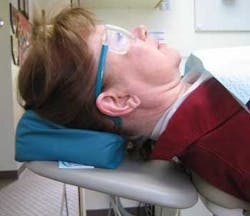
The flat headrest allows you to position the patient's head in three axes: tilting the head up or down, rotating the head, and bending the head to the side. Tilt the patient's head to the desired degree using a cervical roll or pillow behind the neck. (See Figs. b through e) Positioning with ergonomic cushions can greatly improve patient comfort. Neck rotation can be achieved with verbal cues, and side-bending the head to one side is best achieved manually.
Geriatric patients frequently have exaggerated (kyphotic) forward head posture. These patients are more comfortable when supported with a double articulating headrest that is angled forward, or a large soft pillow behind the neck to support the head in a forward posture. Since this positioning keeps the head forward and makes access difficult, it's important to recline the chair of geriatric patients as far as possible. These patients are often more comfortably treated when the operator is standing or is halfway between standing and sitting (i.e., using a saddle-style stool).
Double articulating headrests. The head can be positioned in two axes with a double articulating headrest: tilting up or down and rotation. For maxillary procedures with nongeriatric patients, angle the headrest up into the occiput, which will help relax the patient's neck muscles, and position the chin higher to enable better viewing of the oral cavity. For mandibular procedures, keep the headrest flat, but move it slightly forward.
PROPER PATIENT HEIGHT. A good guideline for achieving proper height is to position the working surface (occlusal surface) to elbow level or slightly higher while operating. Placing the patient too high is a common mistake that can cause shoulder elevation or arm abduction, both risk factors for neck and shoulder pain.
Operator position
LINE OF SIGHT. After properly positioning the patient and equipment, determine which clock position gives you a line of sight that is perpendicular to the working surface (direct or indirect vision) and preserves your optimal working posture. Ask the patient to turn his or her head for easy access. Remember, the patient's head also bends to the side. So if you have a flat headrest, side-bend the patient's head toward you and then ask him or her to turn the head for select procedures. This can often help position the oral cavity two to three inches closer to you and enhance viewing of the treatment area.
For example, while treating the occlusal surface of tooth No. 3 (sealant or direct restoration), an indirect view at the 11 o'clock to 12 o'clock position enables a perpendicular line of sight. On the other hand, the lingual surface of tooth No. 19 may be better seen from the 9 o'clock to 10 o'clock position with the patient's head turned toward the assistant for a direct view. The 12 o'clock position enables the most neutral operator posture, especially of the arms, and should be made easily accessible in the operatory. If needed, swivel or move the patient chair to enable access at 12 o'clock. With all positions, indirect vision using the mirror is an important ergonomic consideration to maintain neutral postures.
Bethany Valachi, PT, MS, CEAS, is a physicaql therapist dental ergonomic consultant, and CEO of Posturepedics, a company that provides research-based dental ergonomic education. She lectures internationally, and is an instructor of ergonomics at OHSU School of Dentistry. Valachi covers these topics and more in her book, "Practice Dentistry Pain-Free," available at www.posturedontics.com or by calling (503)291-5121.