Digital imaging provides more treatment options, easier collaboration, and better patient education: A case study
Joseph Mazzola, DDS, MAGD
Digital technology has long been recognized for aiding diagnosis and treatment planning. However, the benefits extend much further than that. In the case study below, I found that the information captured via 3-D scans and digital impressions allowed me to better educate my patient on potential treatment options, quickly consult with an oral surgeon on whether the treatment was viable, and easily send the digital impressions and prescription to the laboratory. My overall ability to communicate and collaborate was improved in every way thanks to digital imaging.
Patient presentation
In June 2017, a 24-year-old female, non-smoker, reported to our office with the complaint that a bonded pontic replacing No. 11 had broken loose after she had it rebonded while traveling in Europe.
Visual examination revealed a loose composite pontic replacing a congenitally missing No. 11 and a ridge space between Nos. 10 and 12. The patient reported that the adult tooth was congenitally missing, which was why she had the bonded pontic.
The pontic was rebonded. However, the patient requested a permanent solution for her missing tooth.
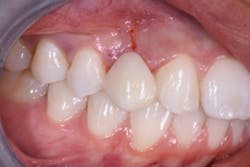
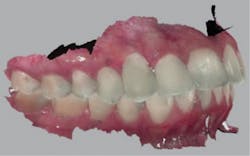
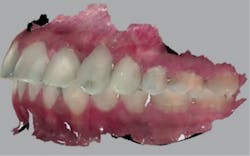
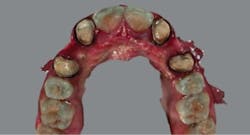
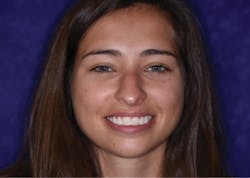
At a subsequent appointment, a thorough examination was completed. The exam included study models, x-rays, CT scans, digital models, and photographs (figures 1a and 1b).
Figures 1a and 1b: Photographs upon presentation

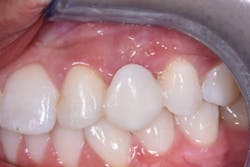
A visual examination revealed normal dentition with no apparent decay, healthy periodontium, and congenitally missing Nos. 6 and 11 with a retained primary crown tooth C held in by gingiva and less than a third of the primary root. The patient was post-orthodontic and exhibited Class I occlusion with a 2 mm overbite and 2 mm overjet. Noted were some minor centric occlusal prematurities, canine rise both right and left with no balancing prematurities, and no evidence of parafunction.
Treatment discussion with patient
The primary treatment discussion with the patient included the following:
- Removing the retained crown C
- Bone grafting to build up the facial lingual profile of the ridges of Nos. 6 and 11
- After graft healing, placing dental implants with immediate temporary crowns to guide the tissues
- Final custom ceramic abutment and crowns
Alternate treatment plans were discussed, including: routine crown and bridge; two three-unit bridges in which Nos. 5 and 7 and Nos. 10 and 12 would serve as abutments and Nos. 6 and 11 as pontics; and two winged Maryland bridges.
Each procedure was discussed in regards to expected outcomes, longevity, functionality, and potential complications. The patient was dismissed and appointed for a final treatment discussion to take place after digital models, a CT scan, and a diagnostic wax-up could be examined.
Diagnostics
CT results showed that the proximity between the adjacent bicuspid and lateral incisor root apices in both positions, Nos. 6 (4.17 mm) and 11 (3.14 mm), only allowed for short, small-diameter, pin-screw-style implants. The ridge width in implant positions No. 6 (4.43 mm) and No. 11 (5.22 mm) were limited but could be expanded or grafted for a better result if a wider implant could be placed. But again, the root proximity and ridge height ruled out this increased diameter.
Further studies were completed by sending the CT’s DICOM file with an accompanying STL file of the maxillary arch to 360imaging. This was done to have the data sets overlaid and to have a consultation with 360imaging’s attending oral surgeon to confirm implant placement.
Consultation with the oral surgeon concluded that only extremely small pin-screw-type implants could be placed without further orthodontic root-torque movement. This orthodontic movement of the roots had previously been attempted and was not successful, and therefore the patient declined more orthodontics.
Further discussion concluded that the longevity would be limited for a small-diameter, short pin-screw implant that needed to function in disculsion. Moreover, the poor tissue-emergence profile could not render an esthetic and long-term functional canine tooth.
Ultimately, the patient decided on the two three-unit ceramic bridge solution.
Treatment
Temporization
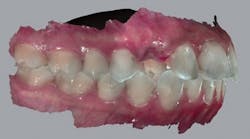
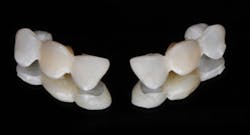
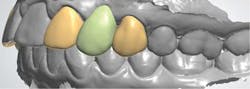
A diagnostic wax-up was completed and two composite pontics were fabricated (figures 2a and 2b). The temporaries were removed and a CS 3600 intraoral scanner (Carestream Dental) was used to capture a maxillary full-arch edentulous scan, a full-arch mandibular scan, and a virtual check bite (figures 3a and 3b). The pontics were temporarily bonded in the edentulous zones to assess esthetics and function. Then, a full-arch maxillary, full-arch mandibular, and virtual check-bite scan were completed with the CS 3600 (figures 4a and 4b). All files were saved for later submission to the laboratory for digital milling.
Figures 2a and 2b: Completed wax-up and fabricated composite pontics


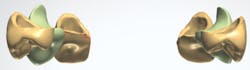
Figures 3a and 3b: Edentulous virtual check bite using intraoral scan
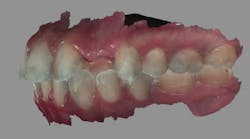
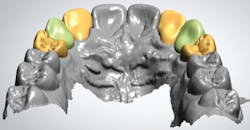
Figures 4a and 4b: Virtual check bite with temporaries
The STL files and desired prescription were downloaded by the milling laboratory through the Carestream Dental CS Connect web portal. A virtual design of the final restorations was then fabricated by the technician for evaluation.
Using design software, the existing anatomy of the abutment teeth were incorporated into the final abutment design (figure 5). The design was accepted and low-reduction ideal preparations from the software database were substituted for the abutment teeth on the edentulous model. The accepted restoration design with existing abutment anatomy was cut and pasted over the edentulous model, which had the preparations in the abutment positions (figure 6). Once the design had been completed, the temporary restorations were milled using poly(methyl methacrylate) (PMMA; figure 7).
Figure 5: Final abutment design

Figure 6: Final design superimposed over edentulous model

Figure 7: Milled PMMA temporary restorations
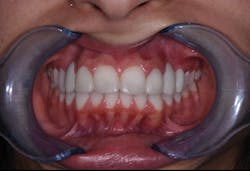
Once the temporaries were delivered from the laboratory, the patient was appointed for preparation and placement. After placement, the patient was dismissed to evaluate esthetics and function (figure 8).
Figure 8: Placement of fixed temporaries for patient evaluation
Final restorations
The patient was allowed to wear temporaries for two months. After all occlusal and esthetic concerns were resolved, continuation to the final restoration proceeded with digital impressions taken with the CS 3600 intraoral scanner.
First, a full-mouth scan, which included the temporaries in place, was taken (figure 9). Then, the temporaries were removed and a full-mouth scan was completed that included the preparations and the pontic area (figure 10). Check-bite scans were completed for each set of digital models, custom shading was completed, the temporaries were recemented, and the patient was dismissed.
Figure 9: Full-mouth intraoral scan with temporaries in place
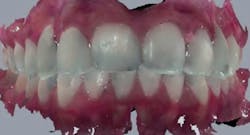
Figure 10: Full-mouth scan with preparations
The digital models were submitted to a milling laboratory using the Carestream Dental CS Connect portal. This included communication of a written prescription and necessary instructions for the fabrication of two three-unit Pearl zirconia bridges replacing Nos. 6 and 11.
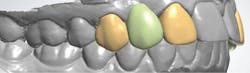
Software by 3Shape was used to design both bridges based on overlaying the accepted temporary design onto the digital preparation model. 2-D screen shots and a 3-D video of the design desktop were returned to us via email for evaluation (figures 11a–11e).
Figures 11a–11e: Design for evaluation
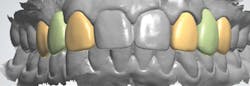
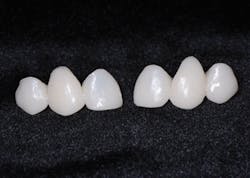
When the design was accepted, restorations were sent to the milling department for completion and delivered to my office for seating (figures 12a and 12b).
Figures 12a and 12b: Completed restorations

Joseph Mazzola, DDS, MAGD, graduated from Regis University with a bachelor of science in chemistry in 1979. He attended Loyola University School of Dentistry, where he chose to complete additional specialty work in both periodontics and oral surgery. Following graduation in 1983, Dr. Mazzola began general practice dentistry in Broomfield, Colorado, where he began his studies of temporomandibular disorders and occlusion and their link to periodontal disease.