Overcoming the fiscal drain of repeating final impressions
WHILE DATA VARIES based on the reporting source, digital scanners have penetrated dental practices at under 20%. The advantages of digital capture are well defended in the literature with respect to accuracy, but the fact remains that the majority of practitioners are still using an analog impression medium in their practices. The focus of this article will be to discuss best practices for impression taking, while introducing a recently released iteration of polyvinyl siloxane (PVS) impression materials with improved characteristics compared to traditional entries in this class.
PVS impression materials have served the dental profession well for decades. As formulations improved and popularity increased, these materials replaced competitive classes—such as polysulfides, polyethers, and reversible hydrocolloids—as the most prevalent material used in practice to capture crown and bridge impressions. It can be argued that no other procedure in dentistry has such a critical link to outcome quality than a final impression used to fabricate an indirect restoration. Unfortunately, the evidence suggests that 86% of final impressions submitted to commercial labs have at least one critical error, and 55% of noted errors critically involve the finish line.1 This issue is complicated by the fact that the quality of a final impression is not standardized across practitioners.
The economics
All too often, we lose sight of our most costly commodity in practice—provider time. The average private practice in the US runs at an overhead rate of $400 per hour.2 All too often, I see doctors who seem resigned to the fate that a certain number of impressions must be repeated and a certain number of final restorations may not fit, leading to a repeat of the entire process—added appointments for patients and a huge opportunity cost.
The material cost of an average full-arch final impression is estimated to be just over $20. This can easily be approximated by adding up average PVS, retraction/hemostasis, mixing tips, adhesives, and tray component costs from supplier catalogs. However, at $400 per hour, total provider overhead lands at $7 per minute. Let’s run through a typical scenario for a single-tooth restoration once preparation is completed and tissue management and final impression procedures are initiated.
- Hemostasis and tissue retraction: five minutes
- Preimpression cleanup, retraction evaluation: one minute
- Impression material delivery (working and set time): five minutes
- Removal and evaluation: 30 seconds
We can quickly see that even in the simplest clinical scenarios, there is an 11.5-minute time drain, which equates to a procedural cost of $77. This obviously far outweighs the $20 cost of materials only. Now, what if this scenario was repeated weekly in practice? What if it was repeated daily in practice? What if the time drain is magnified because of a failed multiunit impression? What if we are using a two-cord technique for an 8- to 10-unit esthetic zone impression? Or worse, a 14-unit full-arch rehab impression where tissue management has to be repeated in its entirety?
We can quickly see scenarios where hours of overhead time are wasted on retaking impressions. This, of course, is further magnified by the fact that new, billable procedures could have taken place during that time. Finally, what is lost when a patient is provisionalized and sent home, and then returns for the cementation procedure several days later? When faced with the unpleasant surprise of a poor-fitting restoration, the procedural cost and loss are exponentiated for both parties!
Material characteristics
Some of the advantages of PVS materials include dimensional stability over time, accuracy, ease of handling, delivery, and storage, as well as allowing for multiple pours. While PVS materials seem to surpass other material classes across the broad-comparison parameters listed, they are not without limitations and some relative disadvantages. These include being generally hydrophobic in nature, technique sensitive, and having tear-strength and rebound-accuracy limitations. In an effort to overcome some of these issues, manufacturers have formulated and released next-generation PVS materials through commitment to R&D. One example of such material is V-Posil (Voco).
When considering moisture tolerance, the key measurement is referred to as contact angle. Traditional PVS materials would have a contact angle greater than polyether materials. However, the improved class of PVS materials demonstrates lower contact angles than polyether. It follows that these materials would have an easier time adapting to critical anatomy, such as a margin, in the presence of moisture. Critical to note, this attribute also equates to wettability of an impression. Since traditional gypsum materials are mixed with water, the more hydrophilic the material, the more accurate the model pour achieved.
Clinical cases
There are several popular techniques and deliveries for making final impressions. These often involve using a combination of viscosities in either a single-phase simultaneous set procedure or a two-step procedure. While many doctors have their favorite impression technique that has developed as a result of a number of factors, I prefer to choose from a variety of techniques based on the specific clinical situation and compounding challenges.
Case No. I
Figure 1 displays a typical single-unit crown impression of an upper first molar. Quite often, a triple tray is chosen in practice by a vast majority of practitioners. Unfortunately, triple trays are overused in private practice, because outcomes can be compromised in several scenarios. These include bites that are difficult to reapproximate by the lab, cases when the patient is missing a minimum number of posterior stops, or when deflective anatomy causes expansion and rebound distortion on a flimsy triple tray.
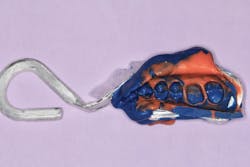
You will note the particular tray used in Case I (Quad-Tray, Clinician’s Choice) shows a metal-reinforced bow. This design significantly reduces the potential for rebound distortion. I also use a heavier body tray material (V-Posil Heavy Soft Fast) as the primary tray filler instead of a less rigid material or a monophase-type hybrid material. A highly flowable wash material (V-Posil X-Light Fast) is injected around the preparation and into the occlusal anatomy of adjacent teeth to pick up optimal detail. Figure 2 displays optimal margin and flash capture that is typically inspected under magnification. If 100% of the margin and critical preparation anatomy are not captured, this procedure would call for a redo.

Case No. II
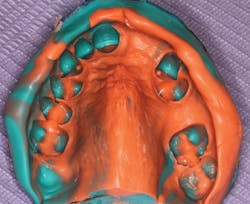
The impression in Figure 3 is taken with a custom tray fabricated from a previously prepared study model. Ideal extensions and a relatively uniform material space are advantages of a custom tray over a stock tray. I consider this a standard for fabricating removable prostheses. While this impression was also fabricated with a dual material, single-step approach, a slightly lower viscosity base material (V-Posil Mono Fast) was selected as the primary tray filler, while the critical tooth and anatomy detail were again captured with a wash (V-Posil Light Fast) injection over the critical areas. The elimination of the higher durometer tray material used in Case I was forgone, as the rigid custom tray required no additional support to ensure against distortion. However, as with most partially edentulous scenarios, a slightly more elastic monophase material allows for easier removal of the set impression from undercuts.
Case No. III
The final case demonstrates one of my most foolproof and versatile impression protocols. The two viscosities employed are a true putty (V-Posil Putty Fast; handmixed catalyst/ base) and a wash (V-Posil X-Light Fast). I use these materials exclusively in stock trays sized accurately for the jaw. This is commonly referred to as a two-step putty/wash technique. However, sometimes I choose to modify the delivery to a staggered one-step. The clinical situations where I prefer the staggered one-step are those for which a very accurate master impression or model is needed for fabrication of exacting appliances, such as splints, sleep appliances, or orthodontic clear aligners.
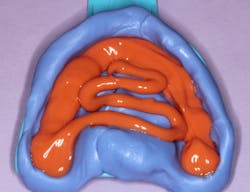
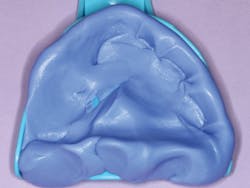
Figure 4 shows putty (V-Posil) that has already been hand mixed, rolled into a sausage shape, and placed into the appropriately sized maxillary tray. Notice that putty also extends to the palatal extension of the tray that would approximate the hard/soft palatal junction rather than only in the dental ridge areas. Figure 5 shows placement of finger indentations for tooth spaces, coupled with pinching and elevation of the putty at the palatal seal area. The tray is then immediately taken to the mouth and firmly seated in the maxillary arch. The purpose of the elevated palatal ridge of putty is to create a custom seal matching the patient’s palatal arch that will become a dam, which prevents wash extrusion and potential gagging. However, the unset putty is not held in a static position.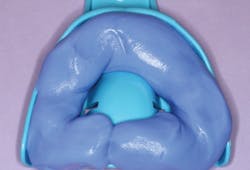
In fact, immediately after seating, I rotate the tray handle just a bit left to right to unseat and reseat the tray a few times. This motion serves two purposes. The lateral motion creates a bit of space, and the lifting and reseating expands the putty past the heights of contour of all the teeth to clear undercuts. These actions create a small bit of space for wash to flow and travel, rather than create excessive hydraulic forces that could cause minimal deflection of the putty and undetected rebound distortion. However, the close approximation of the putty serves to drive the wash into all of the microspaces.
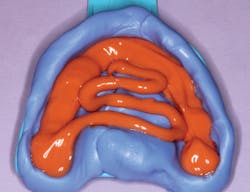
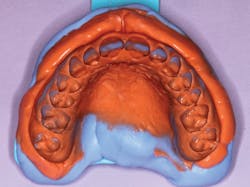
Figure 6 shows the spaced putty removed from the mouth while still unset with an appropriate amount of wash loaded in the putty. Since neither increment is set, the two materials congeal together very nicely. The tray is now reseated into the arch with static and consistent pressure until set. Figure 7 shows the optimal final impression with detailed borders and all hard and soft tissues captured.
When I have multiple preparations to impress (up to and including a full arch of preps), I will employ this exact technique of putty fabrication described but graduate to a true two-step technique. In other words, the putty tray is fabricated at the beginning of the appointment before teeth are prepared (i.e., built-in spacing). The tray is put aside, and the putty will fully set. Upon completion of the tissue management and sulcular retraction, the doctor’s focus will be to deliver wash through his or her preferred syringing technique around multiple preparations.
Discussion
While I routinely take digital impressions in practice, I also come upon certain clinical scenarios that have complicating arch forms, tooth angulations, and limited openings where analog impressions are the answer. When improved materials with better performance characteristics are added to the equation, the likelihood of successfully capturing any impression on the first try significantly increases.
References
1. Rau CT, Olafsson VG, Delgado AJ, Ritter AV, Donovan TE. The quality of fixed prosthodontic impressions: An assessment of crown and bridge impressions received at commercial laboratories. J Am Dent Assoc. 2017;148(9):654-660. doi:10.1016/j.adaj.2017.04.038.
2. Levin RP. How does your overhead compare to national averages? Dental Economics website. https://www.dentaleconomics.com/money/article/16391806/how-does-your-overhead-compare-to-national-averages. Published August 26, 2015. Accessed August 6, 2019.
About the Author

Foroud Hakim, DDS, MBA
Dr. Hakim has lectured nationally on technology, esthetic dentistry, occlusion, and adhesive and composite dentistry. He is former vice chair of the Department of Integrated Reconstructive Dental Sciences at the University of the Pacific, Arthur A. Dugoni School of Dentistry, and a director in the university's Esthetic and Complex Care Clinic. He is in private practice in San Ramon, California. Contact him at [email protected] or [email protected].