Endodontics posts — having success with the latest systems
by Jack D. Griffin Jr., DMD, FAGD
Nothing is more frustrating than having a patient walk in holding that awesome crown I placed last year with the post and core build-up stuck inside it. Maybe there should be some comfort knowing that the procedure wasn’t a total failure … at least I had the core securely bonded to the crown! Was my material choice incorrect, my bonding technique faulty, or should I have repeated the fourth year of dental school?
The three basic choices for post materials are: 1) cast gold, 2) stock metal, and 3) stock metal-free. Dentists base their choice of post materials on cost, perceived esthetics, and ease of use, in addition to their physical properties. Most practitioners rely on the basically clear fiber or ceramic posts. These offer a more esthetic result because of their metal-free construction, result in less tooth fracture because of flexibility, allow for some curing of intraroot adhesive material due to light transmission, and have suitable strength to help anchor the restoration to the remaining tooth.
Efficiency in endodontically-treated teeth depends upon correct post and core selection and techniques to give predictable, long-term results. Choosing the appropriate post system can be a bit confusing for the dentist, especially with the newer systems and their perceived advantages. The following discussion will focus on how to choose these stock metal-free posts and techniques to use them with dependability and efficiency. Two cosmetic cases will be used as examples.
Development in post design
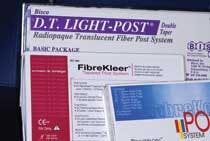
These “fiber posts” use quartz or glass fibers that are held together by a resin or epoxy matrix. Their basic translucency offers esthetic advantages over metal posts, which may impart a grayish color to the restoration and gingival margin. Despite their sacrifices in strength compared to metal posts, advantages in flexibility and esthetics may make them an advantageous choice in esthetic post placement. These posts come in varying shapes, light-transmission capabilities, surfaces, head shapes, and diameters (Figure 1). All of these characteristics affect post performance.
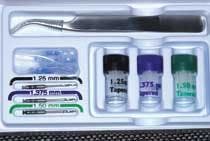
The post systems usually come in kits of two to six sizes, and often have matching color-coded accessories for ease of use and organization. Some manufacturers include forceps (Figure 2) to decrease contamination by hand oils or glove powder. Post fees range from $6 to $15 per post. Refills are less expensive than initial kit purchases.
Advances in post design today have primarily come from improvements in the esthetic, clear posts (Figure 5). Very similar in construction to the D.T. LIGHT-POST® is the new ILLUSION post from BISCO. It has quartz fibers in a resin matrix, and comes in colors which become clear when heated to body temperature (Figure 6). This aids in identification and placement.
Parallel vs. tapered
Both parallel and tapered posts have their advantages. Obviously smaller at the apical end, tapered posts reduce the amount of dentin needed for placement and thus conserve tooth structure — i.e., tapered tooth, tapered post. However, there may be a higher risk of root fracture because the stresses absorbed by the tapered sides concentrate at the apex.
Parallel posts offer greater retention than tapered ones, despite the more aggressive dentin removal before placement (Figure 4). Because they distribute forces along the long axis more evenly than tapered posts, parallel posts may lead to less root fracture. Some fiber post designs have a combination of parallel in the coronal portion and tapered only at the apical end of the post. This may combine the better qualities of both designs.
Post surface finish and head design
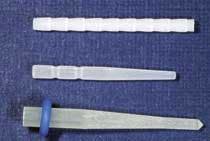
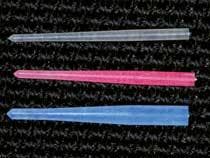
Fiber posts are passive when inserted, and none have threads which may impart unwarranted root stresses (Figure 3). They instead rely on micromechanical retention of the bonding and luting agents. The top post in Figure 3 shows a macro-mechanical undercut pattern which also aids in retention. This post, FibreKor (Pentron), is a parallel-sided post with a pattern and shape similar to widely used metal posts.
The bottom post — the D.T. LIGHT-POST — has a tapered form toward the apex, with parallel sides coronally. It comes with a rubber stopper to help with placement. The middle post — Pentron’s FibreKleer® — also comes with similar varied tapering and has macro-mechanical grooves that may help coronal core retention. The glass fibers are visible throughout the posts, and the clarity allows some light transmission to help during luting and with the chameleonlike effect.
Post drill design
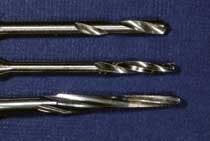
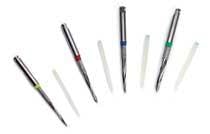
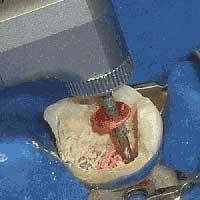
The drills for each of these post systems are available in similar order to posts — smaller to larger. The drills used to create post chambers for parallel posts are far more aggressive than the apical portions of the post prep, which may weaken the tooth and increase the chances for root fracture and lateral perforation. Usually, multiple drills are required to create post preps, and other drills are used to excavate existing root canal fillers. The UniCore drill, which is part of Ultradent’s UniCore post and drill system (Figure 7), is sized to match a correlating post, but it is unique in dentistry because it can also be used to remove stubborn, existing obturators (e.g., Thermafils, gutta percha, composite in canals, etc.), and even fiber posts that need to be excavated for retreatment. Most systems require a phalanx of assorted drills to accomplish these post preps as well as removing existing posts.
Using posts with resin-based sealers
Traditionally, placing a post in the same visit as root canal therapy has been achievable only if gutta percha was the obturation filling material. In recent years, resin-based filler/sealers are becoming more and more prevalent. However, some sealers take up to an hour to cure before a post space can be created. EndoREZ® from Ultradent (Figure 8), one of the most widely available resin-based sealer products, has an adjunct product that sets the filler/sealer in minutes so that practitioners can move to definitive coronal procedures, such as post and core within the same, single appointment.
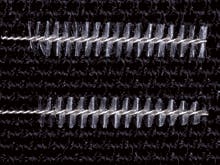
The SpirapostPFS™ from Zenith Dental (Figure 9) has developed a post that looks very much like a pipe cleaner. It has polyfiber strands connected to a twisted metal carrier placed into a canal that has been Gates Glidden prepared, etched, bonding agent applied, and filled with a core build-up material. The Spirapost does not stress the root and it is not necessary to overprep the canal to make room for the post. These are easy to place and may prove to be time-saving. They come in both a straight and tapered design.
Sample post case No. 1 — post placement and esthetic mock-up
A patient with worn dentition from acid regurgitation had endodontic therapy on all four upper incisors. The patient wanted a better smile and treatment of decayed anterior teeth. After the acidic episodes were brought under contol, a plan was made for decay removal, post placement, and all-porcelain crown placement. Post space was created for D.T. LIGHT-POSTs using drills, so that the length was greater than the intended final coronal restoration length for adequate retention, and about 2 to 3 mm apical to the crestal bone. More emphasis was placed on post length rather than the diameter so that root weakening was lessened.
The posts were tried in and the stoppers moved to mark the incisal edges so that complete seating was verified upon placement. The posts were then removed, wiped with alcohol, and coated with a dual-cure bonding agent (Cabrio from Discus Dental®). After complete removal of the old filling material and decay, 37 percent phosphoric acid was placed to etch the entire canal preparation as well as the facial surface of the teeth. Rinsing was thorough after 10 seconds, excess moisture was removed, and the same dual-cure bonding agent was applied and air-thinned.
An automix core build-up material (Build-It® FR™ from Pentron), shade A2, was loaded into each canal post preparation and the posts placed one at a time. After all four were seated, excess build-up material was placed to roughly the desired finish height of the teeth. This material was then cured, shaped, and contoured to roughly the desired height-width ratio of the teeth for the desired outcome. The teeth were then prepared with margins placed a minimum of 2 mm from any build-up material. This ferrule increases fracture resistance while making potential retreatment more plausible.
This is a very efficient way to do the core build-ups and direct mock-up simultaneously. The mock-up shape guides the lab construction and the final result gives a highly esthetic appearance without the risk of metal-post color influence. This creates a predictable and stable result with a natural appearance using pressed ceramics with a clear luting cement and little opacity intended in the restorations.
Sample post case No. 2 – post placement and matching build-ups
In a similar manner, parallel-sided posts with macro-mechanical means may be chosen when there is a lack of coronal tooth structure to aid in core retention. A smile enhancement was desired by a young female patient who also needed endodontic therapy on three of four incisors and a cuspid with posts and build-ups in all teeth. Laser tissue recontouring was also indicated.
After endo was completed in several anterior teeth, decay was removed after verification by a caries indicator. Preparations were then made for parallel sided posts using FibreKor™. These posts were chosen because of the need for additional retention.
As noted before, preparations were completed to at least the length of the final desired clinical crown, teeth were bonded, build-up material was placed directly into the canals, and posts were seated and then light-cured. The build-ups were then completed before setting of the material in the automix tip, followed by curing and shaping.
The final result was a research-backed, strong build-up which blended in with the natural tooth colors very well. This allowed the ceramist to create natural-looking restorations (as natural as bleach shades get) without using opaque porcelains or luting materials. A much-improved smile was achieved with sound mechanical build-up and post-retained restorations.
Predictable and efficient
The advancement in esthetic post materials — when combined with sound science-based tooth preparation and luting techniques — can provide the esthetic-minded clinician with a predictable and efficient prosthesis foundation. Now, if I could just get my endo fills to the apex each time!
Editor’s Note: References available upon request.
Dr. Jack Griffin has maintained a full-time practice in St. Louis County, Mo., since 1988. In a busy practice, his office has consistently maintained a 50 to 55 percent overhead doing all phases of dentistry with an emphasis on cosmetics. The practice is focused on current technologies, materials, and procedures. Dr. Griffin is the head of the Missouri MasterTrack AGD program and the St. Louis area CEREC study club. He also speaks at many study groups and courses. Contact Dr. Griffin at [email protected].
Advantages of Fiber-Resin Post Systems
- Metal-free, more esthetic result
- Ability to transmit curing light
- May provide flexibility to decrease root stresses
- Bondable, not cemented, which may aid in retention
- Will never corrode and are relatively easy to remove for endodontic or restorative failure
- Biocompatible
Keys to Increase Success of Esthetic Post Placement
- Always remember that posts merely aid in restoration retention. Instead of strengthening the tooth, they may weaken it.
- Choose systems that are organized, color-coded, and offer multiple diameters.
- Err on the side of tooth conservation; post length is more retentive than diameter.
- Prepare a post depth as long as the intended finished crown length.
- Prepare the tooth margin at least 1 mm to 2 mm below the build-up.
- Use dual-cure bonding agents and luting materials to ensure material cure regardless of post light transmission.
- Communicate final build-up shades so the ceramist can limit restoration opacity.

