Ask Dr. Christensen: Guided versus freehand dental implant placement
Q:
As a general dentist, I am considering becoming more involved with placing dental implants. I have attended several implant surgery courses and placed a few root-form implants, but I have a question that continues to bother me. Should I orient my practice toward only placing implants using surgical guides, only placing them freehand, or doing both methods?
A:
More dentists-specialists and generalists-are placing implants. In many countries, implant placement by general dentists is as common as placing composite resin restorations. At this time, using a surgical guide as a routine procedure is controversial.
Consider the placement of implants from a historical perspective. When the original developers of the root-form implant placement concept introduced this technique to the profession, there were no cone beam devices and little or no adaptation of conventional CT radiography to dental implants. Dentists who became involved in placing implants did so with the help of diagnostic casts, panoramic and periapical radiographs, and occasionally tomographic images (individual facial-lingual radiographic slices). This orientation was present until the introduction of cone beam imaging about 15 years ago.
READ MORE |A cost-effective method of creating a dental implant surgical guide for ridge augmentation
Therefore, more than 15 years of implant placement passed without using cone beam or today's sophisticated guided-placement techniques. Undoubtedly, there were many mistakes made, and some implants could have been placed in better locations. However, the long-term service characteristics of root-form implants and their approximately 95% success rate is proof of the historical techniques' viability. Directly related to the introduction of cone beam imaging, guided placement of implants has been available for several years and is becoming more used in the profession.
Is guided placement better than freehand placement? Is guided placement mandatory or elective? Should you be considering guided placement for all of your implant placements, none of your patients, or only selected ones? Does it take more time and cost more money for your practice to use guided placement routinely? I will answer these questions for you in the following narrative.
Current typical technique for guided implant placement
Access to cone beam is necessary for guided implant placement. You may choose to purchase one individually or with other dentists, find a practitioner in your area who will provide acceptable images for you, or send the patient to a local cone beam radiographic laboratory that can make proper images.
You need to obtain enough continuing education to learn how to interpret the cone beam images, or have an oral and maxillofacial radiologist interpret them for you. In my opinion, it's best to learn how to read them yourself and then use a radiologist when you need help.
Send cone beam information to a laboratory of your choice. There are hundreds of labs that will be pleased to make a surgical guide for you. Costs vary among labs.
The following steps are usually involved in making a surgical guide:
1. Make a diagnostic appointment with the patient and obtain his or her agreement on placing the implant(s).
2. Make an impression, either a conventional one or a scan for a virtual model.
3. If you made a conventional impression, pour and trim the cast.
4. If the impression was a scan, transmit the virtual impression to a laboratory of your choice.
5. Sign up at the laboratory of your choice.
6. When you sign up at the lab, you specify a) the implant manufacturer you plan to use, b) the brand or type of implant within that company, c) the surgical kit you will be using, and d) which arch-maxillary or mandibular
7. You may or may not request a wax-up by the lab.
8. The lab will send you an electronic potential plan or plans for your implant placement.
9. Communicate with the lab to discuss the potential plans, and approve the plan of your choice.
10. The lab will send you a further detailed plan for the placement.
11. Communicate with the lab for final approval of the plan.
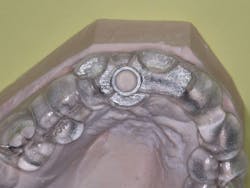
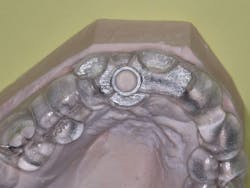
12. The lab will make the guide and send it to you (figures 1 and 2).
13. If every step has been done correctly, you have a very accurate guide for placing the implant(s).
14. Place the implant(s).
Figures 1 and 2:
The lab has made a printed surgical guide for a specific case. The designated drill is easily related to the guide and provides near-perfect placement of the implant.
Advantages of guided implant placement
• If all the steps in the described procedure above are correct, the implant placement is almost foolproof, accurate, fast, nonthreatening to the clinician, and predictable.
• Guided placement produces confidence for the clinician that the best technique has been accomplished, and the implant is in the most appropriate location.
Limitations of guided implant placement
• An absolutely accurate impression (conventional or virtual) is mandatory.
• An absolutely accurate stone cast or virtual model is mandatory.
• Guides are no more accurate than the impressions and casts/models sent to the lab.
• Significant time involvement is required to plan the guide, including communicating with the lab that makes the guide.
• There is a cost for making the guide, although some third-party payers will provide some financial benefit.
• When using most labs, there is a delay while the guide is being made.
Current typical technique for freehand implant placement
1. Make a diagnostic appointment with the patient and obtain his or her agreement for placing the implant(s).
2. Make an impression, either a conventional one or a scan for a virtual model. Most dentists make a typical conventional diagnostic impression.
3. If you made a conventional impression, pour and trim the cast.
4. Analyze the casts and the radiographs-panoramic, periapical, and preferably cone beam.
5. Determine the implant type, brand, diameter, length, and apparent bone density for the sites involved.
6. Place the implant using the freehand technique described later in this article.
Advantages of freehand implant placement
• Communication time with laboratory about the guide is eliminated.
• The dentist saves significant time by not having to make the guide.
• Depending on your clinical schedule, there is no major wait before implant placement.
• Cost of making the guide is eliminated.
Limitations of freehand implant placement
• You are required to make clinical judgments on implant placement based on visualizing the clinical situation from the information provided by the casts and radiographs.
• Placement of the implants usually requires significantly more time than with the guided technique, since you must think and plan while placing the implants.
• Paralleling numerous implants is more difficult using the freehand technique.
• The technique is not as predictable as adequately accomplished guided placement.
• Most clinicians do not have as much confidence using the freehand technique as when placing implants with a guide.
Where are we when comparing the two implant-placement procedures? I have placed implants for more than 30 years, and I have communicated with many who have had similar experiences. With that experience, I have the following current opinions relative to the two procedures. My opinion may change as guided placement becomes simpler and less expensive, and as cone beam becomes more dominant in the profession.
Placing single implants in healthy patients who have adequate bone:
• This situation accounts for the vast majority of implants placed currently.
• The freehand technique is the most used and probably the most appropriate at this time.
• The following freehand technique is simple:
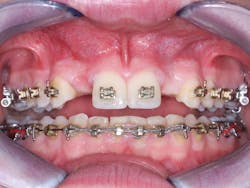
1. From a facial orientation, place the implant osteotomies in the center of the edentulous space from a mesial and distal orientation, using periapical radiographs to verify the parallelism and appropriate distance from the adjacent teeth (figure 3).
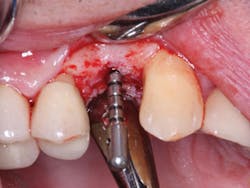
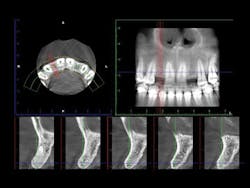
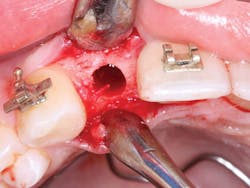
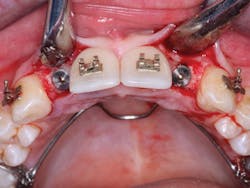
2. In the facial-lingual orientation, locate the osteotomies in the center of the ridge and parallel with the adjacent teeth. Use finger contact on the facial and lingual of the ridge while making the drill cuts. If you feel extra vibration on one or the other side of the ridge, reorient the drill appropriately (figures 4-7).
Figure 3: It is easy to center the implant osteotomy between the two adjacent teeth using your own clinical judgment and periapical radiographs.
Figures 4-7: This series of images shows a clinical situation, the cone beam images, and the freehand implant placement.
3. Use several periapical radiographs while cutting bone and placing the implant(s) to verify proper angulation.
Placing multiple implants in healthy patients who have adequate bone.
• It has been approximated that placing multiple implants in the same patient constitutes only a small percentage of the total implants placed. The same concepts as expressed in the previous section are used if using the freehand technique. However, paralleling the implants can be difficult if not using a guide.
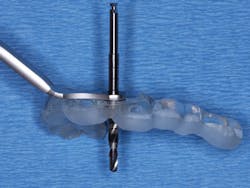
• Guided placement can offer significant advantages when placing multiple implants (figure 8).
Figure 8: Multiple implant placement is often difficult, and surgical guides can help place the implants in the best locations and parallel to one another.
Summary
Placement of single implants in healthy patients who have adequate bone is a simple procedure and should be a part of most general practices. Single implants can be very adequately placed by the freehand technique, or also easily and more predictably placed with the more complicated and expensive guided-placement technique. Use of a guide is often indicated for placement of multiple implants or for patients lacking optimum bone quality or quantity.
READ MORE | Implant placement vs. tooth retention
Gordon J. Christensen, DDS, MSD, PhD, is a practicing prosthodontist in Provo, Utah. He is the founder and director of Practical Clinical Courses, an international continuing-education organization founded in 1981 for dental professionals. Dr. Christensen is a cofounder (with his wife, Rella Christensen, RDH, PhD) and CEO of Clinicians Report (formerly Clinical Research Associates).
