Digital Dental Magic
by Robert Maher, DDS
Modern dental practice offers countless uses for digital photography. Laboratory communication is one important use for this incredible technology. A series of photos included with a cosmetic case is a virtual necessity to obtain good and consistent results from a quality lab. Such a series should include, but is not limited to: full face, profile, close-up smile, profile smile, retracted anterior view of both arches with teeth slightly separated, and upper and lower occlusal photos. Also of interest to laboratories are photos of the preps with shade tabs in the photo, an occlusal photo of the preps, and a stick bite showing the full face. Don't worry about sending too many photos — laboratories never complain about too much information!
Another common use for digital photography is for patient identification. Every patient chart or computer record in my office contains a full-face photo. (Frankly, I couldn't practice without them — I can remember names and faces, but can't seem to put them together in my mind without a photo!)
Documentation is another extremely valuable use of photography. Even insurance companies can't argue with a clear photo of a crack found buried under a cusp after removing an old amalgam restoration.
All these are very good uses of photography in the dental practice; however, I'm about to impart the best reason of all: case acceptance. Digital photography is to case acceptance what hot dogs are to baseball: indispensible! In my practice, we follow a set formula using digital photos with every patient. The results? Our case acceptance rates have soared!
Here's how it works. The very first step of a new-patient exam in my office is a series of five digital photos. My assistant takes the photos; she enjoys the patient interaction and views this task as an essential part of her duties. The entire process of taking the photos and putting them into the computer takes less than five minutes.
The five key photos are: full-face, close-up smile, retracted view with teeth slightly separated, and upper and lower occlusals. Once the photos are in the computer, I view them before I do the initial exam! Viewing the teeth without the personality attached allows me to be more objective, and I frequently see things that I may not see in the patient's mouth. When I go in to do the exam, I have an excellent idea of what I will find and how I need to treat the case. After the exam, we look at the photos with the patient. Some patients are immediately drawn into the process, while others need to be gently encouraged. Either way, they learn a great deal about their conditions and about dentistry from the pictures. As management consultant, lecturer, and author Gary Takacs says, "There is no such thing as a magic wand in dentistry, but these five photos are the closest thing to one that I have ever seen. It is easy, quick, can be done by staff, and has a powerful impact on case acceptance."
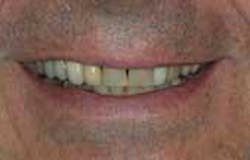
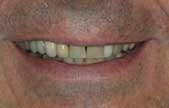
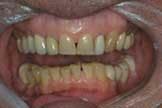
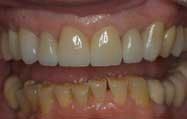
Let me cite a real-life case as an example. (The full-face photo in this case is eliminated for the sake of the patient's privacy.) As we — the patient, my assistant, and I — reviewed the pictures, the patient first noted the brightness of the old porcelain fused to metal crown on his lateral incisor. Then, in the close-up smile photo, he noted the contrast between that tooth and the cuspid behind it. (Figure 1). When he saw the retracted view, it was obvious even to this nondentist that there was something very wrong with his lower plane of occlusion. (Figure 2). He also noticed the exposed PFM margins. This allowed us to explain how the supra gingival margins of Empress restorations would not develop this problem down the road. In the upper occlusal photo, the hole in the crown and the fractured crowns were very apparent, as was the wear and old fillings on his front teeth. (Figure 3.) The wear and irregularities of the lower teeth were also obvious to him. (Figure 4.)
We discussed the need for a full-mouth rehabilitation to correct each problem. The patient understood the logic of case presentation because he could see it. After considering his options, the patient decided to do five front teeth and two posterior teeth on the upper arch. At the prep appointment, we again used the photos to show him that doing six anteriors made more sense because we could make them all look the same and better than the PFMs by using Empress restorations all across the front. Otherwise, we would have had to match the PFM look or have an inconsistent look to the front teeth. The patient agreed to restore eight teeth, Nos. 6 through 11, and 13 and 15. (See the retracted photo.)
Empress is a great product to utilize not only for clinical longevity and success, but also to showcase visually to your patients. It photographs beautifully, and, because of the way it is fabricated, it demonstrates a lifelike, natural appearance. We clinicians know that Empress mimics natural tooth structure in wear and function, but we can also maximize the immediate impact to the patient, because in all aesthetic arenas — translucency, saturation of color, depth, and luster — it can be made identical to the visual appearance of the patient's natural dentition. It is a perfect way to highlight your photography and your clinical skills
At the seating appointment three weeks later, the first thing the patient said when viewing his new smile (see "After the restoration," page 80) was, "I guess we have to do these lower front teeth now, huh?"We agreed. We again showed him the photos, but pointed out that if we were to make the lower front teeth the correct length (as approximated by the lower left cuspid), his back teeth would no longer touch; therefore, we would need to fix all of his lower teeth. This was obvious to him without a lot of explanation. The patient then said, "I guess we're right back to where we started, aren't we — doing all my teeth?" We again agreed with his assessment. We actually explained very little to the patient — the pictures made his condition very clear and sold the case for us. I rest my case!
Many courses are available that teach more complex methods for digital case presentations using Power Point. While this is an excellent way to do it, it is my belief that most dentists are not interested in complexity but in simplicity and expediency! K.I.S.S (Keep It Simple, Stupid!)


