Ask Dr. Christensen: How to salvage an impression
Prevention is the best way to ensure that you make an adequate impression almost every time. The following procedures will help you make a great impression of multi–tooth preparations:
1) Preoperative rinse. Place the patient on 0.12% chlorhexidine gluconate (Peridex® from OMNI Preventive Care, or if you don't want alcohol in the chlorhexidine rinse, use GUM® Paroex from SunStar). The patient should use the rinse once or twice per day for two weeks preoperatively. I suggest rinsing immediately after breakfast and before going to bed. If the rinse is used only once daily, then just before bedtime is best. This simple procedure reduces oral soft–tissue inflammation significantly and decreases the chance of making an inadequate impression. Unrelated to impressions, but equally important in the rinsing concept, is continuing the use of the chlorhexidine rinse for two weeks while the patient wears provisional restorations, and for two weeks post–cementation. Soft–tissue health is markedly improved by this procedure.
2) Custom impression tray. Using a tray that actually fits the specific patient you are treating is a great preventive technique. It is well known that most dentists (about 80%) use stock trays. If you are one of the 20% using custom trays, you probably have fewer defective impressions than the stock–tray group. As a prosthodontist treating many difficult patients, I use custom trays made from light–cured Triad TruTray (DENTSPLY) for any crowns or fixed prostheses involving three teeth or more. They are made in advance by trained dental assistants in about 10 minutes. They use one–third as much impression material as a stock tray, and cost much less to use than stock trays. They are also more accurate and stable. Look into the custom–tray concept. You will be pleased with the clinical results, the better impressions, and the lower cost.
3) What to do with bleeding sites as you make the impression. If a small bleeding spot is observed immediately before injecting the impression material, inject a few drops of lidocaine containing 1:50,000 epinephrine about 2 mm from the spot. Use a 30–gauge needle to minimize the diameter of the needle puncture. This will stop any minimal blood flow for about two minutes.
4) What to do if blood is present and coming through the impression material. If you see blood coming out of the impression material after injection, very gently blow air on the material where blood is showing until the tooth preparation has only a thin layer of nearly transparent impression material on it. If the blood seepage is still present, repeat the injecting and blowing procedure until it stops. Usually, the slight blood flow is reduced to the level that it does not create a problem with the impression.
Let's now assume that you have made an impression of a multi–tooth case and one or more teeth are not adequately impressed. What do you do?

5) Making a new impression of all of the prepared teeth. Nobody wants to repeat an entire impression unless it is absolutely necessary because several preps were missed. When the first impression is removed, the soft tissue often bleeds and cords come out if a double–cord technique is used and the first cord is left in place. The soft tissue falls back on the tooth preparation, or other challenges can occur. For that reason, I don't recommend making an entirely new impression.
6) Making a second impression inside of the defective impression. This is not my most preferred technique to salvage an impression. Making a second impression inside of the inadequate impression is not a good idea, unless you ream out the defective site thoroughly to ensure that there is little or no pressure placed on the new material by the already set material. If there is pressure — and the set material is compressed — it will spring back when the impression is removed from the mouth, distorting the new material. Usually, restorations made from such impressions are too tight, if they fit at all. If you are doing this technique, I suggest cutting a vent in the most coronal portion of the defective tooth area. This will allow any pressure produced by the set material to dissipate by the impression material flowing out of the hole.
7) Tube impressions. This technique is also not my choice. Although this technique works — and it was my choice many years ago before we had the accurate and reliable materials of today — it has some challenges. The tubes can easily be bent or compressed when removing the impression from the tooth. The adhesive on the tube is often inadequate, allowing distortion of the impression material. If you choose to use this technique, I suggest that you use a very rigid material, such as 3M ESPE's Impregum™, to reinforce the tube and reduce the potential distortion of the tube and the impression material.
8) Double–arch impression including detail of only the defective areas. If the defective areas are all close to one another, this is my technique of choice. For example, let's say due to blood leakage into the impression, you have missed teeth Nos. 6 and 7 in an impression of tooth preparations from teeth Nos. 4 to 13. Making an anterior double–arch impression of just teeth Nos. 6 and 7 is an easy fix. Accomplish tissue management on only teeth Nos. 6 and 7, the teeth that were inadequately impressed. If the defective areas are in the posterior part of the mouth, making a double–arch impression of just the teeth that were inadequately impressed in your first impression is simple, fast, and easy. The laboratory technician pours both your initial, partially defective impression and your remedial impression. Then the technician makes wax patterns on the incomplete dies from the initial impression, exclusive of the defective areas, and transfers the wax pattern to the remedial die. The wax pattern is completed on the remedial dies.
Popular and highly effective "triple–trays" for this technique are available from many companies. I prefer the Premier Sideless Triple Tray® or the Clinicians' Choice® QUAD–TRAY® for the posterior area. Anterior triple trays are also available from the two companies I mentioned, as well as many others.
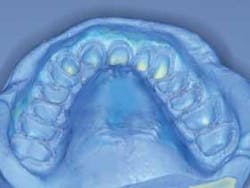
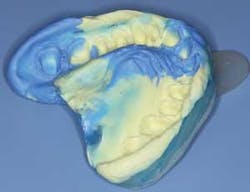
9) Full–arch impression including detail of only the defective areas. If the tooth preparations are in remote areas of the arch, this is my preferred technique. The procedure requires another tray. If you are using a stock tray, this is not a problem. If you are using custom trays, I suggest you make two trays for any comprehensive, potentially difficult impression. This concept has saved me significant time. See Figures 1 and 2 for examples of this technique.
Now all you have to do is select the concept of your choice. I have provided my preferences for you. Call (800) 223–6569 or visit www.pccdental.com for details about a video on this subject. Ask for video No. 1934.
About the Author

Gordon J. Christensen, DDS, PhD, MSD
Gordon J. Christensen, DDS, PhD, MSD, is founder and CEO of Practical Clinical Courses and cofounder of Clinicians Report. His wife, Rella Christensen, PhD, is the cofounder. PCC is an international dental continuing education organization founded in 1981. Dr. Christensen is a practicing prosthodontist in Provo, Utah.