Using a digital workflow for both the surgical and prosthetic phases of implant therapy

Daniel Domingue, DDS, DABOI, FAAID, DICOI, MICOI, FICOI
Cory Glenn, DDS
Anterior dental implant placement is a predictable surgical procedure when conditions are ideal. But when there are soft tissue deficiencies, horizontal or vertical bone loss, poor bone quality, or esthetic challenges, these can complicate both the surgical and restorative phases of treatment.1 To ensure patient satisfaction, surgical success, predictable prosthetic results, proper lab communication, and overall long-term hygienic access, it is best to incorporate digital technology at both the surgical and restorative phases. Doing so will optimize results and prevent complications that hinder final outcomes.
Case study
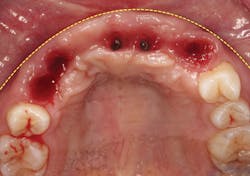
A 21-year-old female was injured five years ago in a jet ski accident. Seven of her maxillary teeth (Nos. 5–11) were avulsed along with the buccal plate. The patient was seen by several specialists to assess treatment options. Ultimately, she was allowed to heal over a few years (figure 1) and given a partial denture in the interim. The patient’s family had many consultations over the years to hear recommendations for restoring her smile with implant-retained crown-and-bridge treatment. At that point in time, options were expensive and the patient was too young to start treatment. The patient wanted fixed maxillary restorations to replace her missing teeth. Treatment began after the patient had graduated from high school and before entering college.
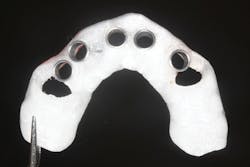
A cone beam computed tomography (CT) scan (Prexion 3-D cone beam unit, Prexion Inc.) of the upper jaw was obtained. A full-arch upper impression was taken in polyvinyl siloxane (PVS) and poured in model stone. Then a CT scan was taken of the model. Both sets of DICOM files were imported into Blue Sky Plan software (Blue Sky Bio LLC), where all digital planning occurred. Using the “add tooth” function, digital teeth were added into the DICOM files. These were overlaid on the digitized model, and all aspects (midline, horizontal plane, bite, and overjet) were checked using basic principles of implant restorability (figure 2). This was done to ensure proper placement for future implant workup. Based on the available bone, there was room for five implants (3.5 mm x 10.5 mm MegaGen AnyRidge implants): a single implant for No. 5 and implants in Nos. 6, 8, 9, and 11 for two three-unit bridges. Even though there was marked bone loss, angulations were adjusted as much as possible to allow for implants to emerge through the lingual of the incisor (figure 3). Once the correct orientation was complete, we designed a fully guided surgical kit to print one guide for all drills. Guides were exported as STL files and 3-D printed using an in-office CEL Robox 3-D printer out of nGen material (ColorFabb BV). After printing the guide, we added a metal sleeve housing (figure 4).
Figure 1: Full retracted view of full bite
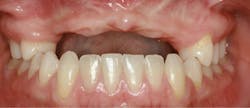
Figure 2: Digital workup in Blue Sky Plan software
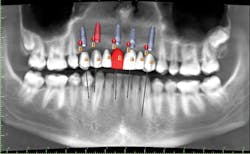
Figure 3: Superimposed model overlaid with digital wax-up and meshed with cone beam computed tomography scan
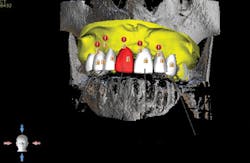
Figure 4: Surgical guide 3-D printed based on digital workup
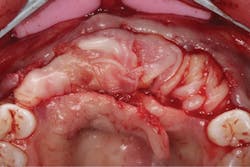
The patient was sedated intravenously in a surgically sterile in-office operatory. The surgical guide was placed over the teeth, checked to make sure it was fully seated without soft tissue impingement or surgical guide excess (figure 5). It was verified that there was no rocking of the guide from either side. An initial pilot drill was made through the guide into the soft tissue. A surgical incision was made with a 15c blade splitting across the keratinized gingiva across the crest of the ridge from Nos. 5–11. A full-thickness flap was elevated buccally and lingually. This released the soft tissue enough to allow the implant drills to go to depth and perform a widening osteotomy. Five osteotomies were made with copious saline irrigation and drill speed of 2,000 rpm. A pilot drill and each sequential step drill guide were used to widen out the osteotomy before placing five 3.5 mm x 10.5 mm MegaGen AnyRidge implants (figure 6). The implants were placed and torqued out at 35 Ncm. (Implants were not placed through the guide, although this was an option. Cover screws were placed. A bone graft with fusion bone binder (figure 7) and platelet-rich fibrin (PRF) were all placed over the implants before suturing with 5.0 polyglycolide sutures (figure 8). The upper partial was relined to take pressure off the soft tissue site.
Figure 5: Surgical guide in patient’s mouth
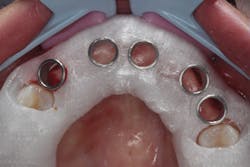
Figure 6: Implants placed
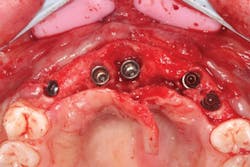
Figure 7: MFDBA with fusion bone binder covering implants
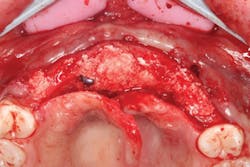
Figure 8: PRF tucked into buccal and lingual tissues
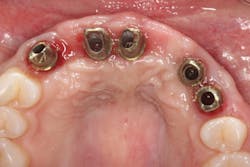
The patient was allowed to heal for three months before returning to uncover the implants. Full thickness flap incisions and retraction of Nos. 5–11 noted bone growth over the implants. We placed polyetheretherketone (PEEK) abutments over the implants to fabricate a fixed screw-retained provisional chairside (figure 9). We grafted once again with PRF, mineralized freeze-dried bone allograft, and fusion bone binder to thicken the area. One horizontal suture was placed from Nos. 7–10. One vertical mattress suture was placed around the No. 5 implant to obtain secondary healing, tucking the PRF membranes over the bone graft on the buccal and lingual tissue and keeping them exposed on the occlusal surface where the temps were screwed in (figure 10) . We allowed this to heal for two months before bringing the patient back to start the restorative phase of treatment (figure 11). During this time, the tissue was able to thicken with the added PRF and additional bone graft added around the implants.
Figure 9: PEEK abutments screwed into implants to convert to fixed temporaries
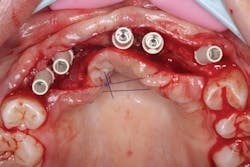
Figure 10: Temporaries screwed into PRF
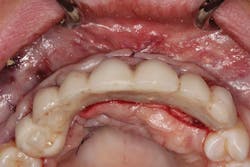
Figure 11: Healed for two months and ready for final impressions
We made adjustments to the temporaries until the patient was happy with the esthetics. We took final upper and lower impressions and sent them to Burbank Dental Lab for custom titanium abutments and provisionals. Using 3Shape software, Burbank Dental Lab was able to digitally design temporaries based on the patient’s current temporaries (figure 12). Digital files were approved before milling polymethylmethacrylate (PMMA) temporaries and custom titanium abutments (figure 13). Custom abutments were torqued out to 35 Ncm and sealed with Teflon (figure 14) and flowable composite so temporaries could be seated. The patient was allowed to wear these for a few weeks to ensure she was happy with the results. Once the patient approved, we took new PVS impressions and sent to them Burbank Dental Lab to fabricate final zirconia bridges.
Figure 12: Digital design of new provisionals
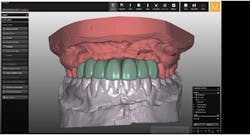
Figure 13: Custom titanium abutment digital design
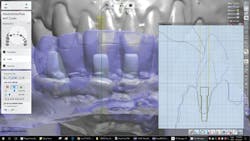
Figure 14: Custom titanium abutments torqued into place
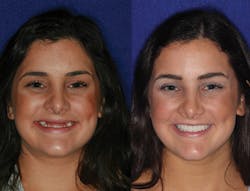
Final crowns were seated with Durelon (3M Oral Care) cement. Lingual access holes were sealed with flowable resin and cured (figure 15). No adjustments to the final restorations were needed. The patient was sent home with a final fixed crown and bridge (figures 16 and 17).
Figure 15: Final crown and bridges delivered
Figure 16: Day of delivery
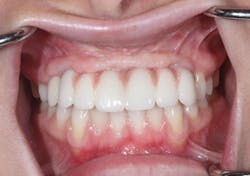
Figure 17: Before-and-after full-face smile
Analysis
Before coming to us, the patient was treatment planned by two surgical specialists without collaboration of a restorative dentist or utilization any digital design technology. Estimates to complete treatment ranged from $80,000 to $100,000 to restore her maxilla with the use of advanced bone grafting from her hip, perform a secondary implant placement procedure, and be referred to a restorative dentist to get a final result with proper esthetics, phonetics, and function.
However, to achieve optimal results, utilizing readily available, inexpensive digital technology to plan all phases of care was possible. Integrating digital technologies in all phases was crucial. The digital design pre-op workflow, as well as the surgical phase of treatment in re-creating ideal contours for final prosthetics, can and should be easily duplicated from this article to maximize restorative outcomes—especially on patients with multiple scenarios that could severely ruin the final result.
Even if a restorative dentist is not sufficiently adapted to the digital technology currently available, it is easy to work with a dental laboratory that has invested the time and money needed to adequately provide a digital workflow for the restorative phase.
Reference
1. Chu S, Tarnow D. Managing esthetic challenges with anterior implants. Part 1: Midfacial recession defects from etiology to resolution. Compend Contin Educ Dent. 2013;34(10):26-31.
Daniel Domingue, DDS, DABOI, FAAID, DICOI, MICOI, FICOI, practices in Lafayette, Louisiana. He focuses on implant dentistry as a restorative option to replace missing teeth.

Cory Glenn, DDS, operates a private practice in Winchester, Tennessee, where he performs all disciplines of dentistry. His focus is on utilizing technology and innovative techniques to provide treatment in an efficient and cost-effective manner while still maintaining the highest level of quality.