The most challenging everyday restorative problem: A case study in adjacent interproximal composite restorations
Certainly, there are difficult procedures we perform in dentistry. Complex restorative treatments can be long and stressful. Tasks like converting hybrids, opening vertical dimension of occlusion, and prepping full arches are extremely challenging. There are also tough cases that we encounter much more frequently than more sophisticated treatments.
In my opinion, nothing we encounter in regular everyday restorative dentistry is as challenging as restoring two class II lesions back-to-back. Because many of us practice quadrant dentistry in an effort to be more efficient, we often encounter these back-to-back interproximal carious lesions in series—meaning we often see a patient for two or three of these back-to-backs. These appointments are absolutely brutal on us, both physically and for our productivity. It routinely takes me more time and effort to do three or four class II composites on a single patient than it will to do a single crown preparation—and the single crown is most likely more profitable.
You might also be interested in: How to make a lifetime crown
We have to find ways to make this common restorative dilemma more predictable, easier, and more profitable. This case study highlights three key components for these cases that will do just that.
Component 1: The approach
To make these adjacent class II procedures simpler, we must take the correct approach to our preparation and filling sequence. There are only three possible approaches to these situations. Two of them are absolutely more difficult and the one remaining, while still difficult, has the most advantages.
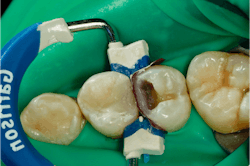
Approach 1: Prep one of the lesions and fill that preparation. Then prepare the second lesion and restore it (figure 1).
This seems easiest and most sequential at first, but the downside to this approach is significant. No matter how hard you try, the first restoration is almost always nicked during the preparation of the second lesion. This may just be Murphy’s Law, but despite my being as careful as possible and using any number of interdental separators, something always happens to distort the interproximal contour of the first restoration. When the second restoration is done, we end up with an uneven contact that is far less than desirable. I no longer try this approach.
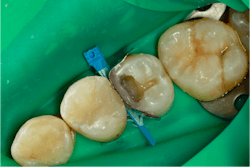
Approach 2: Prep both lesions at the same time, and then restore each preparation one at a time (figure 2).
This seems like the natural retort to the problems of approach 1. If we are likely to nick the first restoration when preparing them asynchronously, let’s just prep them together! Problem solved, right? Wrong. When we go to restore the first preparation, we will often overcontour that restoration into the space of the second preparation. When we go to restore the second restoration, we end up with an “S”-shaped irregular contact that will be a nightmare to cleanse for the patient. No matter how hard we try to not overcontour, it just happens. Matrix bands often will bend into the space they are given. Even when I try to finish down the first restoration with a disc or finishing bur, I still end up leaving it overcontoured and creating a poor contact area. I no longer attempt this.
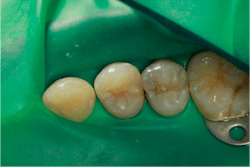
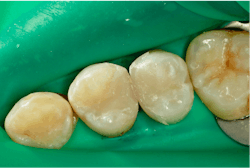
Approach 3: Prep both lesions at the same time, and restore them at the same time (figure 3).
This ensures that we give equal space to each lesion and that we don’t nick the finished restorations. There are a couple of caveats to this approach. First, a rubber dam will definitely make your life easier, and we must use a sectional matrix system. While still challenging, this approach gives us by far the best contact and lets us work with some efficiency.
Second, we’re not really restoring both at the exact same time, but we are applying a matrix to each tooth at the same time to conserve space. A case study should be a good illustration to cover the steps of this approach.
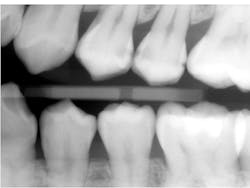
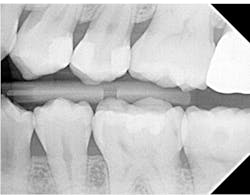
Below is the bitewing radiograph of my patient Lee (figure 4). Lee is a postgraduate student at a university near my office. He presented for a comprehensive examination, and we diagnosed a lot of decay in his dentition.
Many of the teeth that we diagnosed carious lesions on will eventually need indirect restorations, but our first goal is caries control. Two of his largest lesions happened to be on adjacent teeth, the distal of the upper left first premolar and the mesial of the upper left second premolar.
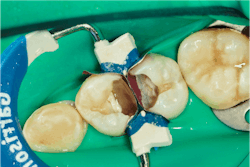
A rubber dam is applied and both lesions are prepared (figure 5).
After both teeth are prepared, we can see that these were large, deep lesions. An indirect pulp cap is placed over the pulp using a light-cured, flowable material (Theracal LC by Bisco) (figure 6).
Component two: The matrix
A sectional matrix system is placed with two matrices on, with a single wedge and ring. This is a key part of the procedure. Traditional Tofflemire matrix bands were designed to work with amalgam. While they served dentistry well for decades, as our materials have evolved, so have our needs from a matrix system. Tofflemires are designed to be tightened on the tooth. As the retainer tightens the band, it straightens, leaving us with a flat interproximal wall.
Unfortunately, posterior teeth do not have straight interproximal walls. With amalgam, we could contour the matrix out as we packed our amalgam, but composite is not packable like amalgam, so we don’t have the opportunity to contour the band out and create an anatomic wall. Sectional matrix systems generally come with anatomical matrices that are curved. This is critical to achieving good interproximal contacts with resin composite restorations. In this case, we used Garrison Composi-Tight 3D Fusion system.
A matrix is applied to each tooth and then secured into place with a single wedge. Once this is stable, the interproximal ring is applied to ensure proper separation. This separation force is vital to producing an interproximal contact. If we don’t separate the tooth enough, we will always have an open contact of the width of the matrix itself. The separation uses the PDL of the tooth to create a slight movement of the tooth away from the restoration so when the separation force is removed, the tooth settles back to where it was with a beautiful, cleansable floss-popping contact. While the Garrison ring produces more tooth separation than a traditional Tofflemire matrix, it doesn’t produce enough force to overcome the thickness of two matrices. We will need to phase our next restorative steps in a certain order to account for this.
Once the matrices, wedge, and ring are placed on the tooth and secure, we are ready for our restorative steps. Those start with etching the teeth with 35% phosphoric acid etch. I practice the selective etch technique and apply the phosphoric acid etch only to enamel. This is left in place for 15 seconds or so and then rinsed.
Once we have a clean, damp preparation, it is time to apply our adhesive. I use a universal adhesive, Adhese Universal VivaPen by Ivoclar. I enjoy the flexibility that a universal adhesive offers and the ability to use the same product for all my bonding procedures, whether direct or indirect. The Adhese Universal VivaPen gives me fresh bonding agent with the click of a button and is the best direct adhesive delivery system available. Within the 3s PowerCure System (discussed below in Component 3), it can be cured for only three seconds! Once the Adhese Universal is applied, blotted, air-thinned, and light-cured for three seconds, it’s time to restore the teeth with our selected restorative material.
Component 3: Bulk fill composite
Now that we have a matrix on each tooth of our contact and have done all the chemistry steps of our adhesive process, it is time to actually restore. Because the separating ring can’t overcome the thickness of both matrix bands, we need to restore one tooth at a time. This means that one of our matrices will be the active matrix, while the other matrix is the “shepherd matrix.” The shepherd matrix serves to hold the space for the second restoration, ensuring we don’t overcontour the first restoration. While we technically aren’t restoring both teeth at the exact same time, we are virtually doing that by ensuring we don’t encroach on the space we need for both restorations.
Pick which tooth you want to restore first. I almost always choose to restore the widest preparation bucco-lingually. In this case, it is the distal of the maxillary first premolar. I load that preparation with my restorative material of choice, which for this case is Tetric PowerFill composite by Ivoclar.
Bulk fill composite offers some distinct advantages over its incremental fill cousins. First, a decreased polymerization shrinkage is important for minimizing marginal gaps and leakage. Second, it makes me more efficient during these procedures, reducing chair time and increasing profitability. I chose Tetric PowerFill in this case because of its ease in handling and manipulation, low wear characteristics, and 4 mm increment depth.
When used with the Bluephase PowerCure curing light, also by Ivoclar, my curing time for a 4 mm increment is only three seconds. In the 3s mode, Bluephase PowerCure produces a light intensity of 3,000 mW/cm2. This allows the exposure time to be reduced to three seconds. If using any other curing light, the curing time for this material is 10 seconds (or more based on the output power). The 3s PowerCure System (including Adhese Universal, Bluephase PowerCure light, and Tetric PowerFill and PowerFlow) is a great choice for any posterior composite restoration.
I always build my marginal ridge and interproximal wall first. Here you can see my first increment of Tetric PowerFill. Because the measurement from the gingival floor to occlusal surface was 4 mm, this wall is built up in only one increment (figure 7).
This is cured for three seconds using my Bluephase PowerCure light on 3s mode. Once the first increment is cured, I fill the rest of the preparation with Tetric PowerFill, shape, and cure (figure 8).
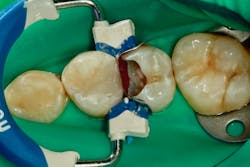
Once the first restoration is placed and cured, we now get to the key to this approach. I take off the Garrison separation ring and the wedge. Then I tease out the active matrix. Once that matrix is out, I make sure the one remaining matrix—what I earlier called the shepherd matrix—is still in place. I then re-place the wedge and ring and contour the matrix to the newly placed restoration. This step is why this approach is best done with a rubber dam. If I don’t have a rubber dam on, this step will create gingival bleeding that will contaminate the remaining preparation. The rubber dam prevents this, and there’s no contamination (figure 9).
Now we are ready to restore the second tooth. Since the preparation was already etched and bonded and no contamination occurred, I restore the second tooth much like the first tooth. A single increment of Tetric PowerFill was placed to build the interproximal wall and marginal ridge. This was cured for three seconds with the Bluephase PowerCure curing light on 3s mode (figure 10).
Once this step is done, the separating ring is no longer of any use, so I remove it to clear my path to place and shape the final increment (figure 11).
The last increment of Tetric PowerFill is placed, shaped, and cured. Once this is finished, the matrix and wedge are removed.
As you can see, we do have some flash to finish off. We will always have flash with resin composite restorations. The key is to get the flash in a manageable position on the tooth. As can be seen below, the flash is on the midbuccal and midpalatal; easy to finish with either a finishing bur or a disc. We don’t want to generate flash in between the teeth where it is difficult to finish. The Garrison 3D Fusion system does a tremendous job of this (figure 12).
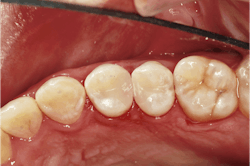
Once the restoration is finished, the rubber dam is removed and the occlusion is checked. Finally, a quick polish is done with a single-step polishing system, the Optragloss. At this point, we have created a great interproximal contact for Lee and restorations that should last very well while we continue to restore his other carious lesions (figure 13).
A post-op bitewing radiograph shows successful restorations for Lee (figure 14).
Editor’s notes: Ivoclar is a recent financial supporter of Dental Economics.
This article appeared in the September 2023 print edition of Dental Economics magazine. Dentists in North America are eligible for a complimentary print subscription. Sign up here.
About the Author
Joshua Austin, DDS, MAGD
Joshua Austin, DDS, MAGD, is a graduate and former faculty member of the University of Texas Health Science Center at San Antonio School of Dentistry. Author of Dental Economics’ Pearls for Your Practice column, Dr. Austin lectures nationally on products, dental technology, online reputation management, and social media. He maintains a full-time restorative dentistry private practice in San Antonio, Texas. You may contact Dr. Austin at [email protected].
Updated June 21, 2023


