HOW TO PROFIT FROM... photography
Technological explosion reinforces `visual art`
Steven M. Seltzer
A decade ago, researchers, academics, lecturers and photo enthusiasts took pictures of teeth to document their work and share it with other clinicians. They doggedly organized trays filled with 35 mm slides that consumed vast amounts of space and consumed endless hours of their time.
X-rays are another form of picture-taking that, until digital X-rays, scanners and intraoral cameras appeared, were not terribly effective for educating patients and presenting cases.
This article discusses how intraoral-video cameras, digital cameras and digital radiology are rapidly changing how dental teams diagnose, communicate and market dentistry. Video-and digital-imaging have forever changed the way dentists will view pictures of teeth. The intraoral camera, which Dr. Gordon Christensen says is the one technology that has had the greatest impact on dentistry in the past 30 years, shifted the focus of photography from clinical documentation to patient education.
These advances in technology, coupled with the advent of new, natural-looking dental materials, increase the vast practice-building opportunities dental photography offers. Dentistry is a visual art. For years, dentists have attempted to verbalize visual images, hoping that patients would grasp their explanations. This is tantamount to listening to the audio tour of an art exhibit without seeing the paintings! It is truly miraculous that patients accept treatment based on verbalizing their needs and trust.
In the early 1990s, a new trend began with the use of the intraoral camera to educate patients. The need to own an intraoral camera is now widely accepted. However, more than 90 percent of practices that have intraoral cameras underutilize them. As technology develops and dentists and hygienists establish appropriate protocols for using the intraoral camera, it will be used more effectively.
Seltzer Institute has developed business models and methodologies that integrate digital technologies with proven protocols that significantly increase the quality and quantity of dentistry diagnosed, presented and accepted. I will discuss dental-photography technologies and outline some of the steps in the process that will allow you to become more efficient clinically, improve your photography and educate staff and patients more effectively as you present cases using technology and sound business principles.
There are six steps to dental photography:
1. Acquisition
2. Image processing
3. Image storage
4. Image retrieval
5. Image manipulation
6. Image output.
Photographic methods
Let`s look at three photographic methods: Silver-halide photographic film, computer-based digital photography and hybrid analog/digital photography.
Traditional silver-halide 35 mm photography uses a conventional 35 mm camera and silver-halide film to acquire images, a film-processing service, a container to store them, human memory to remember what they look like and where to find them and a projector or viewbox to output them.
Step 5, image manipulation, is not possible.
In digital photography, an intraoral or digital camera combined with a computer system uses a charge coupled device (CCD), sensitive to visible light, to acquire images and for instantaneous viewing. The computer stores the images and an electronic-image database displays thumbnails (miniature images) on the computer screen. This is combined with powerful electronic search capabilities to retrieve them, special software to manipulate images for simulating the image after the dentistry is performed and a variety of output formats.
The steps are identical for digital X-rays, except that the CCD in step one is sensitive to the X-ray region of the spectrum rather than visible light. Some digital X-ray systems, such as the new system from Gendex and the Digora system, use an acquisition method that differs from a CCD.
Digital photography is superior to silver-halide photography with one possible exception. A digital system that produces ultra-high-quality images that 1 percent of all dentists require will cost $10,000 to $20,000. If you are among the other 99 percent and already own an intraoral camera and a fast Pentium PC, you can purchase equipment for steps 1-4 for less than $500.
Many products available
There are many products to choose from to perform the steps in digital photography. You should evaluate them based on your specific needs. To illustrate how some of Seltzer Institute`s clients use digital-imaging, I will discuss several products. Because technology changes rapidly, our recommendations may change by the time you are ready to purchase equipment.
Step 1: Acquisition. You need a quality intraoral camera and/or digital camera. For the highest quality digital images, we recommend the Kodak DC520 camera. The camera is a Canon EOS system that has been modified to accept a special Kodak digital back. The camera has all the features of a standard 35 mm camera and delivers image quality that approaches 35 mm slide-film quality.
Designed for serious professionals, the DC520 is priced around $15,000. The Kodak DC120 or Kodak DC210 digital still cameras deliver high-quality images for under $1,000. These cameras deliver excellent images for case presentations and documentation. The features and flexibility don`t compare, as you might expect, with the DC520. Nevertheless, the DC120 or DC210 are great cameras for most dental practices. For medium-quality images, we recommend the Sony Mavica, priced around $500, which conveniently records images on a standard 1.44MB floppy diskette.
To digitize images from your intraoral camera, we recommend Snappy ($99), the Matrox Mystique video card and Rainbow Runner Studio capture card ($350 for the pair) or the ATI All-in-Wonder Pro capture card ($350).
Step 2: Image processing. Processing is instantaneous when you capture images digitally. We do recommend a 20-inch monitor in the operatory and a monitor in the consultation room for patient viewing.
Step 3: Image storage. A 6GB or larger hard drive (8GB hard drives cost $400) is important for storing images for current cases. We also recommend a 100MB Zip Drive ($100 for the drive plus $12 for each 100MB diskette), a 1GB Jaz Drive ($300 for the drive plus $100 for each 1GB cartridge) or a recordable CD-ROM drive ($500 for the drive plus $2.50 for each 600MB CD-ROM), depending on your needs.
Step 4: Image retrieval. The seamless retrieval method is having images integrated into the patient database of your practice-management system. If your vendor offers a seamlessly integrated product and the investment makes sense, you should seriously consider purchasing it. Our favorite non-integrated products are Intellident Image ($1,500), Image F/X ($2,500) and Microsoft Picture It! 2.0 ($59). You can install a free 30-day trial version of Picture It! from the 1998 DDRT CD-ROM available from Seltzer Institute.
Step 5: Image manipulation. Digitized images can be manipulated. Digital X-rays can be enhanced with color and the contrast and brightness can be adjusted. Digital images can be manipulated to create post-op simulations. Dental-specific software, such as CosmetiX (SciCan) or Vipersoft, works best. If you want to experiment and don`t mind spending 10-50 hours developing your technique, consider Adobe Photo Deluxe ($99) or Adobe Photoshop ($600).
Step 6: Image output. The output format is the most important step for educating patients and increasing case acceptance. Digitized images can be output in a variety of ways. Display them on computer or TV monitors (You need a scan converter for a TV monitor. The Matrox Rainbow Runner Studio and ATI All-in-Wonder Pro have one built-in). Consider using Microsoft PowerPoint to create your own computerized case presentations. A sample presentation that you can customize for your own needs can be installed from the 1998 DDRT CD-ROM.
Create your own visual take-home presentations by adding words to the images and printing them in black and white on a laser printer or in color on an ink-jet printer. Epson and Hewlett-Packard offer high-quality color ink-jet printers that cost $250 to $1,200, depending on quality and speed. Look at the special glossy paper to produce the highest quality images.
Are you looking for a replacement video printer for your analog intraoral camera system? Sony has introduced the UP-2100 printer that has been designed for dental-imaging. The colors are more accurate and sharper. While the print size is slightly smaller than older printers, the cost per print is reduced 30-40 percent from the $1.00 per image printers. Take a close look at the UP-2100.
A special visual presentation is called the Visual Treatment Proposal. Identify a patient`s treatment needs, use the intraoral camera to digitize images and then insert the images into a Microsoft Word document with your treatment recommendations. Some dentists like to use a full-face photo of the patient as the first image rather than the toothpaste-and-floss image shown.
The Visual Treatment Proposal takes three to five minutes to create and is used when presenting the case. Use the "Table" feature in Microsoft Word to create a grid. Then use the "Insert/Picture/From file" commands on the menu bar to add pictures to the proposal. You can draw and write on the page to further the patient`s understanding of treatment needs. Some dentists like to use a highlighter to accentuate fracture lines, open margins, weak cusps and other features that may not be obvious to the patient. Patients focus and retain visual information better if the salient points are augmented with color and hand-written notes.
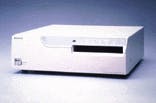
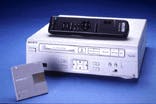
Many practices have virtually replaced 35mm silver-halide photography with intraoral cameras, but are not yet ready to use computer-based digital photography. A transitional method I call Hybrid Analog/Digital photography combines existing intraoral cameras with a special new digital-storage device from Sony called the DPA-300 ($1,695). This small, stand-alone unit captures images directly from your intraoral camera and stores up to 2,000 images on a single mini-floppy diskette. Built-in software allows you to organize images into an individual photo album for every patient or type of case. There is even a built-in slide-show feature for patient education or case presentation. The DPA-300 can be centralized if you already have a multi-op system, kept on an intraoral cart or connected to each camera or docking station.
The DPA-300 produces a higher level of case acceptance and lower operating costs. You can avoid the expense of making prints to document a case because images can be stored on the mini disk. It is a snap to show patients pre- and post-op images, as well as how their mouth is getting worse over time because treatment is not accepted.
One of my favorite applications is to have the DPA-300 in every hygiene operatory. Plug the camera into the unit and store as many images as you like. The images are available to the patient and the doctor during an exam, even if the camera is moved to another operatory. This approach greatly increases the utilization of the intraoral camera.
High expectations
Once you experience the excitement of digital-image capture, storage, retrieval and manipulation, you will never go back to the darkroom and fixer days. Patients are responding positively by accepting treatment and demanding visually pleasing techniques and materials.
Dental photography, by documenting before-and-after conditions, has raised peoples` expectations about how dentistry can help them look and feel better. Many people now refuse unaesthetic treatment because they prefer to look better. Dental photography has catalyzed their need to enhance their appearance.
Analyze the quantity of visual information you provide patients compared to verbal or written information. In 1990, the average dental practice was 80 percent verbal, 15 percent written and 5 percent visual. In 1996, the percentages were 70 percent verbal, 15 percent written and 15 percent visual. To achieve optimum results, the percentages should be 40 percent verbal, 15 percent written and 45 percent visual.
Taking X-rays is a photographic process that traditionally uses silver-halide film. This is an explosive year for digital radiology that uses media other than film. Systems based on CCD technology are offered by Cygnus, New Image, Schick (CCD or ASP), Trophy and Welch Allyn (variation of a CCD called CCI). Digora and Gendex offer a system based on charged phosphor technology. Five years ago, only Trophy offered a digital radiology system. Three years ago, there were fewer than five systems available. Today, there are more than 10 systems.
The Schick system is installed in more than 3,500 dental practices throughout the U.S. The reduced radiation and instantaneous viewing of X-rays have enhanced the way endodontic procedures are performed. Patients appreciate the reduced radiation, shorter treatment times and the ability to see and understand what the X-rays mean when they are displayed on the monitor.
Trophy installed its first digital-radiology system in 1989 and now has 25,000 systems installed worldwide. The system is compatible with a fast PCI bus interface and uses 32-bit software that is Windows NT workstation-compatible. The company offers diagnostic software for caries detection and enhancing bone density. New features include single-click operations for optimizing images, the ability to integrate any TWAIN-compatible image-capture device (scanners, digital cameras, etc.) and integrating Trophy`s digital panorex or film-based panorex images.
How do these systems compare to silver-halide film? The answers depend upon whom you ask. In laboratory experiments, CCDs resolve at 8 to 11-line pairs per millimeter vs. 10-line pairs per millimeter for film. A certain amount of electrical noise is present that can reduce effective resolution of the CCD. In clinical use, the effective resolution of film depends upon the quality of the exposure and processing. Effective resolution of digital methods depend upon the amount of noise and any image- enhancement features available in the software that processes the images. The consensus seems to be that a perfectly exposed and developed film is diagnostically superior to digital X-rays. However, digital systems constantly are improving.
Setting aside technical discussions, the real issue is how digital radiology compares to film. Seltzer Institute was unable to locate any clinical studies that address this issue. However, digital radiology is indisputably superior to film for endodontic procedures and placing implants. The chief benefits are instant viewing, along with being able to take X-rays at one-tenth the radiation level of film. The quality of the X-ray is as critical as it would be for diagnosing decay and periodontal conditions.
In the future, software will greatly enhance the diagnostic abilities of digitized X-rays. Kodak recently introduced software that scans and enhances the image quality of silver halide film-based X-rays. While the diagnostic quality of the sensor media will improve, the benefits from more powerful software will be even greater.
Digital photography will supercharge your practice! Define your vision, develop a plan and then implement the plan. Calculate your verbal/written/visual ratio. Then set goals and deadlines to increase the visual component. The entire process will take months, but the rewards are astounding. Seltzer Institute`s clients have increased their income 20-60 percent using digital-dental photography as part of a patient-marketing program. You can, too.

Kodak`s Digital Science Dental-Scanning Software
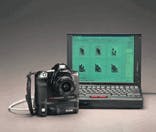
Kodak DC520
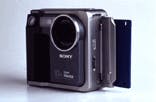
Sony Mavica
Sony UP2100
Sony DPA-300
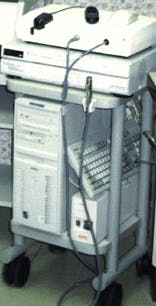
SuperCart digitizes video images and prepares visual case presentations