It's all in the Presentation
by Dennis H. Munholand, DDS, MBA
About a year-and-a-half ago, our office was recognized by Dental Economics and Matsco as the winner of the national Office Design Competition. Since that time, many dentists have visited our office for a closer look. We think the emphasis that was placed on creating an ideal balance of form and function is what makes our facility special. Our goal was to incorporate technology into the space without it appearing obtrusive. In this article, I will elaborate on some of the technologies that we built into our facility initially, discuss some of the additions we have made since moving into the building, and preview some of the areas of technology that we are considering adding in the future.
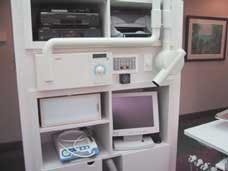
One of our design features that has received significant attention are two-foot-deep, rear-delivery utility walls in our treatment rooms. While the additional depth adds to the facility's overall square footage, the extra space allows a multitude of current and future technologies to enter the treatment area without being readily visible to patients. This would not be possible with the traditional one-foot-deep utility wall. The middle portion of the wall is solid to support an X-ray machine, light communication system, and speaker volume control. The upper and lower portions of the utility wall are open, with adjustable shelves to accommodate changing technology needs.
When we moved into our new facility, the utility wall contained an intraoral video camera, DVD player, videotape recorder, light communication system, X-ray machine, X-ray view box, clock, audio speaker with volume control, video source selector, computer with flat-screen monitor, wireless keyboard and mouse, photo-quality inkjet printer, Florida Probe periodontal charting system, hookups for the dual carts, and equipment for hygiene procedures such as our USI M25 ultrasonic scalers and DENTSPLY Prophy-Jets. Our plasma-arc curing lights and CD players initially were located in the rear-delivery wall, but have subsequently been moved to drawers within the side cabinets for more convenient access without cluttering the countertop. We installed electrical outlets behind the cabinet drawers to accomplish this.
At the front of the treatment room is a television monitor mounted high on the wall so it can be viewed by the patient in both seated and reclined positions. By using the video selector located in the utility wall (Radio Shack #15-1976) and an RF modulator (Radio Shack #15-1244), five different video sources can be sent to the monitor for patient viewing. The way this is accomplished is worth elaborating on for those who may be interested in creating a similar system in their offices.
The first button on the video selector is connected to the DVD player. When this button is depressed, whatever is playing in the DVD player is sent to the television monitor at the front of the room. We generally keep the CAESY patient-education program in each of our DVD players so it is ready when we need it. Occasionally, when we are treating children, we will replace the CAESY DVD with a Disney DVD movie. In this situation, we turn down the volume on the television and use the wireless headphones (Sony #MDR-IF 130K) that are plugged directly into the DVD player to supply the sound. The combination of Disney movies and wireless-headphone sound has proven to be a great distraction for potentially apprehensive children.
The second button on the video selector is connected to our intraoral video cameras. Depending on the particular system, the video out connection may be on the video printer, the docking station, or on the intraoral video camera itself. Today, some dentists use digital still cameras in the same way we use intraoral video cameras. If that's the case, the video out cable for the digital camera could be connected to the second button of the video selector.
The third button of the video selector is connected to the video tape recorder (VCR) and actually provides two different video sources. This is accomplished by connecting the antenna input of the VCR to a centrally located DVD five-disk changer. The DVD changer is loaded with a collection of relaxing underwater videos. By following the manufacturer's directions, the DVD changer can be programmed to play the underwater videos continuously, all day long. The video output of the DVD changer is connected to an RF modulator set to Channel 3 and then to an amplified splitter. The video signal is then carried to each treatment room by coaxial cable and connected to the VCR antenna inputs. When the VCR is turned on and set to Channel 3, the patient can enjoy relaxing underwater videos during the appointment. This is what our patients usually see when they first enter a treatment room. By turning the television monitor volume down, the underwater video music doesn't compete with the general office music, which is provided by an 18-disk CD changer. When a videotape, such as Sonicare Instruction, is inserted into the VCR, the television will switch to whatever is on the tape until the stop button is pushed. In this way, two different video sources are available with the third button of the video selector.
The fourth button of the video selector is connected to the treatment room computer. This becomes especially valuable if digital X-rays are used, and viewing images on the large television monitor is desired for co-diagnosis. Since the signal used by computer monitors is entirely different than the signal used by televisions, it is necessary to convert the computer signal into a television signal using a Computer-to-TV scan converter (AverMedia). The second monitor output of the computer is connected to the scan converter, and the video out of the scan converter is connected to the fourth button of the video switchbox. Now, when the fourth button is pressed, whatever is on the utility wall computer screen will be viewable by the patient on the front-located television monitor.
The last step to completing this video-selection system is to connect the video output of the video switchbox to an RF modulator set to Channel 3. The selected video signal is carried by coaxial cable to the television located at the front of the treatment room. By keeping the television set to Channel 3, whatever video source is selected on the video switchbox will appear on the television monitor. The wireless remote for the television is used only to adjust the volume or to turn the television on or off.
After we moved into our new facility, the first thing I wanted to add was digital photography and digital case presentation, two rapidly evolving areas of technology. After testing several different digital camera systems, and even attempting to make consumer cameras do what I wanted, I settled on two different digital camera systems that seemed to best suit my needs. We use one system for most of our new-patient examinations, treatment planning, and case-presentation needs. We use the other system primarily for gathering images of existing patients during their hygiene appointments. Either way, the resulting images are impressive and immediate, allowing a dentist to do case presentations while the new patient's interest is at its highest, rather than having to wait for slides or film to be developed.
Once I had the means to gather digital images, I needed ways to share those images with patients to get them involved in the co-diagnosis process. I zeroed in on three technologies that we still use extensively today: photo-quality printers with memory card readers built in, PowerPoint computer software, and a clever device from Iomega called FotoShow.
One way to get a hard copy of a digital image is to download it onto a computer hard drive and print it on a connected printer. However, companies such as Epson, Kodak, Olympus, and Hewlett Packard have made the added steps unnecessary by creating photo-quality printers that have memory card readers built right into the printer.
After our initial new-patient interview, we begin the clinical exam by taking a series of clinical photographs. We take the memory card immediately to the printer, and print two sets (four images on each 8 x 10-inch glossy photo sheet). The first set of images goes into the patient's chart. The second set goes home with the patient for review prior to the upcoming consultation appointment.
We have found that sending clinical photographs home with patients has a double benefit. First, the patient's awareness of his own dental situation goes to a much higher level. Second, and perhaps more importantly, the patient's spouse often becomes involved in the co-diagnosis process without having to take off work to be a part of the process. This singular change in the new-patient process has had a significant impact on our case-acceptance percentage.
At consultation time, yesterday's slide projector can be replaced by a computer using PowerPoint presentation software or Iomega FotoShow and a television monitor. PowerPoint is the software that many speakers use when they give computer-based presentations. The same software can be used in the office to arrange and present images for consultation purposes. However, one limitation of computer-based presentations in a dental office setting is the potential expense of computer projectors or large-screen computer monitors for the ability to display larger images. Otherwise, PowerPoint is an excellent presentation tool with endless creative potential.
Another way to display digital images for case-presentation purposes is by using Iomega FotoShow connected to a large television. Iomega is the company that is best known for Zip disks and Zip drives. FotoShow is actually a modified Zip drive that adds memory card readers, video output for television, and a wireless remote control. After we print the new-patient images on the printer, we place the digital memory card into the FotoShow device in our consultation room and copy the images to a Zip disk. The patient's images are now ready for a slide show on the large television, freeing the memory card to be used for the next new patient. Eventually, the images on the Zip disk will be transferred to our management software for long-term storage, so the Zip disk can be reused.
You may be wondering what's next. In fact, with the holiday season at hand, we are beginning to make our wish list for the coming year. The CAESY patient-education system has been a wonderful tool for helping us raise patient understanding of dental-care options; we have used it for years. CAESY has just introduced a computer-based form of their material called Enterprise Plus. In this format, the same helpful information can be printed out for patients or even emailed to them. The possibilities are exciting.
We love helping patients achieve whiter smiles. Most of our patients have achieved excellent results with the tray-based home systems such as Nite White from Discus Dental or Brite and White from Omni. However, a few of our patients have begun to ask us about options available within the dental office. For this reason, our wish list will include one of the new chairside whitening lights, such as the Zoom system from Discus Dental or the Rembrandt system from Den-Mat.
After several years of enjoying the benefits of the Schick digital radiography system, we would love to add a digital panorex to our array of diagnostic tools. We think this system will be a superior co-diagnosis tool, but we've been waiting forl their costs to decrease. Perhaps next year will be that time.


