Make a good first impression: A guide to accurate full-arch implant impressions

Pamela Maragliano-Muniz, DMD, provides instructions for taking accurate full-arch implant impressions to help you minimize frustrations and maximize chair time.
With the increasing prevalence of "teeth in a day" and full-arch implant restorations, it is more imperative than ever that impressions are accurate. Inaccurate impressions can lead to ill-fitting final restorations, more impressions, remakes, extra appointments, and less profit for the practice.
In my opinion, clinicians who spend a few extra minutes in the lab using this technique can minimize frustrations with misfits and maximize chair time.
1. Take a preliminary impression. Place the transfer (or closed-tray) impression copings. Although it is customary to take radiographs to ensure the complete seating of the impression copings, it's unnecessary for this technique. This is a preliminary impression; radiographs will be taken during a later step.
Using a stock impression tray, make a transfer (or closed-tray) impression. This step is best accomplished with animpression materialthat has favorable intrinsic properties, including cross-arch stability and elastic recovery. There are many of these on the market, including Aquasil Ultra (Dentsply), Impregum (3M ESPE), and Exa'lence (GC America), which are polyvinyl siloxane (PVS), polyether, and vinyl polyether silicone materials, respectively.
Then, place the laboratory analogs and pour the cast with a type III gypsum, such as Buff Stone (Whip Mix).
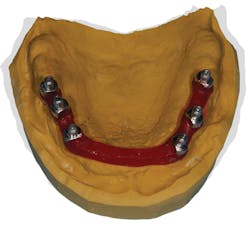
Figure A: The pick-up impression copings in this working cast were luted with a low-shrinkage resin.
2. Place open-tray impression copings and create a rigid connection. For single-unit implant restorations, the accuracy of transfer versus pick-up impressions is similar.1 For full-arch restorations, a pick-up impression tends to have greater accuracy than a transfer impression.2 Small inaccuracies occur if full-arch impressions are made with pick-up impression copings only. These include movement of the impression material during removal of the impression tray, placement of the copings in the impression before pouring, and movement of the laboratory analogs during the setting of the die stone.3 It is essential to connect the impressions with a rigid material prior to making a final impression to minimize these inaccuracies.4
Attach the pick-up (or open-tray) impression copings to your cast. Using a low-shrinkage resin (e.g., Pattern Resin LS, GC America), link all of the impression copings together (figure A). Allow the resin to set completely. This resin offers a working time of two to three minutes and a setting time of four minutes. Although this is a low-shrinkage material, it shrinks by .36% after 30 minutes and by .37% after 24 hours.5 I try to leave this undisturbed overnight.
3. Section the rigid material. After allowing the resin to set completely, use a thin laboratory disc to section the resin (figures B and C). The disc should be thin enough that the slices do not exceed .3 mm, or the thickness of a business card.
4. Block out the impression copings and the resin (figures D and E). This can be accomplished with wax or a polysiloxane laboratory putty (Lab-Putty, Coltene/Whaledent). I prefer a polysiloxane blockout material because the wax can distort, melt, or become difficult to remove during the fabrication of the custom impression tray.
Be sure to allow the long screws of the pick-up impression copings to extend beyond the top of the blockout. Additionally, the blockout should only extend 2-3 mm for ideal impression material thickness. If it extends too much, it can result in unsupported impression material and distortion.
5. Fabricate a custom impression tray. Custom impression trays provide improved accuracy, compared to stock impression trays.6 Fabricate a custom impression tray with a technique similar to what you would use for a complete denture. I prefer using a material that is a visible light-cured (VLC) polymethylmethacrylate (PMMA). Be sure that the screws of the impression copings extend beyond the custom tray (figure F).
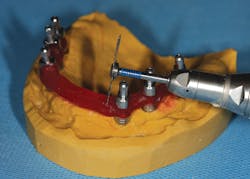
Figure B: Section the resin between the copings if they are in close proximity to one another.
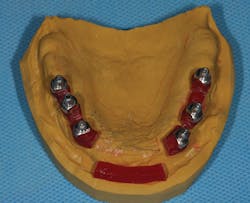
Figure C: In the area where there is considerable space between the copings, section the area close to each coping, separating the anterior portion from each coping.
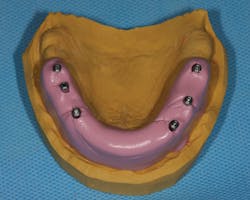
Figure D: View of the polysiloxane blockout
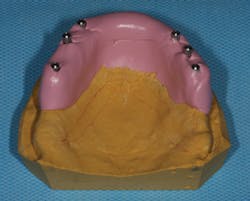
Figure E: Palatal view of the polysiloxane blockout
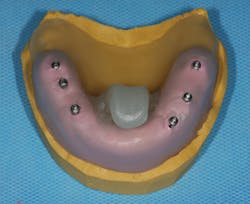
Figure F: Fabrication of a custom impression tray
I allow this material to achieve an initial set before placing it into the Triad machine. This is accomplished by leaving the cast with the VLC PMMA material in natural light or under a laboratory light for a few hours. Once an initial set is achieved, place the cast into the Triad machine to completely set the material. Once the material is fully set, smooth the margins of the impression tray for comfortable placement and removal.
6. Remove the healing abutments and seat the impression copings. If the resin is in contact when the impression copings are seated or during placement of the impression copings, use an acrylic bur to create space between the resin. The space should not exceed .3 mm.
7. Take radiographs to ensure complete seating of the impression copings.
8. Lute the impression copings together with the same resin used to fabricate the rigid resin connection. I prefer using Pattern Resin (GC America) with the "salt and pepper" or "bead and brush" technique.
9. While the material sets, per the manufacturer's recommendation, try in the impression tray. During try-in, check that: (a) the tray seats passively, (b) the tray does not cause the patient any discomfort, and (c) the screws of the impression copings extend beyond the tray. If needed, relieve any interferences from the intaglio of the impression tray and adjust any areas of the tray that are overextended or rough. If the tray was overadjusted in this area, add wax over the holes placed in the trays. The screw of the impression coping will extend through the wax without the added mess of extruded impression material through the tray.
10. Make a final impression using the technique that works best in your hands (figure G). I prefer syringing a light-bodied impression material over the impression copings and along the gingival margins of the copings and placing a custom impression tray with a heavy-bodied impression material. I ensure that the copings extend beyond the borders of the tray and apply positive pressure on the palate.
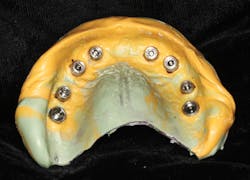
Figure G: Final impression made with this technique
When this technique is used, material distortions are minimized, patient comfort is maximized, and chair time is optimized. The clinician can expect that frameworks will fit predictably, which will reduce remakes and wasted chair time.
Helpful hints
• Allowing the material to attain an initial set minimizes shrinkage, so the material will adapt to the palate. This is helpful for seating the impression tray against the palate.
• I index the handle to my dominant hand's thumb and forefingers, which allows me to get a strong grip on the handle during removal of the impression after the impression material has set.
References
1. Bewer G, Hazboun A, Masri R, Romberg E, Kempler J, Driscoll C. Effect of implant angulation and impression technique on impressions of NobelActive Implants. J Prosthet Dent. 2015;113(5):425-431.
2. Lee H, So JS, Hochstedler JL, Ercoli C. The accuracy of implant impressions: A systematic review. J Prosthet Dent. 2008;100(4):285-291.
3. Kim J, Kim KR, Kim S. Critical appraisal of implant impression accuracies: A systematic review. J Prosthet Dent. 2015;114(2):185-192.
4. Papaspyridakos P, Lal K, White GS, Weber HP, Gallucci GO. Effect of splinted and nonsplinted impression techniques on the accuracy of fit of fixed implant prostheses in edentulous patients: a comparative study. Int J Oral Maxillofac Implants. 2011;26:1267-1272.
5. GC Pattern Resin LS. GC America. http://www.gcamerica.com/lab/products/PATTERN_RESIN_LS/pattern_resin_tech_guide.pdf. Accessed February 2016.
6. Burns J, Palmer R, Howe L, Wilson R. Accuracy of open tray implant impressions: An in vitro comparison of stock versus custom trays. J Prosthet Dent. 2003;89(3):250-255.
Pamela Maragliano-Muniz, DMD, is an editorial director for Pearls for Your Practice: The Product Navigator, an e-newsletter from DentistryIQ and Dental Economics. She was a dental hygienist before earning her DMD from Tufts University School of Dental Medicine and her certificate in advanced prosthodontics from the UCLA School of Dentistry. She teaches, and she maintains a private practice in Salem, Massachusetts. In 2010 her practice was named the Adult Preventive Care Practice of the Year by the American Dental Association.