Give life to your restorations: Effective anterior composite contouring and finishing techniques
With contemporary direct composite systems, now the clinician can truly be an artist by conservatively and esthetically creating restorations that are so lifelike that they virtually emulate the beauty of natural tooth structure. However, rehabilitating or enhancing a smile with direct composite resins can be a challenge. The task not only requires an understanding of the intricacies of shade selection, but also a mastery of replicating the uniqueness of natural tooth morphology and luster of the restoration.1
The understanding of tooth morphology and luster becomes paramount when restoring a single maxillary central incisor, where not only the shade but the shape, surface texture, and luster distinguish between an average restoration and a restoration that simply disappears among the natural teeth. The key elements and methods for the creation of lifelike restorations, which are critical for excellence in anterior composite resin restorations, will be discussed below and subject to selective adaptation to the variation of natural human tooth morphology.2-5
• Primary tooth anatomy (square, ovoid, triangular)
• Transitional line angles
• Point angles
• Facial embrasures
• Incisal embrasures
• The three facial planes
• Facial depressions and lobes (secondary anatomy)
• Tertiary anatomy
• Polishing techniques and armamentarium
Primary tooth anatomy
Primary tooth anatomy simply defines the geometric shape or outline of the tooth and usually falls into three categories: square, triangular, and ovoid.
Transitional line angles
There are three transitional line angles in maxillary anterior teeth that represent the area of transition between the two proximal surfaces and incisal surface with the facial surface. Altering the distance between the two proximal line angles gives the illusion of making the tooth appear wider or narrower. The proximal transitional line angles also influence the size of the facial embrasures.
Point angles
Point angles are the junctions of the two proximal transitional line angles with the incisal facial line angle. The point angles determine the size of the incisal embrasures, wherein esthetically oriented maxillary anterior teeth grow larger away from the midline.
Facial embrasures
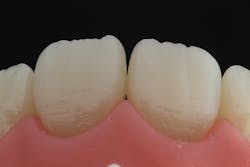
The volume of the facial embrasure is determined by the location of the proximal transitional line angles. The closer the transitional line angles are to each other in a tooth, the greater the embrasure space. The opposite is true if the transitional line angles are farther apart. This embrasure space can be most accurately and clinically evaluated by the incisal view using a mouth mirror.
Incisal embrasures
The volume of the incisal embrasure space is determined by the location of the point angles between two adjacent teeth. The larger the distance the point angles are between two adjacent teeth, the greater the incisal embrasure. The opposite is true if the point angles are closer together.
Three facial planes
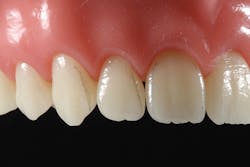
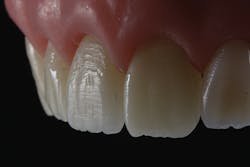
This morphologic characteristic depicts the three facial planes of maxillary anterior teeth and can be evaluated best by viewing from the sides of the tooth rather than straight on. A common error with anterior composite resins is overcontouring the incisal third, which results in an appearance that is too flat and sometimes may also impinge onto the lower lip.
Secondary tooth anatomy
Secondary tooth anatomy is the result of normal tooth development and refers to the facial depressions and undulations commonly found in maxillary anterior teeth that give rise to the facial contours and accentuate the proximal/middle lobes.
Tertiary anatomy
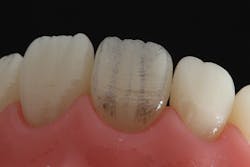
This commonly refers to perikymata and various forms of surface stippling usually present in younger teeth. This is commonly lost in older teeth or those that are in function longer due to frictional forces that erode this morphology over time.
Anterior composite finishing workflow
Suggested armamentarium for creating tooth anatomy and finishing composite resins that virtually mimic natural teeth are:
• Burs
• Disks
• Rubber points and cups
• Brushes and aluminum oxide paste
• Cotton wheel and aluminum oxide paste
Finishing and polishing a composite restoration well is probably the number one secret for a seamless integration where there currently exist myriad techniques and materials used to create a natural-appearing texture and polish. The technique described here is a very simple procedure the clinician can use to achieve a very lifelike tooth appearance, with only subtle modifications necessary from patient to patient due to the variability of natural human tooth anatomy and luster of the native enamel.6
READ MORE | The Bulk of the Matter in Composite Restorations
Armed with a sound knowledge of human tooth morphology, here is an effective, systematic approach to use. Once the last layer of resin has been cured, use a coarse-grit disc followed by a medium-grit disc (such as Sof-Lex from 3M or FlexiDisc from Cosmedent) to develop the primary anatomy of the tooth and properly contour the following:
• Incisal edge position
• Three facial planes
• Location of the proximal line angles
• Location of the point angles
• Determine how open or closed the facial and incisal embrasures are
• Use a sharp pencil to visualize and if needed to modify or move the location of the proximal line angles with the finishing discs
Author's note: It is very important to keep in mind that the proximal line angles, point angles, facial embrasures, and incisal embrasures all influence and are dependent on one another.
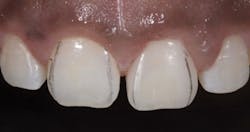
Once the primary anatomy has been obtained with the use of rotating discs, the secondary anatomy can be developed. A very effective method of placing secondary anatomy in a tooth is to visualize it first by drawing the locations onto the tooth with a pencil.
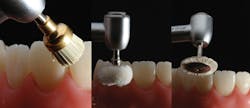
Once the areas have been identified, use a single flame-shaped fine diamond bur (I use the Brasseler F888) to create the depressions and at the same time accentuate the proximal/middle developmental lobes. Cervical constrictions in the distal of the central incisors, mesiodistal of the lateral incisors, and distal of the canines can also be placed with this bur. A series (gray, green, pink) of rubber points and cups (Astropol from Ivoclar Vivadent) with water can be used to smooth any surface irregularities and/or scratches to create a subtle, naturally flowing appearance of the secondary anatomy.
A quick and effective way to verify the anatomy and ensure that all scratches are removed is with the use of edible silver glitter (available at most cake-decorating establishments). Apply the glitter with a makeup brush. Silver glitter will quickly show areas that need additional smoothing or blending of the surface texture for a restoration that appears natural.
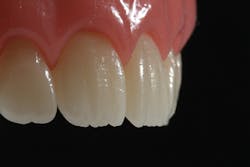
Tertiary anatomy generally presents in the form of perikymata or surface stippling that may or may not be present depending on the genetic variation of the patient or the age of the tooth. These characteristics are erased by the friction of mastication forces over time. Perikymata can be very simply placed by running a coarse diamond bur at stall-out speed in a mesiodistal direction on the facial surface. Surface stippling, on the other hand, can be placed with a fine football high-speed diamond bur using a pecking motion on the facial surface where this effect is desired.
The final polish will depend on the desired degree of luster or that which matches the native dentition if restoring only a single tooth. It is paramount to adhere to this sequence and not use discs at this stage for any reason. The natural anatomy created thus far can be easily erased with the overuse of discs.
A lower surface luster can be achieved by using any silicone-impregnated brush with aluminum oxide paste (Enamelize from Cosmedent) over the entire surface of the composite resin. If a very high degree of luster is desired, a cotton wheel or goat hair wheel along with the polishing paste will give a shine that rivals the highest luster of natural enamel that exists.
Conclusion
The systematic approach described here can simplify the understanding of each morphologic component of maxillary anterior teeth. Armed with this knowledge, the clinician can use the procedure and tools discussed to create anterior composite restorations that mimic the beauty of natural tooth structure.
References
1. Gomes T. A didactic concept of dental morphology. J Cosmetic Dent. 2015(summer);31(2):48-60.
2. McGowan S. Anterior tooth form and formation: A systematic approach. Inside Dental Technology. 2016;7(9).
3. McGowan S. Characteristics of teeth: A review of size, shape, composition, and appearance of maxillary anterior teeth. Compend Contin Educ Dent. 2016; 37(3)164-171; quiz 172.
4. McLaren EA. The skeleton buildup technique: a systematic approach to the three-dimensional control of shade and shape. Pract Periodontics Aesthet Dent. 1998;10(5):587-597; quiz 598.
5. Kano P. Challenging Nature: Wax-up Technique in Aesthetics and Functional Occlusion. Hanover Park, IL: Quintessence Publishing; 2011:154-168.
6. Fahl N Jr. Achieving ultimate anterior esthetics with a new microhybrid composite. Compend Contin Educ Dent Suppl. 2000;(26):4-13; quiz 26.
David K. Chan, DMD, AAACD, a 1989 Oregon Health Sciences University graduate, maintains a full-time practice focused on cosmetic and comprehensive dentistry in Ridgefield, Washington. He is an accredited member of the American Academy of Cosmetic Dentistry, president of an AACD-affiliated study club, mentor to dentists at Seattle's Kois Center, and director of the Center for Dental Artistry teaching center in Washington State.


