Pulp cap or endo?
Q:
I am a dentist out of school only three years. Many of the adolescent patients I treat have deep carious lesions. Making clinical decisions about whether to do pulp caps or endodontic treatment is often frustrating. I was taught in dental school that pulp caps are unpredictable and should not be done routinely, but my mature associate does pulp caps frequently with success. I know that the literature is confusing with reported success rates of pulp caps varying from as low as 10% to as high as 90%. What is your opinion, and would you have a pulp cap in your own mouth?
MORE FROM DR. CHRISTENSEN |Restorative treatment for the aging patient
A:
You asked some very important questions, and you deserve some candid answers and direction. I can't base my answers on the scientific literature, since even the meta-analysis conclusions are confounded and inconclusive. Therefore, you are going to read my candid clinical opinions based on thousands of restorations that I have placed in primarily operative dentistry situations. These clinical experiences have allowed me to make decisions on pulp capping based on my personal clinical observations, which is an important part of evidence-based dentistry.
In answer to your question, yes, I would have a pulp cap in my own mouth.
This brief discussion is divided into several sections, which include a definition of direct and indirect pulp caps, steps in the indirect pulp cap procedure prior to placement of resin-based composite, desirable and undesirable direct pulp exposure conditions, steps in the direct pulp cap procedure prior to placement of resin-based composite, and success expectations for indirect and direct pulp caps.
MORE FROM DR. CHRISTENSEN | Cementing zirconia restorations
What are indirect and direct pulp caps?
You have had many situations in your young career similar to the one I will now describe. Let's say you are treating a deep carious lesion, and it is impossible to see on the radiograph if the pulp is exposed. Undoubtedly, you know that making a radiographic image from various angles-including a few degrees mesial, a few degrees distal, and straight on-will show the lesion depth relatively well. Also, it is well known that any current digital radiograph will not show the exact depth of the caries. Unfortunately, the current generation of digital radiographs shows only part of any carious lesion.
When you cut the tooth preparation, do the following:
1. Cut the prep to the ideal external outline form for the size of the lesion. Do not touch the deepest portion at this time.
2. Undercut the enamel peripheral walls, removing all of the discolored dentin and caries. If cracks are present in the enamel, cut those portions away.
3. At this point in the procedure you have an ideal outline form for the size of the carious lesion, although cutting the prep has probably removed much of the tooth structure. The deep carious lesion is still untouched.
4. Slowly remove the caries a small amount at a time using a sharp spoon excavator or a very slow-speed rotary bur, preferably in a low-speed electric handpiece.
5. As you excavate deeper, you will find one of the following characteristics:
a. The color of the underlying dentin, deeper than that of the dentin being removed, progressively changes from brown or yellow-white to slightly pink. The dentin is quite hard to excavate, so you stop. Your excavation is close to the pulp but the pulp is not exposed. When trying to determine when to stop excavating and how soft or hard the dentin is you elect to leave, I suggest the following guide. You could still excavate more tooth structure if you used considerable force, but the dentin is relatively hard-not moist and easily penetrable-and it significantly resists your excavator or bur. You are now ready to place an indirect pulp cap.
b. Or . . . The color of the dentin being removed progressively loses its brown or yellow-white characteristic and starts to have a pink coloration. Your excavation is close to the pulp, but the dentin is still quite soft. You keep excavating, and blood comes from a pulp exposure. You have a direct pulp exposure.
c. Or . . . The dentin continues to stay the same color as previously without a change to pink, and a serous or purulent exudate comes from the pulp. The pulp is dead.
d. Or . . . the dentin continues to stay the same color as previously without a change to pink. You will probably expose a bloodless, often dry pulp chamber. The pulp has been necrotic for some time.
6. Conditions "c" and "d" above will obviously require root canal treatment or extraction.
7. Condition "b" is a direct pulp exposure requiring one of the following treatments: a direct pulp cap and restoration to be described later, endodontic treatment, or extraction.
8. Condition "a" can have an indirect pulp cap described in the next section.
Indirect pulp cap procedure prior to placement of resin-based composite
There are numerous techniques recommended by clinicians and researchers for an indirect pulp cap. Some would call this technique a "liner" or "base." My clinically proven procedure is below:
1. Make sure there is no obviously soft, carious material in the prep.
2. Treat the entire prep with two one-minute applications of a 5% glutaraldehyde and 35% HEMA solution. Be careful to avoid excess solution getting on the soft tissue. Some glutaraldehyde brands are G5, Gluma, GluSense, or MicroPrime (the least expensive).
3. Aspirate the liquid with high-velocity suction. Do not wash it off! Clinicians Report Foundation has shown that this type of solution desensitizes and strongly disinfects the prep, as well as enhances the subsequent bond.
4. Only on the deepest portions of the prep, place a layer of about .5 mm to .75 mm of the bioactive pulpal stimulatory material you prefer. Some popular brands are Vitrebond Plus from 3M or TheraCal LC from Bisco.
5. Acid-etch the enamel only. Wash, dry, and place a slight layer of glutaraldehyde solution with a micro brush to replace the previously placed glutaraldehyde liquid you may have washed off when rinsing the acid etch. Suction off the excess.
6. Place the bonding agent of your choice.
7. Place the composite of your choice, finish, and polish.
This indirect pulp cap technique has proven effective and seldom has any subsequent signs or symptoms if all of the steps were accomplished correctly.
Direct pulp exposure conditions
Some important characteristics of direct pulp exposures are:
• Age of the patient and size of the pulp canals. The older the patient, the smaller the pulp canals, bleeding is slower on pulp exposure, and there is usually more chance for the pulp cap to fail. The younger the patient, the larger the pulp, and chances are better for success.
• Size of exposure. Judging from my experience, I question pulp capping any exposure that is more than .5 mm to .75 mm in diameter.
• Nature of the blood flow. The blood should be normal blood color, not magenta. It should slowly come from the perforation. It should stop soon after the first small amount comes from the exposure and not keep flowing. Excessive, continuing flow of blood indicates a hyperemic pulp.
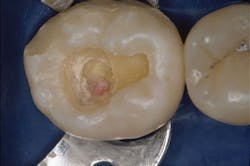
Direct pulp cap procedure prior to placement of resin-based composite (Figures 1-3)
1. Make sure there is no obviously soft tooth structure in the prep.
2. Treat the entire prep and the minor exposure with two one-minute applications of a 5% glutaraldehyde and 35% HEMA solution, being careful to avoid excess solution getting on the soft tissue. Some examples are G5, Gluma, GluSense, or MicroPrime.
3. Aspirate the liquid with high-velocity suction. Do not wash it off!
4. Place a layer of about .5 mm to .75 mm of the bioactive pulpal stimulatory material you prefer only on the deepest portions of the prep. Some popular brands are Vitrebond Plus from 3M and TheraCal from Bisco.
5. Acid-etch the enamel only. Wash, dry, and place a slight layer of glutaraldehyde solution with a micro brush to replace the previously placed glutaraldehyde liquid you may have washed off when rinsing the acid etch. Suction off the excess.
6. Place the bonding agent of your choice.
7. Place the composite of your choice, finish, and polish.
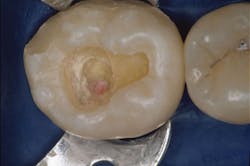
Figure 1: Both indirect and direct pulp capping, as described in this article, have similar techniques. Isolation of the operating field with an appropriate technique is mandatory for success. This image shows a direct pulp exposure.
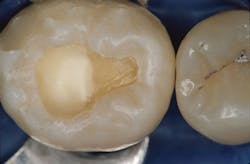
Figure 2: The bioactive material of your choice is placed on both direct and indirect pulp caps. In this case, the material used was Vitrebond Plus from 3M, but numerous other materials could have been used. Indirect pulp caps are more successful than direct pulp caps.
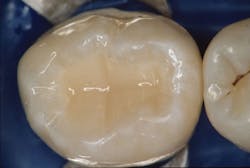
Figure 3: The final restoration, in this case resin-based composite, should be placed over the direct or indirect pulp cap in the normal manner as described in this article.
Success expectations for indirect and direct pulp caps
If the indirect pulp capping procedure has been accomplished properly, there is an amazingly high success rate. In fact, over many years of experience, I have seldom had failures. However, this procedure is primarily for operative dentistry procedures and not for crown preps. Why? Placing a crown over a tooth with unknown pulp vitality can necessitate endo through the crown, potentially destroying the crown.
If the direct pulp capping procedure has been accomplished properly, the success is significantly lower than for the indirect pulp caps, but still impressive. I recommend direct pulp capping primarily for operative dentistry procedures and not for crowns.
Summary
Indirect pulp capping is a very successful procedure. Try to avoid exposing the pulp. Leaving a layer of hard dentin over the pulp is desirable. Direct pulp caps are less successful. The scientific literature is highly confounded on this subject due to the different techniques and the different criteria used for success of the two procedures. Record the technique and materials you use for each procedure as you accomplish them, and then subsequently draw your own conclusions from your own clinical experiences.
Gordon J. Christensen, DDS, MSD, PhD, is a practicing prosthodontist in Provo, Utah. He is the founder and CEO of Practical Clinical Courses, an international continuing-education organization initiated in 1981 for dental professionals. Dr. Christensen is cofounder (with his wife, Dr. Rella Christensen) and CEO of Clinicians Report (formerly Clinical Research Associates).
About the Author

Gordon J. Christensen, DDS, PhD, MSD
Gordon J. Christensen, DDS, PhD, MSD, is founder and CEO of Practical Clinical Courses and cofounder of Clinicians Report. His wife, Rella Christensen, PhD, is the cofounder. PCC is an international dental continuing education organization founded in 1981. Dr. Christensen is a practicing prosthodontist in Provo, Utah.