Common preparation mistakes that cost you money

Michael DiTolla, DDS, FAGD
The issue:
The longer a preparation gets, the easier it is to undercut the prep, particularly the gingival third. This seems to happen most when bicuspids are prepped for full-coverage crowns, especially when there has been some gingival recession or there is an abfraction lesion present. I used to make this mistake a lot when prepping these teeth, but I have found a few ways to overcome undercuts on preparations that I want to share with you.
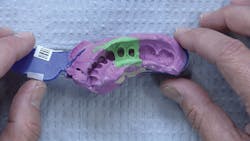
Figure 1: Viewing the impression before sending it to your dental laboratory is an unreliable way to determine whether or not the preparations have undercuts. Because dentists don't have the benefit of seeing the model, this determination needs to be made in the mouth.

Figure 2: Something we should check on any impression made in a double-arch tray before sending it out the door is whether or not we accurately registered the patient's bite. In this photo, I am holding the impression over the light in my iPhone to demonstrate the solid occlusal contact between the cuspid, lateral, and second molar with the opposing teeth. It turns out the first molar is ankylosed and not in occlusion, as indicated on the impression.

Figure 3: Looking at the preps from the buccal, it appears as though we have enough reduction for solid zirconia crowns, as requested by the doctor. Unfortunately, looking straight from the buccal is not a very helpful angle for determining whether or not there are undercuts on the preps.
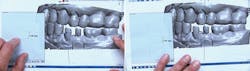
Figure 4: Since we scan the stone models as soon as they are poured to get them into the digital environment, we are able to measure the amount of occlusal reduction provided with precision. The doctor provided us with a minimum of 1.50 mm of reduction on the first bicuspid and a minimum of 1.57 mm of reduction on the second bicuspid. That's enough reduction for IPS e.max, let alone solid zirconia.

Figure 5: The design software also clearly shows where the undercuts are on the preparation, but at this point it's difficult to fix. When we are short on occlusal reduction, it's easy for us to make a reduction coping for the doctor to use prior to cementing the crown, but axial reduction copings are notoriously difficult to fabricate and use intraorally.

Figure 6: Here is the model for those preparations. Do they look undercut to you? They definitely both have an area of undercut, and it's pretty easy to see when viewing the model from this angle, but the problem is that it's impossible to get this view in the mouth. Moisture on the teeth makes it even more difficult to see the undercuts.
The solutions:
Unless you have the benefit of a digital scanner so that you can see the undercuts on the virtual model produced by the software, you are going to have to get it done intraorally. The best time to start thinking about undercuts is before you prepare the tooth. Has the tooth had a few millimeters of gingival recession? Is there an abfraction lesion present? If so, an easy step is to restore this lesion prior to preparation so that you are now preparing a more ideal tooth. This can be accomplished quite quickly with the use of a self-adhering flowable composite, such as Vertise Flow from Kerr.
Another solution is to do your normal occlusal reduction on the tooth to provide enough room for the material you are prescribing. If the prep is still 7 mm long, making it tough to see the undercuts, place a long reduction bevel over the buccal cusp toward the gingival to effectively shorten the height of the buccal wall from 7 mm to, say, 4 mm.
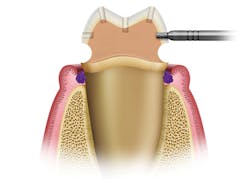
Figure 7: In addition to the occlusal and gingival depth cuts that I place during preparation, it's the axial depth cut in the middle third that prevents undercuts. In this case, the axial depth cut is slightly deeper than the gingival depth cut, which ensures I will end up with a tapered prep.

Figure 8: When attempting to view whether your finished preparations are undercut, the best way to see it is to look down the buccal corridor at dry tooth preparations. Oftentimes, placing a perio probe against the facial surface can help your eyes see an undercut, but notice how this picture is inconclusive. That's because the tip of the probe is off the tooth.
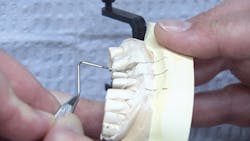
Figure 9: When I readjust the tip of the perio probe to ensure that it is in contact with the preparation at the deepest part of the margin, the undercut and its severity are readily apparent. Make sure to place the tip of the probe in the margin first and then pivot the probe toward the prep and stop at initial contact.
Hopefully you are able to identify the undercuts on your preparations while the patient is still in the chair and anesthetized. Then, you can go back in to provide more axial reduction, place a long, buccal reduction bevel, or add composite to the gingival third prior to getting that dreaded phone call from your lab!
Michael DiTolla, DDS, FAGD, is the director of clinical research and education at Glidewell Laboratories in Newport Beach, California. He lectures nationwide on both restorative and cosmetic dentistry. Dr. DiTolla has several free clinical programs available on DVD through Glidewell Laboratories or online at glidewelldental.com.