Enhancing a smile with cosmetic dentistry in the new economy
by Ara Nazarian, DDS, DICOI
As demands for the perfect look increase due to pressure from the media and the competitive nature of our society, the potential for growth in cosmetic dentistry becomes greater. However, this rapid response to social media can lead to unreal expectations from the patient when quickly responding to marketing. Because of this, it is imperative to utilize the proper skills and techniques in patient communication as well as dental treatment. For example, communication between the dental provider and the dental laboratory are very important in obtaining an esthetic and functional outcome. Two such parts of this communication are dental imaging and the diagnostic wax-up.
In my practice, I have delegated the image-capturing portion of treatment to my treatment coordinator. When a new patient comes to my practice, the first thing my treatment coordinator will do is capture a full-face view of the patient for their record. While the patient is completing the rest of their health history, my treatment coordinator will quickly simulate an enhanced smile – whether it is whitening, veneers, or crowns – using SNAP imaging software. In the past, many systems remained unused in the dental office because they took too much time, were hard to use, or produced unprofessional results. However, the SNAP software is much faster and easier to use than the older programs. In addition, despite the staff member producing the images with little effort, they come out looking professional.
When you use SNAP, patients are able to see for themselves the benefits of a cosmetic procedure. It's simple to implement, and you're able to offer it to every patient who walks through the door of your practice. Once they have their picture, they can take it home and consider the procedure. Your practice's information is included on the photo, so they always have a way to contact you if they decide to accept the procedure.
Another important role of the diagnostic wax-up is in the fabrication of provisional restorations. An impression of the wax-up is taken with putty (Siltec, Ivoclar Vivadent) by the dental lab. A bis-acrylic provisional material is then placed in the putty and on the prepared teeth by the dentist or assistant. In the mouth, the provisionals can be contoured and customized to the patient's facial features. Occlusion and phonetics can also be evaluated, and when these along with esthetics are deemed satisfactory, an alginate impression can be made to communicate the proper size, shape, length, and form.
Case Presentation
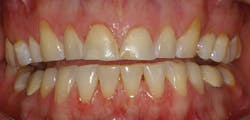
A woman in her early 40s came to the practice dissatisfied with the appearance of her smile. She commented that she felt that her existing teeth and restorations were unattractive because of size, shape, wear, and color (Fig. 1). She also mentioned that she could feel some chips in her restorations, as well as broken portions of tooth structure, which caused occasional discomfort and a misaligned bite.

In order to illustrate the benefits of her proposed smile, we simply took a picture of the patient smiling and instantly transferred it to the automatic editing software (SNAP) for instant simulation. We then selected the desired simulation of veneers and traced the smile with the marking tool. From the library of teeth, an enhanced smile was selected that would complement the patient. A convincing side-by-side comparison photo, complete with the name of my practice and telephone number was handed to the patient.
Without hesitation, the patient asked if we could in fact deliver this type of smile. In response, I replied, "Absolutely," but that we would like to render a 3D White Wax-Up model (from Arrowhead Dental Lab) to confirm the treatment necessary to enhance her smile, due to the wear in her dentition. The diagnostic White Wax-Up would correspond with the cosmetic simulation and show what the final case would look like esthetically and functionally.
Planning
To develop a treatment plan and determine if the vertical dimension could be increased, impressions were taken for a diagnostic White Wax-Up. Based on information gathered from the initial consult, it was determined that all the remaining teeth should be cleaned of any caries or defective restorations, cored if necessary, and crowned. All risks, benefits, and alternatives to various treatments were clearly reviewed with the patient.
As a result of the information gathered from the cosmetic simulation, the diagnostic wax-up, and the patient's desires for treatment, it was determined that restoring the entire upper and lower dentition would enhance esthetics and function. The final treatment plan would consist of 3M ESPE Lava crowns on teeth Nos. 2-15 and teeth Nos. 18-31, with core restorations where needed.
Zirconium foundation crowns and restorations such as Lava are becoming popular as an alternative to metal substructures. The preparation design for this type of restoration is similar to conventional porcelain-fused-to-metal alternatives; however, I have found that the elimination of metal from the substructure makes these restorations even more esthetic. Some of the advantages of zirconium-based restorations such as Lava include the elimination of dark lines at the margin and natural translucency or fluorescence. Most of all, this material exhibits superior strength (1440 MPa), excellent marginal fit, and it can be cemented with conventional cement if the dental provider desires.
Preparation
Patients exhibiting a "gummy" smile or an uneven smile line, as in this particular case, may want to consider a crown lengthening or gingivectomy procedure to create symmetry in their smile. In cases not requiring the removal of bone, a diode laser can be used to contour the gums. A diode laser is beneficial, as it will cauterize the tissue as the incision is made, which is less invasive and causes minimal bleeding.
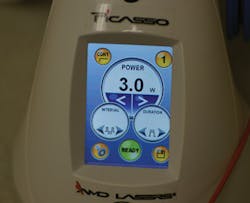
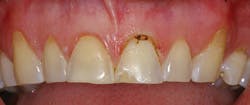
There should always be a minimum of 3mm biologic width when measuring from the crest of the bone to the free gingival margin and crown margin. Once the patient was fully anesthetized, the gingival tissue was trimmed apically to create a symmetrical gingival zenith, utilizing the AMD Picasso diode laser from DENTSPLY (Fig. 2). With an energy setting at about 3.0 watts, the initiated tip (I used a black Sharpie marker) was angled at about 45 degrees before starting any incision. Once the tip was activated, it was moved from side to side and positioned progressively as it removed excess tissue (Fig. 3).
Using a coarse grit chamfer diamond bur 856 from Axis, the maxillary teeth were prepared for 3M ESPE Lava crowns. Utilizing Expasyl from Kerr, we not only controlled hemorrhaging, but also achieved gingival retraction. After approximately two minutes in the sulcus, the Expasyl was rinsed off with copious amounts of water. Utilizing a full-arch tray from Pentron and fast-set impression material (we used Take 1 Advanced from Kerr), an impression was taken for the final restorations. The same materials and steps were used for the mandibular arch.
Provisionalization
A provisional restoration, which would aid in determining the best size, shape, color, and position, was made from a Sil-Tech impression of the diagnostic wax-up. Using Structur 3 temporary material (from VOCO America), the Sil-Tech mold was quickly filled and placed on the patient's prepared dentition (Fig. 4). Within minutes, the temporary was fabricated and effortlessly trimmed with trimming burs and discs.

Sil-Tech mold
I have found that Structur 3 lasts throughout the duration of the provisional, which can be anywhere from three to six weeks. According to the manufacturer, the compressive strength is reported to be over 500 MPa.
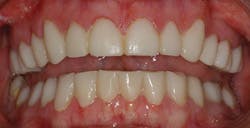
The next day, the patient returned for evaluation of esthetics, phonetics, and bite. Already, the patient exhibited excitement and confidence with her provisional restorations (Fig. 5). However, she selected a whiter shade for her final restorations. Information was recorded and the patient was informed to rinse with Oris chlorhexidine gluconate rinse to keep her gingival tissues healthy.
Cementation
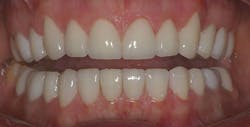
Before try-in of the definitive Lava crowns to verify fit and shade, the provisional restorations were removed sequentially, starting from the maxillary anterior region. Any remaining cement was cleaned off the prepared teeth, and bleeding from the gingival tissues was controlled with Expasyl paste. After the patient was shown the retracted view for acceptance, the cementation process was initiated. The prepared dentition was cleaned with chlorhexidine 2% (Consepsis) for 15 seconds and rinsed to remove any contamination during the temporary phase. The preparations were then desensitized with Gluma Desensitizer and the final Lava crown restorations were tried in to verify marginal fit, contour, contacts, shade, and accuracy. The patient was very satisfied with the look of her new restorations and approved them for final cementation. The crown restorations were seated utilizing self-etching, self-adhesive resin cement (G-CEM Automix) (Fig. 6). Excess cement was easily removed from the margins and accomplished within a short amount of time before final curing with the DEMI curing light for 20 seconds. No finishing of the cement was necessary along the margins. Any adjustments to the occlusion were achieved using the Zirconia Polishing Set by Axis. The overall health and structure of the soft tissue and restorations was very good (Fig. 7). The patient was very pleased with the restorations and her new enhanced smile (Fig. 8).
Conclusion
It can be a challenge to effectively explain the benefits of a full-mouth reconstruction. Having additional technology and materials within your practice to accurately display the benefits will help your practice immensely. In addition, having a systemized approach to delivering efficient, effective, and predictable full-mouth dentistry can also be very helpful technically.

of patient's face
Ara Nazarian, DDS, DICOI, is in private practice in Troy, Michigan, with an emphasis on comprehensive and restorative care. He has conducted lectures and hands-on workshops on esthetic materials and dental implants throughout the United States, Europe, New Zealand, and Australia. Dr. Nazarian can be reached at [email protected].
Past DE Issues