In this monthly feature, Dr. Gordon Christensen addresses the most frequently asked questions from Dental Economics® readers. If you would like to submit a question to Dr. Christensen, please send an e–mail to [email protected].
For more on this topic, go to www.dentaleconomics.com and search using the following key words: implants, ridge preservation, bone–grafting, prosthesis, fees, gingiva, tooth socket, lingual bone, extraction, Dr. Gordon Christensen.
Q I have seen a recent revival of the technique called “ridge preservation,” used to stimulate bone growth in a tooth socket months before placing an implant and to preserve the bony ridge after tooth removal, thus allowing an esthetic pontic to be placed in areas of esthetic concern. Is this technique reliable and predictable? Should different materials be used to accomplish the two purposes, and how difficult is the procedure?A You are asking about one of my favorite clinical techniques. As a prosthodontist, I am frequently faced with frustrating clinical situations in which a previous dentist has removed a tooth, often breaking off the thin facial plate of bone, allowing the site to heal and creating an unsightly gingival and bony defect. Placement of a pontic in these situations almost always creates an unacceptable clinical result, with a long, obviously false pontic extending deeply into the gingival area. If implant placement is planned for such areas, there is usually insufficient bone quantity, and complex and expensive grafting is necessary. Ridge preservation is a proven and successful technique and should be used in many situations when a tooth is extracted, especially when the extraction site is in the esthetic zone.I have promoted and taught ridge preservation in continuing–education courses for over 20 years. When speaking with dentists who were in those courses, I found that only some of them have adopted the technique into their practices, and many have not done so. Why? In my opinion, some of the early ridge–preservation techniques were much more difficult and expensive than those I will describe. They called for a membrane over the grafted socket, which often required a separate procedure to subsequently remove the insoluble membrane. Also, one of the ridge–preservation techniques required significant facial and lingual flap procedures for socket preservation, which caused more discomfort, complicated the procedure, and prolonged the healing. The high cost of some of the complicated procedures has been an additional negative factor.
I contend that ridge preservation can be simple, fast, and relatively complication–free; that the procedure can preserve most of the remaining bone if facial and lingual bone has not been removed during the extraction, and if the patient is careful to avoid traumatizing the grafted site for several days after the procedure.
In the following narrative, I will discuss my views on two simple, effective, and predictable ridge–preservation techniques, one for preservation of a ridge before placement of a fixed prosthesis without the expectation of an implant, and the other for ridge preservation when an implant is planned.
Ridge preservation when an implant is not planned
Is the ridge preservation procedure different if an implant is not planned for a later time? The answer is both yes and no. A technique long used in the profession, but not well known to most dentists, will be described below. Although the following technique can be used when implants are planned, I prefer to use it when I am not planning an implant, because the bone must heal longer for implant placement when using this material. The following technique preserves almost all of the ridge height, and allows a pontic to be placed on a fixed prosthesis with an optimum esthetic result.
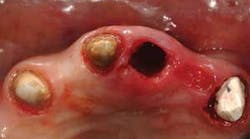
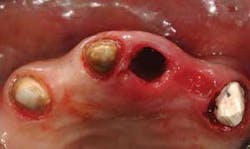
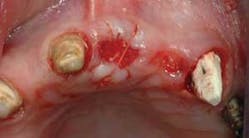
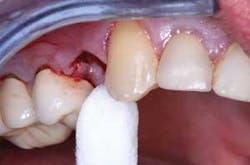
Frequently, after discussing various options for tooth replacement, you and a patient agree that a fixed prosthesis should be used to replace the missing tooth instead of an implant and a crown. This conventional technique is often the most desirable and economical decision when the teeth adjacent to the edentulous space are broken down or heavily restored, and in need of crowns. In these cases, most dentists and patients want to obtain soft–tissue healing rapidly and place the fixed prosthesis as soon as possible. Such a case is shown in Figure 1.
Although most grafting or bone stimulating materials can preserve the majority of the bone around the extracted tooth socket relatively well, there is still some unpredictable bone and soft–tissue shrinkage with most of them. When anticipating unpredictable bone and soft–tissue shrinkage, most dentists are uncomfortable to place a fixed prosthesis until many weeks or even months after the grafting. The technique to be described minimizes that risk, because the grafting material does not resorb. It remains in place, maintaining the ridge contour.
Many bone grafting materials could be used to preserve the majority of the bone height after a tooth extraction. However, some of them require a membrane to reduce or eliminate soft–tissue growth into the socket. Others are relatively difficult to use, and most of them are quite expensive. Using a predictable shrinkage technique for ridge preservation is desirable when you are not planning on placing an implant.
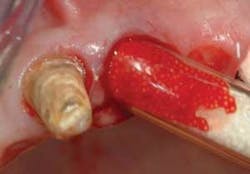
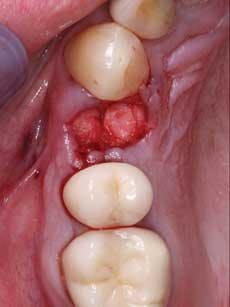
A simple, relatively inexpensive ridge–preservation technique not requiring a membrane, with long–term successful research and clinical observation, uses Bioplant® from Kerr. It has been used for over 25 years with success. This material is comprised of small, porous, radiopaque spheres (three sizes) made of polymethyl methacrylate, coated with polyhydroxyl ethyl methacrylate and calcium hydroxide. This material does not dissolve, resorb, or migrate. It remains in place, visible on a radiograph. Bone grows into the porous spheres. The clinical result is that nearly all of the original bone height is preserved, with only minimal bone and soft tissue shrinkage.
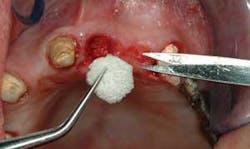
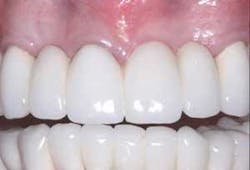
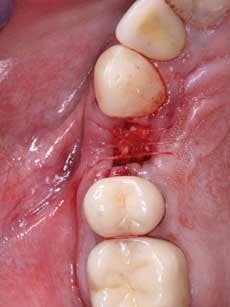
When using this technique, I suggest making the fixed prosthesis as soon as six or eight weeks after the tooth is extracted and the socket grafting accomplished. An example of the use of this material is shown in Figures 2 to 5. After the extraction and placement of the ridge preservation material into the socket, a piece of GELFOAM® from Pfizer is cut slightly larger in diameter than the soft–tissue defect to be placed over the small spheres, thus reducing the chance of their coming out before the bone grows into them. A suture or two can be placed, connecting the facial and lingual attached gingival tissues to reduce the size of the hole in the attached gingiva where the tooth was extracted, thus reducing the chance of the graft coming out before a clot has formed and the site has stabilized. Attached gingiva grows into the defect where the tooth was extracted in a few weeks.
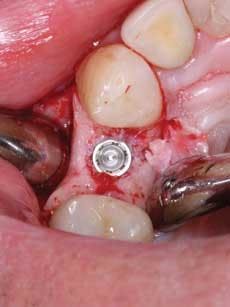
Remember, this technique is one of my choices if I am not planning an implant. If, for some future reason, an implant is placed in a Bioplant site at a later date — after the site has healed completely — the bone preparation is similar to any other grafted site material and the technique is successful. In such cases, I suggest waiting about one year before placing an implant in this material, but others may suggest less wait time.
Ridge preservation when an implant is planned
Many types of grafting or bone–stimulating materials may be used when anticipating placing an implant as soon as the graft is integrated into the bone. These materials can also fill spaces in the bone present during an immediate implant placement when the implant does not fill the entire tooth socket. My answer to you will include only one simple technique that does not require a flap or a membrane. Many more complicated procedures are available.
One of the most innovative bone–growth stimulating products is Foundation™ from J. Morita. This product has had positive research from the mid–1960s as a skin–regenerative material for severe burn wound victims. It has been used in dentistry in Japan for over 10 years as a bone growth–stimulating material. It appears similar to a dense cotton roll, but can be cut into pieces of the desired sizes. Use of the product is easy (see Figures 6 to 11 on pages 46 and 48).
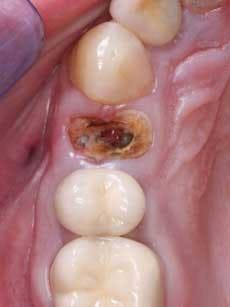
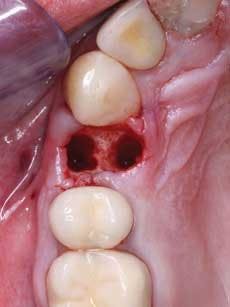
The tooth is extracted without breaking the facial bone. The Foundation is shaped to fit the socket hole or holes. It can be cut to facilitate placement into multiple root sockets as in the example photo (Figure 9 on page 48). There is no need for an expensive membrane. I suggest a suture or two to hold the material in place during the healing period. In a CLINICIANS REPORT (CRA) survey of 26 users (CRA Newsletter, September 2007), it was reported that 96% of the CRA evaluators had success, 56% reported predictable results, and 81% stated that it was easy to use. Implant placement can be accomplished as soon as 10 weeks after use of Foundation. In that survey, CR general dentist and specialist evaluators stated that the material was very successful when the socket had bone remaining on all sides, but less successful if one or more sides of the socket were not present.
The result of placing Foundation is that most, but not all, of the height of the bone around the socket is retained. The bone that grows into the socket, stimulated by the Foundation, is dense, and implant placement is predictable (see Figure 11 on page 48). As with the previous technique, a flap procedure is usually not indicated.
What are logical and fair patient fees for these grafting procedures? The ADA code for ridge preservation is D7953. The current average fee for a single–tooth extraction in the U.S. is about $120. The cost of the grafting material for a socket can be up to $100 or more, which is a direct overhead cost for you and the patient. You will probably use a suture. Additionally, you need some income for your time and expertise in placing the material. Add these costs, and you end up with the total fee you should charge for the extraction and the ridge preservation.
How can you present the need for ridge preservation to patients and expect them to accept the additional cost of the ridge–preservation procedure? A method I use routinely is to show patients a photo of a resorbed ridge and the resultant unacceptable esthetic result when ridge–preservation techniques are not used. Most patients are eager to accept the procedure when they see the result of not using the ridge–preservation materials.
When should ridge–preservation techniques be used? Some clinicians use these techniques on almost all extractions, while others never graft sockets. I suggest having the patient smile as high as possible while doing your treatment–planning.
While observing the smile, determine the teeth and gingival areas for which bone and gingiva shrinkage will produce a nonesthetic result if a specific tooth is extracted. With the patient holding a large hand mirror and observing the tooth area, show him or her the location of the tooth to be removed and estimate the potential defect that may result from extraction of the tooth without grafting. Seldom have I had a patient deny ridge augmentation.
In summary, my answer to your first question is: “Yes, ridge preservation is an easy and predictable procedure.” In answer to your second question, I have suggested different materials and techniques for ridge augmentation with and without implant placement. I hope the procedure appears to be relatively simple to you. In my opinion, ridge preservation is well within the capability of a competent general dentist. Other dentists will have their own personal preferences, and they may disagree with my suggestions and conclusions. Additionally, there are many and varied techniques for ridge preservation, and most of them are more complicated and time–consuming than the two I have suggested.
Removal of teeth without breaking facial or lingual bone, as suggested in this article, can be difficult! Our Practical Clinical Courses (PCC) video, “Oral Surgery in General Practice,” Video 4116, makes that goal easy. This video shows simple use of Luxators from JS Dental Manufacturing, Inc., and Proximators from Karl Schumacher to accomplish atraumatic tooth removal without difficulty, along with many other useful surgical tips and techniques.
Call (800) 223–6569 or go to www.pccdental.com for details on the many Practical Clinical Courses videos and courses, including implant surgery and practical oral surgery.
Dr. Christensen is a practicing prosthodontist in Provo, Utah, and dean of the Scottsdale Center for Dentistry. He is the founder and director of Practical Clinical Courses, an international continuing–education organization initiated in 1981 for dental professionals. Dr. Christensen is a cofounder (with his wife, Rella) and senior consultant of CLINICIANS REPORT (formerly Clinical Research Associates), which since 1976 has conducted research in all areas of dentistry.
